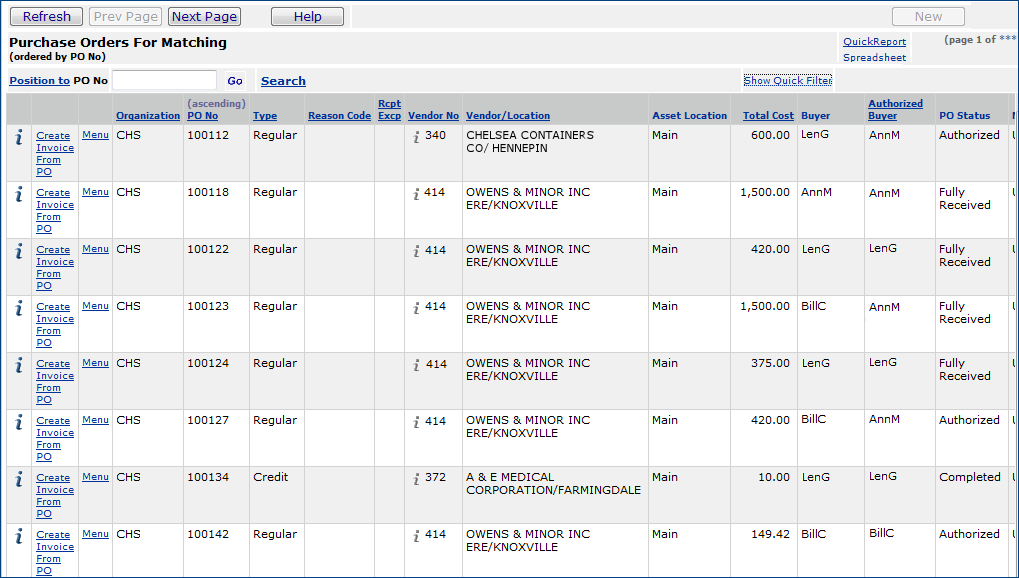
The invoice matching tools in both Materials Management and Accounts Payable let you compare purchase order/receipt lines with invoice lines to ensure that quantities and amounts are the same. When a vendor invoice for a purchase order arrives, accounts payable staff typically enter invoice information -- such as the invoice number, the date, and the amount -- into the system. The system then associates the invoice with its purchase order lines.
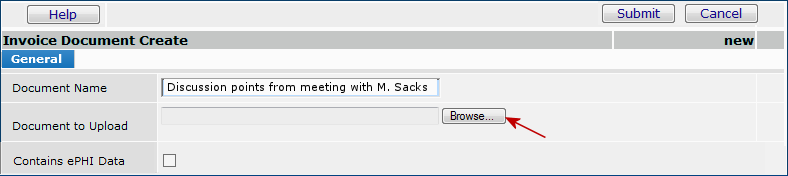
You can scan paper invoices into a network location from which they are automatically uploaded to Accounts Payable via Pulse (the client "gateway"). Once in the system, the scanned invoice file can be used to create an invoice. When you create the invoice, the scanned file can be attached as a document.
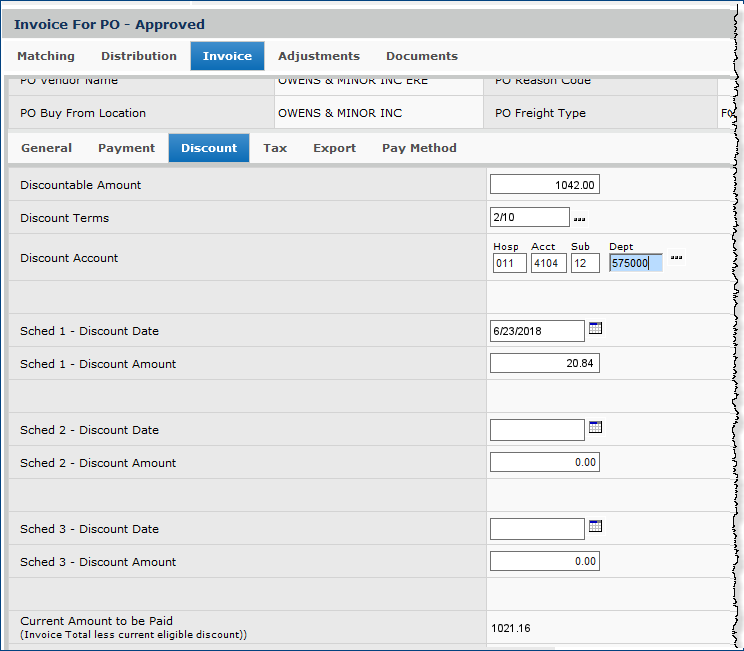
Charges such as freight or postage may be entered on an invoice as an invoice distribution line. Taxes may be calculated by selecting a tax type and a tax group, and entering a taxable amount. The tax amount is created as an invoice distribution line when the invoice is approved. (Tax types and tax groups are set up in your application tables. See Setting Up Tax Information for Accounts Payable.)
As purchase orders are received, the application looks for invoices containing unreceived PO lines and tries to match the lines with receipts. If a line is partly received, the system adds the received portion to the invoice and creates a new line for the unreceived remainder.
When the matching process is complete, the application creates invoice distribution lines for the matched and price variance amounts for future posting to GL accounts. For more detailed information about account transactions during invoice matching, see the summary of General Ledger transactions.
Many sites require approval of invoices. You can set up approvers in ERP and design the approval flow for your invoices as suits your operations. Details are in the topic Invoice Approval Processing. Also, in the Process Flows section of the online help The Approval Process for Invoices, Check Requests, Requisitions, and Vendors: Setup and Flow may be useful.
The method that you use to enter and match invoices depends on whether you have the authority to approve invoices for payment. If you are not an Invoice Approver, you must enter invoices as part of an invoice group. When the invoice group is complete, it must be approved by a user with invoice approval authority. If you have approval authority, you may enter and match invoices individually, or enter them as part of an invoice group. Completing an invoice match also approves the invoice, if you are an Invoice Approver. Invoice approval authority is set by your system administrator in your user profile.
The user's data profile controls the organizations, asset locations, and departments whose data the user can work with.
The "Invoicing" role object controls access to invoice creation and PO matching. The minimal setting (to view the list of purchase orders available for matching) is View. The Create setting is required to create an invoice from a purchase order or from a receipt.
The "Documents" role object controls access to invoice documents. The setting Create (or All) allows users to create and copy documents. The default setting is Create. Only users with the setting All can delete documents.
See Work With User Roles for details on roles and role objects.
You will probably encounter situations in which PO lines/receipts and invoices cannot be matched; for example, if an invoice shows different item prices than the PO line, or if the invoice shows a larger quantity than a receipt.
Invoice matching errors occur if a dollar or quantity difference between a PO/receipt and an invoice exceeds the tolerances set by your organization. Tolerances are limits on dollar differences between invoices and purchase order receipts. When a tolerance is exceeded, the invoice has an exception. Price exceptions are designated by P in the Exception Status field for the invoice. Quantity exceptions are designated by Q. The system provides tools to handle exceptions so that you can complete the invoice match. For differences that are within tolerance, the application does not record an exception, but posts the difference to the PPV (purchase price variance) Account.
In addition to price and quantity exceptions, you may also encounter exception receipts. An exception receipt occurs when an overage -- a larger quantity of an item than you ordered -- is received, and the invoice does not show the increased quantity. In this case, the application matches the invoiced quantity with the received quantity (minus the overage), and keeps the purchase order available should an invoice for the overage arrive. You can view Exception Receipts by selecting Receiving > Exception Receipts from the Materials Management main Contents.
To use the exception receipt feature, your organization must have the appropriate permission set on its Organization record. (Your system administrator can set the permission.) If your organization does not use the exception receipt feature, the application creates a Receipt Overage Report and sends email about the overage to the PO buyer. (The buyer's email address must be entered by your system administrator.)
For regular purchase orders, you can add unreceived lines to an invoice. To make sure that the invoice cannot be paid before the items actually arrive, the unreceived lines are marked as invoice receiving exceptions (R) on the invoice itself. As the items come in, and receipts are created, the application clears each invoice receiving exception.
A given invoice line may have multiple exception types: quantity, price, and invoice receiving. Exception codes appear in this order: Q, P, R. When the quantity exception is cleared, a P for the price exception appears. Clearing the price exception reveals an R. When the R exception is cleared, totals can be adjusted, and the invoice match completed.
A field on the user profile specifies the default type of notification that the user will receive when when invoice exceptions are cleared. Options include:
The field is on the Users edit panel AP Limits tab.
The user profile settings can be overridden for any individual invoice that the user creates. The override field is on the Create Invoice panel Approvals tab. See Cleared Exception Notifications for details.
Credit POs must be completed before you can match them with invoices. The completion process creates receipts for credit POs. See Completing Credit POs for details. If you created a credit PO using Quick Return to Vendor, and you specified a restocking amount or percent, the restocking fee is automatically written to a distribution line when you match the credit PO. See Return-to-Vendor Quick Credits for details.
Note: For invoices associated with credit POs, the Invoice Total can now be less than the Taxable Amount on a credit invoice if the credit PO has restocking fees. This rule allows taxes to be calculated correctly, if the item is taxable.
You can partially match credit PO invoices and receipts.
Assume that a credit PO has the Status Complete, and enters the invoice matching process. When the invoice arrives, the returned items have quantity discrepancies, compared to the credit PO. The application handles quantity discrepancies for partial matches with credit POs in the same way as for regular POs. The only rule is that you cannot match more than the receipt amount.
Notes: This method applies to file items. For non-file items, partial matching can only be done in the ordered/received UOM. For multiple invoices that apply to the credited item, the invoice amount may be off slightly due to rounding in the prior matching activity. Tax lines are not affected in resolving the exception.
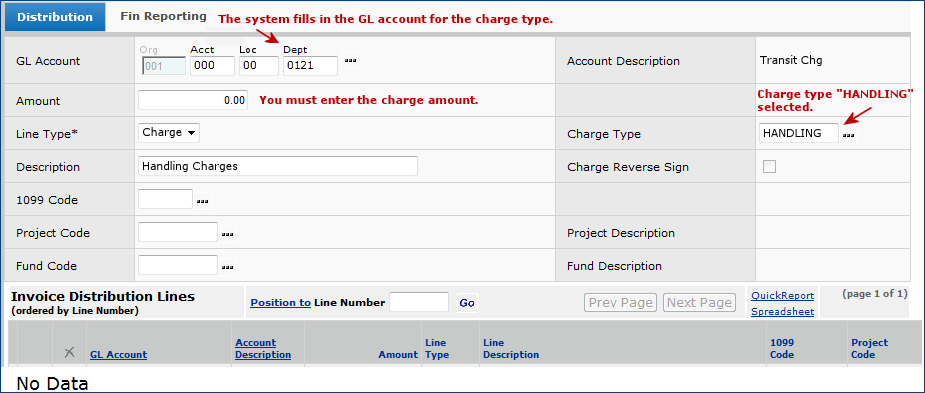
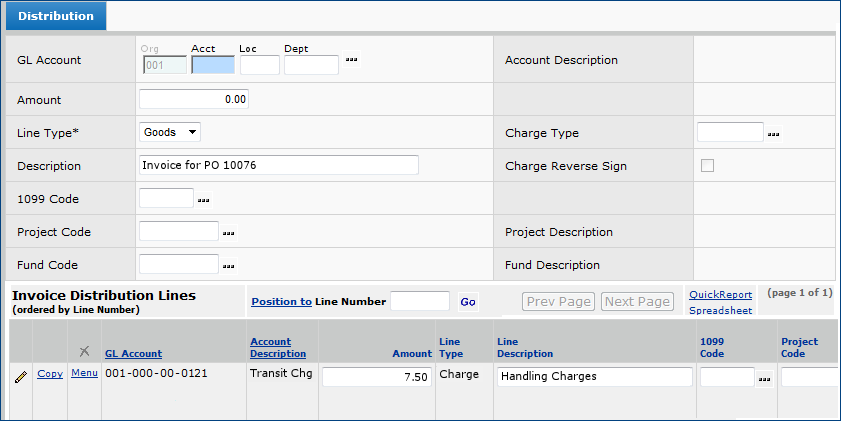
Invoices may contain additional charges such as freight, tax, and postage. When you match purchase orders and invoices, you can distribute dollars for such charges to the appropriate accounts by associating a Charge Type with each charge.
If you have invoices that contain the same charges over and over, you can create Distribution Profiles to build the charge lines in advance. Specifying a Distribution Profile on an invoice that you are matching calls in the pre-built lines.
Charge Types and Distribution Profiles are set up in your site's AP tables. See Setting Up Charge Types and Distribution Profiles for details.
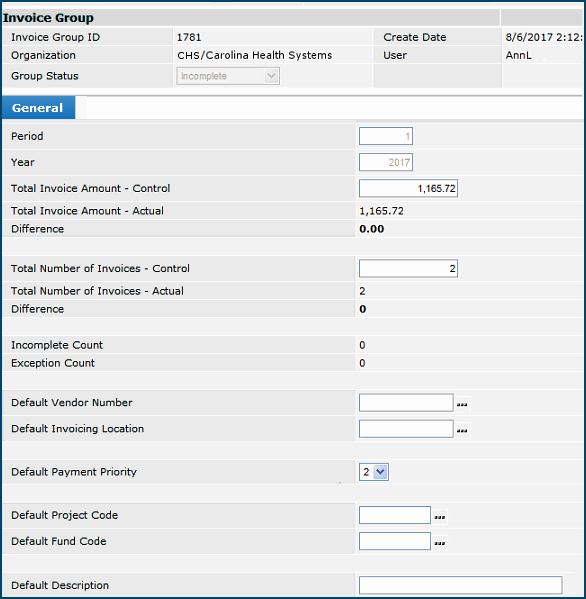
You can create collections of invoices known as invoice groups. Invoice groups are useful when you wish to separate the process of entering invoices from the process of approving invoices. Invoice groups also incorporate control totals.
You can create templates for vendor invoices that recur often. After creating the template for a recurring invoice, you can use it to generate a "real" invoice. See Recurring Invoices for more information.
Since the process of matching invoices and receipts can have its challenges, the system also allows you to delete an invoice and start over if you make mistakes during the matching process. You can delete invoices even if they have cleared exceptions.
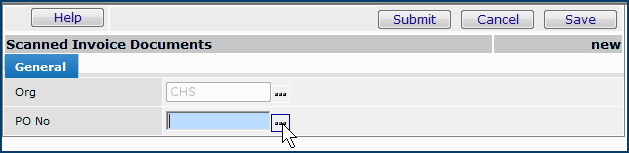
You can create an invoice either from a PO that is ready for matching, or from a receipt, or from a scanned paper copy of the invoice. The procedure below describes how to create an invoice from a PO. The procedure is the same if you start with a receipt or with a scanned paper copy, except that the path is different.
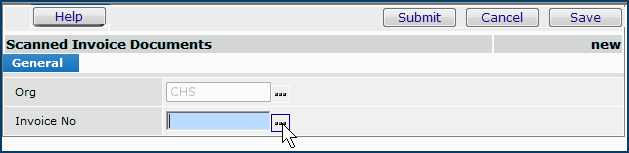
When you receive a paper copy of an invoice, you can scan it into your network and have it sent directly to Accounts payable. Scanned invoices are delivered to the system via Pulse. Once in the system, the scanned file can be used to create an invoice. When you create an invoice, you can attach the scanned file as a document.
Each user who works with invoices needs a network folder -- an "inbox" -- for scanned invoices that are picked up by Pulse (the client "gateway") and uploaded to Accounts Payable. Panels in Accounts Payable provide access to scanned invoices for each user of this feature. Panel menus provide actions such as creating a new purchase order invoice or manual invoice. Scanned invoices used to create an invoice can be attached to the Invoice Documents panel.
Several steps are involved in configuration of this feature. Pulse uses the file type Scanned Imports which must be enabled. Also, you may wish to make the feature available only for particular organizations and users. Your scanner must also be capable of outputting scans in Adobe Acrobat .pdf format.
Important: Call the Help Desk for assistance with setup.
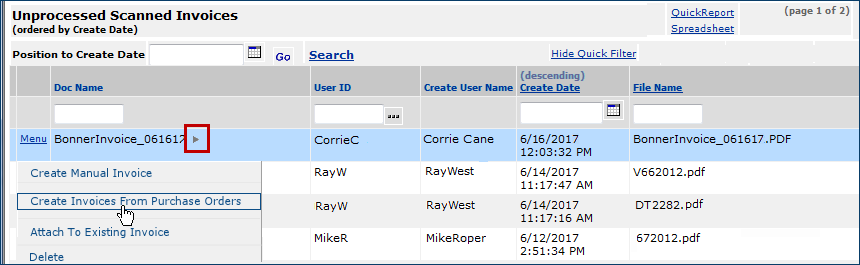
The scanned invoice disappears from the Unprocessed Scanned Invoices panel and moves to the Processed Scanned Invoice panel (Accounts Payable > Invoices > Processed Scanned Invoices).
If an invoice that has a scanned document attached to it, you will see it on the Documents tab when you find and select the invoice from the Invoices panel. (MM/AP > Invoicing > Invoices > Edit/Inquiry).
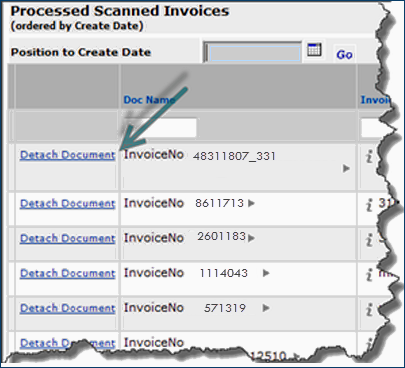
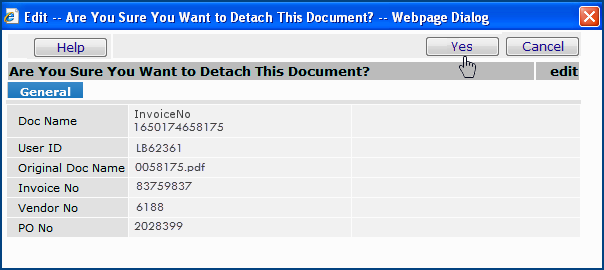
If you wish to delete a scanned document, you must use the Detach link on the Processed Scanned Invoices panel.
Go to Materials Management > AP > Invoicing > Processed Scanned Invoices. Click the Detach Document link beside the desired invoice number (Figure 8).
A confirmation panel appears. (See Figure 9.)
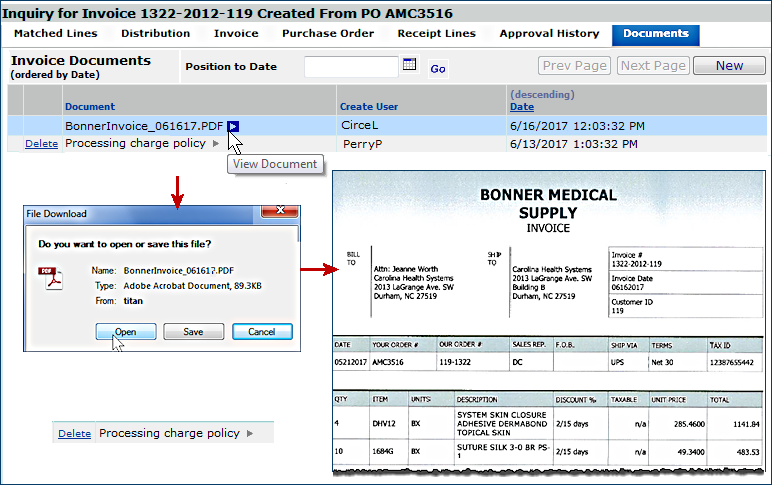
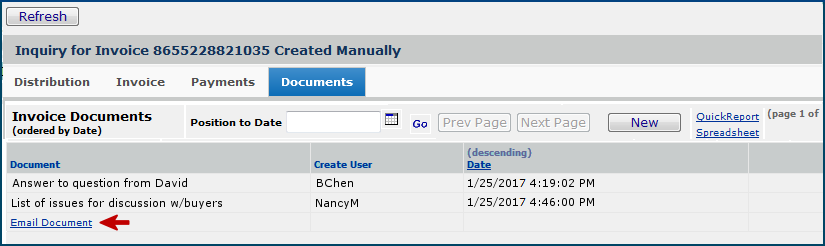
The Documents panel for an invoice (Figure 10) is available when you edit or inquire on the invoice. From the panel, you can add documents to the invoice, view the documents, and delete the documents. If you have scanned in paper documents for the invoice and processed the scans, they also appear on the Documents panel.
On the Documents panel, if you do not have ePHI access, and the "Contains ePHI Data" checkbox is selected, you cannot view a document. When you click the arrow to open the document, the Insufficient Authority message appears. For more information, see Securing Electronic Protected Health Information (ePHI).
For Bill Only documents, if the checkbox has previously been selected for "Contains ePHI Data," then only the Administrator can change the status of the document and select or unselect the "Contains ePHI Data," checkbox. This checkbox remains locked for everyone else.

See Notes, below, before you attempt to delete a document.
Notes:
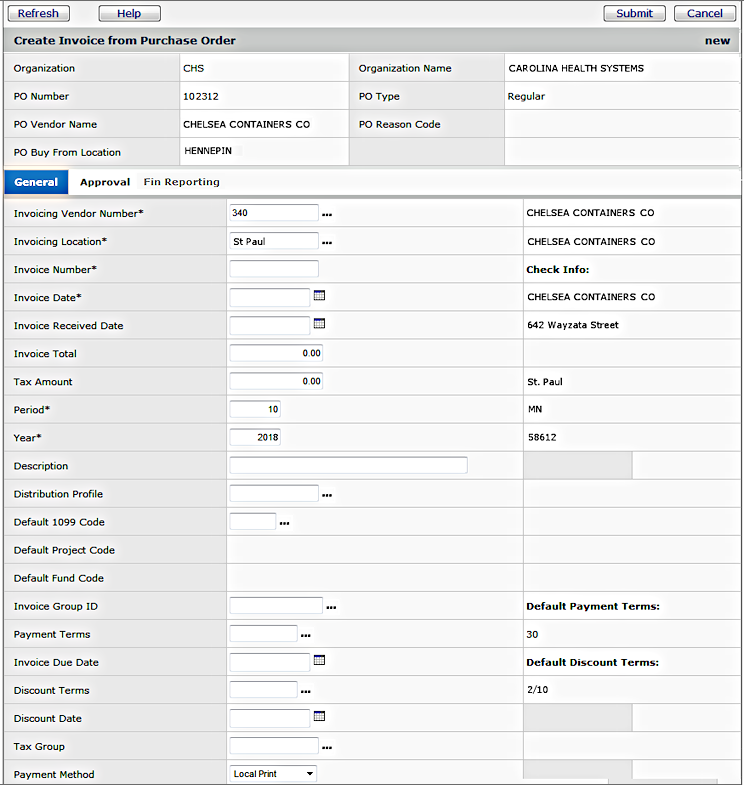
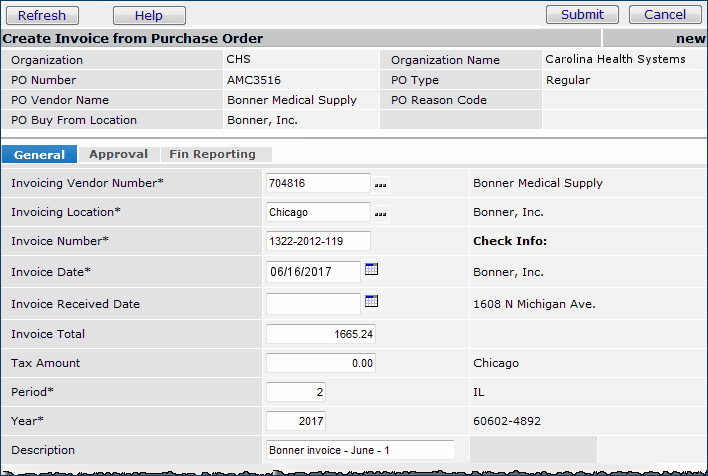
When you are creating a new PO invoice, the first steps are to complete the header information. Then, you match lines from the invoice to the PO receipts. ERP brings in the PO lines for matching.
Complete the required fields (marked with *) on the Create Invoice from PO General panel.
Enter the Invoice Number, Invoice Date, and Invoice
Total from the vendor's invoice.
The Invoice Date must be within a year (future or past) of the current date.
The Invoice Number can have a maximum of 30 characters.
Note: The reason for the Security Warning panel is to get your permission to install controls needed by the Invoicing interface. Controls are program elements created by Microsoft and other vendors. Controls are commonly used by many applications, such as Excel. You often need to install controls the first time you use an application that requires them.
Click the Approval tab to enter approval information.
Documents can be attached to invoices manually, or attached by the system (for example, with IDS imports, a copy of the scanned invoice is attached). The documents can be displayed when editing or inquiring on an invoice.
A list of documents emailed to the invoice is displayed.
You use the Add Lines and Invoice Lines tabs to add detail lines to the invoice. The lines are matched automatically.
Navigating and using the lists simplifies working with invoices that contain many lines. Detailed instructions for navigating and using the lists are in a separate topic.
You can edit values on the lines so that they match the invoice, however, in doing so, you may create invoice exceptions.
If you are working with a regular purchase order, you can add unreceived lines to the invoice. The unreceived lines have an exception status of R "invoice receiving exception." When the items arrive and receipts are created, the system automatically changes the invoice receiving exception on the lines to N (no exception). You can then complete the invoice.
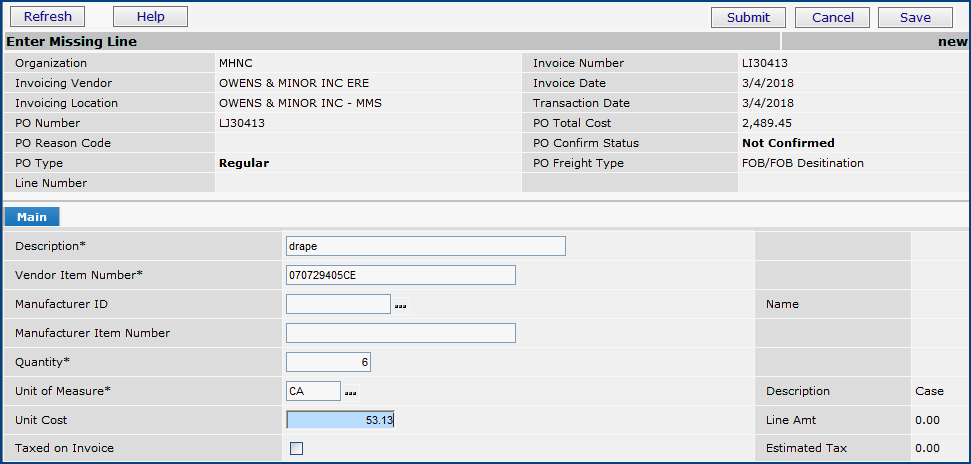
You may occasionally receive invoices that contain lines which do not exist on the original PO. You can add the lines and match them as "missing lines" on the invoice you create in ERP. You can add missing lines for non-file and non-stock items, or increase the quantity of an existing PO item line. You can add missing lines to both regular and bill-only POs. (See Using "Bill Only" Requisitions and Purchase Orders for details on working with bill-only POs.) The Missing Lines tabbed panel (see Figure 13) displays the invoice lines you have added that do not correspond to an existing purchase order line.
To work with missing lines, the field Invoice Match Missing PO Lines must be set on your organization record. This field is located on the on the Organization AP Info panel. The Missing Lines panel is only visible if the corresponding flag has been enabled on the organization record.
The detailed process for adding and matching missing lines is in the section below.

To clear the exception, go to Invoice Exceptions (MM > Invoicing). Detailed instructions for clearing this type of exception are included in Resolving Missing PO Line Exceptions.
Note: You can also use the missing lines feature to increase the quantity of an existing PO line. To do so, enter a missing line for the item with the quantity difference. An exception will exist. Clear the exception. You will then have a new PO line for the same item for the extra quantity.
In addition to matching item lines, you must also distribute charges such as freight, handling, and others. If your organization has a General Ledger account specified for Freight and/or Other (in the Organization record), the system will pre-build distribution lines for those categories on the invoice. (If you don't use the lines, they are automatically deleted when you click Submit.)
Otherwise, if you have no appropriate pre-built lines for charges, you need to create the lines yourself. These tools are provided to assist you:
When the organization for a purchase order points its charges to a different organization, distribution lines (e.g., freight) may also need to be charged to the override organization. In this situation, you can select a GL account whose organization segment is different from the purchase order's organization segment.
Purchase order invoices for which you wish to create inter-organizational distribution lines must have these characteristics:
Distribution profiles are set up in the AP tables and are assigned to individual vendors in the vendor record.
When you create an invoice, if the vendor has a default distribution profile, the system automatically uses the default distribution profile. The distribution profile name appears on the Invoice General tab (Figure 18). The distribution detail lines are created from the distribution profile when the invoice is created.
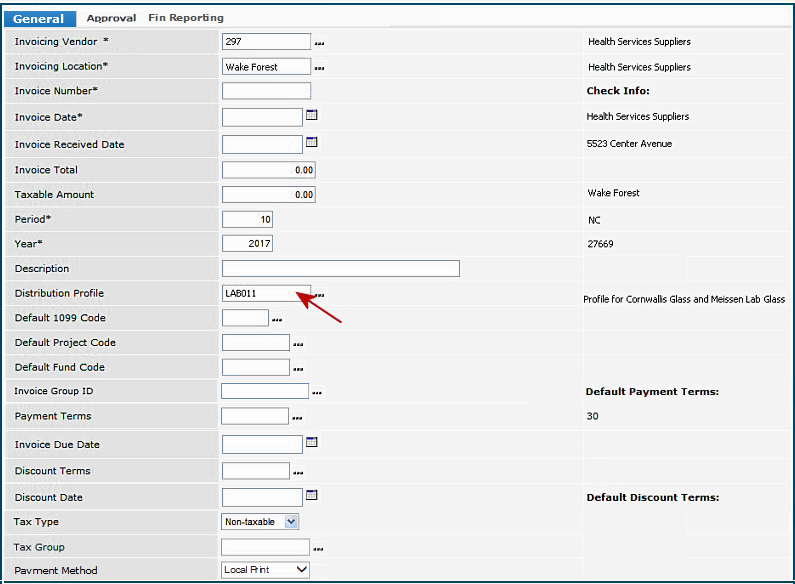
Figure 19 is an example of a distribution profile:
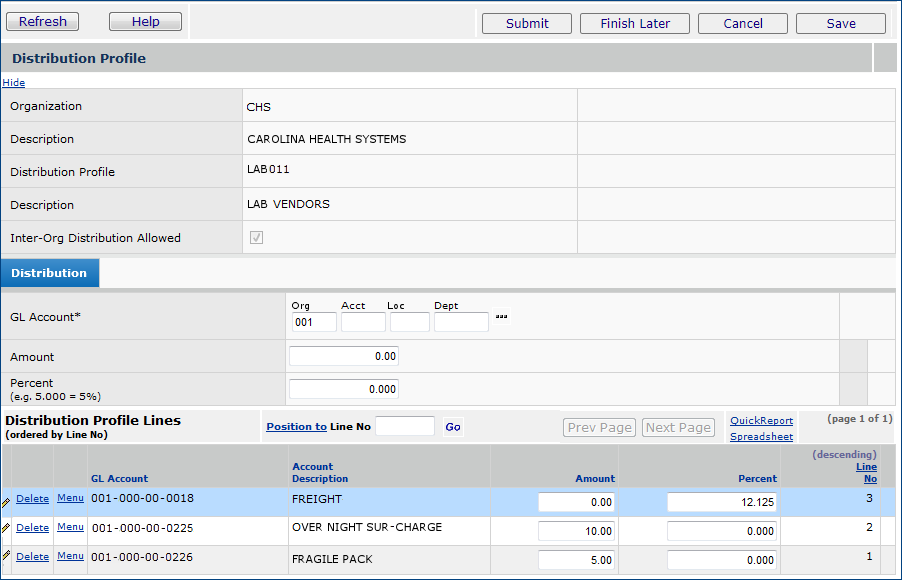
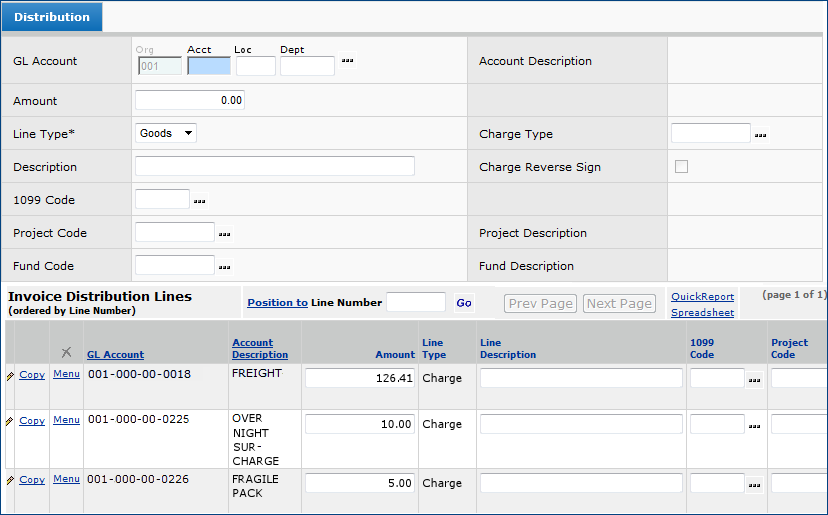
In Figure 13, for two accounts - Overnight Surcharge, and Fragile
Pack - dollar amounts are specified: $10.00, and $5.00 respectively. Charge
lines containing the amounts appear on the Invoice Distribution Lines panel
(Figure 20) when invoices from vendors with this distribution
profile are created. Notice that one account - Freight - has a Percent
charge specified: 12.125 percent. A calculated charge line
is created using the percent based on the Invoice Total.
Charge Types identify various types of charges and associate each type with a GL account. When you match an invoice containing charges, you select a charge type, and the system creates the line for the charge. You manually enter the charge amount. (In contrast, a distribution profile creates a line with an amount already entered.)
Charge Types are set up in the Materials or AP tables, and are selectable on invoices.
You can enter statistical GL account information on an invoice from the Distribution tab, just as you enter financial accounts for goods or charges. Statistical accounts can also be entered on Check Request detail lines. (See the Check Request topic.) Invoices with statistical account distribution lines can be imported. (See Import Invoices into Financials.)
Statistical recurring invoice distribution details are not currently supported.
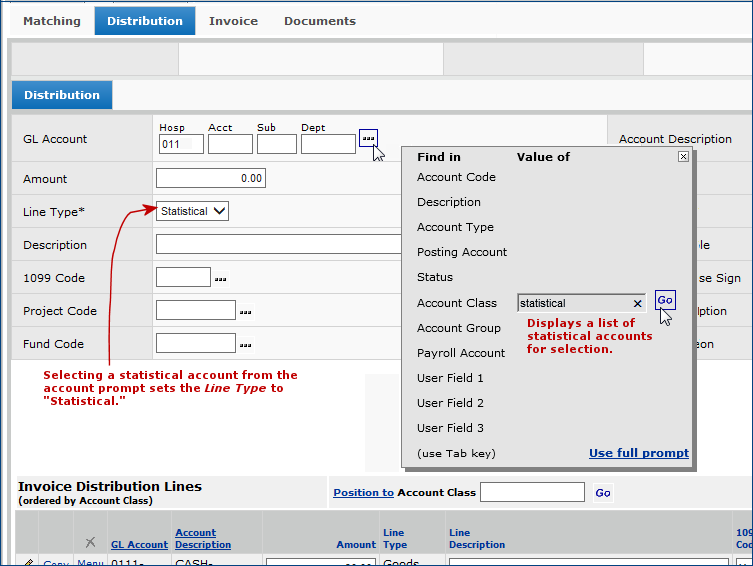
When you select a statistical account for a distribution line, the application sets the Line Type to Statistical. The application will not let you change the Line Type when the GL Account field contains a statistical account. If you key in statistical account segments manually, you will need to set the Line Type to Statistical manually.
Restrictions for Statistical Account Lines: An invoice cannot contain only statistical account lines. It must also contain lines for financial accounts.
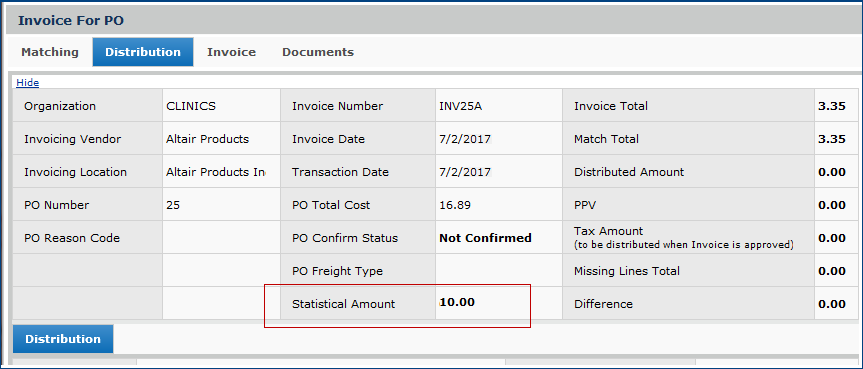
Amounts for statistical account lines are not added to other distributed totals for an invoice. When you balance an invoice with lines for statistical accounts, the value(s) that you entered in the Amount fields for each statistical distribution line are accumulated in the Statistical Amount field on the invoice header (Figure 24).
Accrued Receipts
Accrued Receipts Summary
Accrued Receipts Summary2
AP Reconciliation Report
AP Reconciliation Report - All Periods
AP Reconciliation Report - Summary
Payment Expense Accounts.
GL Export Report
GL Export Summary Report
GL Transactions MM and AP.
Invoice Activity
Invoice Activity Summary
Invoice Match Header.
A balanced invoice is one where...
Invoice Total = Match Total + Distribution + PPV and Difference = 0.00
Important: You should never allow an unbalanced invoice to route through approval so that its status becomes "Approved."
Before you can match the entire PO against all invoice lines, the lines that you add to the invoice and any other dollar amounts that you enter on the Distribution or Invoice tabbed panels must balance with the Invoice Total. If the value in the Difference field is not zero, your invoice and PO are out of balance.
In the upper right of the General tab on the invoice header, the system recalculates the Difference value. If the Difference was due to incorrect Unit Cost, the difference moves to the PPV (Purchase Price Variance) field.
Note: For direct delivery items, you cannot enter and save an invoice quantity greater than the receipt quantity
For lines with price or quantity exceptions, from the Invoice Lines list, you can override the tolerances established and manually match an item. Select Menu > Override. The exception field (EX) will show a value of O. The system treats the item as though it is matched, although the invoice quantity/price and receipt quantity/price do not match. A system note is written to identify the user who manually matched the invoice line.
Note About the Cancel Button: If no invoice lines have been matched, and you click Cancel, you delete the invoice header. If you click Save after matching invoice lines, Cancel exits the invoice. No Save is performed. Any changes you made since the last Save are lost.
You can finish the matching process later (click Finish Later) or finish immediately (click Submit). Either has some implications. If your invoice is not balanced, most likely you do not want to Submit. Remember that if you click OK (to Submit), the invoice is completed. If it is out of balance, you cannot fix it. Invoices with an Invoice Status of Completed have been extracted from the system to another AP system.
The payment completion process automatically clears invoice payments whose payment method is Credit Card or any of the ACH types. The payment is marked as cleared using the current date/time and payment amounts. The system also creates the AP transactions for the payment
Clicking Submit completes and approves the invoice. A completed invoice means that:
If the invoice is "out of balance," a warning message appears when you click Submit. The Difference field contains a value.
Clicking Finish Later suspends completion of the invoice.
If you clicked Finish Later, you can return
to the invoice and edit it. You can also add new lines to the invoice. You can
locate an invoice starting with either the PO number, or the invoice number.
You can edit invoices that have not been authorized. You can access a PO invoice if you know either the PO number or the invoice number.
A purchase order's status fields change, depending on what you are matching, and whether you select Submit or Finish Later. You can view the status fields for the PO from the PO, Invoices, or Receipts Lists.
In matching lines for a PO that has been fully received, the system sets values in the invoice match status fields as follows:
Unmatched - No lines on the invoice and PO have been matched.
In Process - Matching is in progress. This value occurs when you click Finish Later.
Part Matched - The PO has been partly matched with invoices. For example, some of the line items on the PO may have been received, but others have not been received. An invoice for the received items has arrived, and was matched.
Matched - All of the PO receipts have been matched with invoices. Any unmatched lines are deleted. Their remaining items will be available for matching when they are received and invoiced.
No Match - This value is used for internal vendors.
Exception - The PO and the invoice do not match. There is an exception (such as a price or a quantity discrepancy) which must be cleared before the PO can be closed or matching completed.
Manually closed -The invoice and the PO could not be matched for a specific reason. Therefore, the PO was closed manually.
Incomplete - Invoice information is not complete. A header was created for matching, but no lines were matched. This status is set when you
cancel out of invoice line details without matching any lines. Incomplete is also used for blanket POs, since blanket POs with 0 quantity lines are never considered completely invoiced given that the original ordered quantity is never known.
Canceled - The invoice is canceled.
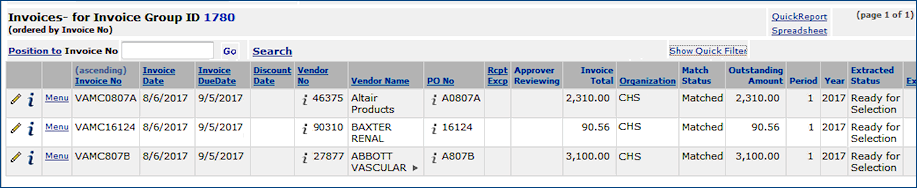
To look at the match between an invoice and a PO associated with it, from the AP or Materials main Contents, select: Invoicing > Invoices to display the Invoices list. Review the value in the Match Status field in the center of the line for any invoice in the list.
An invoice group is a tool that groups invoices so that you can approve invoices separately from the process of entering and matching them. Invoice groups also let you use control totals.
Invoices may or may not need to be included in an invoice group depending on whether the User is an Invoice Approver field is set in your user profile (See Assign Role Objects and Security Levels.) If the User is an Invoice Approver field is set to Yes, you can create invoices outside an invoice group. When you create an invoice outside of an invoice group, and the invoice is in balance (with no match exceptions), clicking Submit matches and approves the invoice. The approval of the invoice creates the AP transactions and GL transactions.
If you are an invoice approver, you may use an invoice group. For invoice approvers, the invoices in the group become approved when you complete the invoice group. In completing an invoice group, the system validates that the Control totals match the Actual totals for the number of invoices and for the amount. The invoice group status changes from In Process to Approved. No more invoices can be added to the invoice group at this point. Approved invoices are available to be paid.
If you are not an invoice approver, then you must use invoice groups. When each invoice group is completed, a user who is an Invoice Approver or the members of an Invoice Approver Group must approve the invoice group. Approving the invoice group approves all the invoices within the group. See the discussion of invoice approvals for details.
You can move an invoice from one invoice group to another invoice group, edit the invoice, and change the invoice group (as long as the invoice group is not Approved). You can delete invoices from an invoice group, but you cannot delete an entire invoice group unless the group is empty.
You can change the year and period on an existing invoice group. The following conditions apply:
The system creates the invoice group and assigns it an ID number. You can now open the group, and create invoices within it.

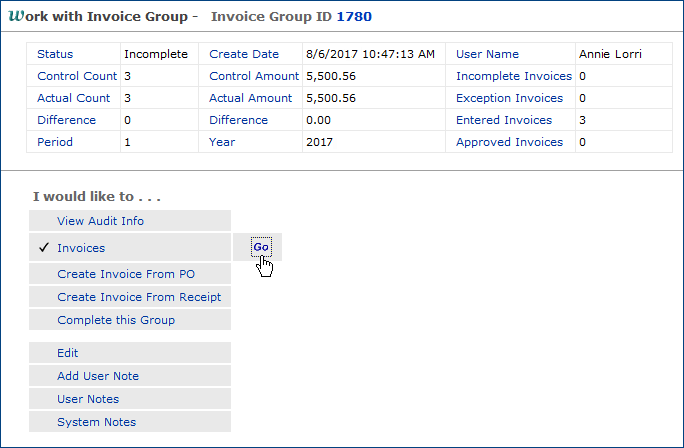
Notice that you can use this panel to create invoices within the group from POs or receipts, edit the group, and complete the group, among other activities.
Note: If you are creating individual invoices outside of an invoice group (described in "To create an invoice and match it with a PO"), as you create each invoice, you can assign it to an invoice group. Enter the Invoice Group ID on the Create Invoice from Purchase Order panel (Figure 2).
When you accrue invoices, the period and year on an individual invoice can change. However, in an invoice group, the period and year on the invoice group does not change, creating a situation where all (or some) of the invoices in the invoice group have a different period and year than the invoice group itself. In this situation, you need to check the AP transactions for the invoices that differ from the invoice group to view the accrual transactions that caused the change in the period or year. For example, since invoices can be approved individually, it is possible that some invoices in the invoice group were approved, and would not be accrued. The period and year for these approved invoices may be different from the period and year for invoices in the group that were accrued. (Only invoices with an Invoice Status of Entered are accrued.)
Non-stock and non-file lines can be receiptless. When receiptless lines occur on a purchase order alone; that is, the PO has no other lines that require receipts, the PO's status is Fully Received upon authorization. If receiptless lines and lines requiring receipts are mixed on a purchase order, when the PO is authorized, its status is Part Received.
As purchase order lines available for matching are processed, the system creates a receipt header and a receipt line with a quantity of zero for those marked as receiptless. On the Invoice Lines list, you can enter an invoiced quantity and a dollar amount. The invoiced quantity updates the receipt line, and is not considered a quantity exception.
If the Unit Cost on the receipt line (the line-item Unit Cost or the Next Estimated Receipt Unit Cost) is zero, and you enter an invoiced unit cost greater than zero on the invoice line, the invoiced unit cost updates the unit cost on the receipt line, but is not considered a price exception. If the receipt unit cost is greater than zero, and the invoice unit cost differs, the system does signal a price exception.
To allow multiple receipts, in subsequent invoice matching the system revisits any receiptless line again as long as the invoice has not been fully matched. The system again creates a receipt header and a line with zero quantity. The receipt is Incomplete.
When you complete an invoice, the receipts created for receiptless lines are also completed. If a non-file line on a blanket PO has a PO Ordered Qty of zero, a requisition is created with an ordered quantity equal to that specified on the invoice and receipt. The Status of the requisition is Complete. All other quantities on the receipt are zero. The receipts created for receiptless lines that were not selected for matching are deleted. The system updates the period and year to the current AP period and year.
When you delete a completed invoice for a receiptless PO, the system cancels the receipt that it generated for any non-file receiptless lines.
Completed receipt dollars are added to those on the blanket PO line, and applied to the header. If the received amount on the PO header exceeds the dollar amount, the overage is allowed, provided that the receipt was created by the invoice matching process. Otherwise, the system sends a warning message.
Bill-only requisitions and purchase orders are used for items that are not procured through the usual process. For example, a device may be provided by a manufacturer whose representative brings the item to the hospital and works with the surgeons who implant it. The item is consumed, and must be paid for.
Bill-only purchase orders may contain "bill-only" lines for non-file items, such as implants delivered to an OR for a procedure. These items are receiptless and do not replenish stock. When an invoice is created for the associated bill-only PO line, as with all receiptless items, the system makes a receipt available for matching.
The Accrue Unapproved Invoices feature in Financials allows you to accrue unapproved invoices for the current organization, for all organizations, or for organizations that you select from a list.
The invoice Status remains as Entered for both Invoice 1
and 2. Vendor balances are not updated and AP transactions are not created
for invoice accrual or for reversing invoice accrual because the AP Liability
Account is not one of the GL accounts for which GL transactions are created.
Note: To use this feature, you
must have the appropriate permissions set in your user profile.
When Materials Tax is calculated and an invoice is sales taxable, a debit entry to the Tax Liability account is created when the invoice is approved. When Materials Tax is calculated and an invoice is Use Taxable, no entries are created for either the Tax Expense Account or Tax Liability Account. (Materials Tax is calculated when the field Calculate Tax For Materials Transactions on the Organization record is selected.)
Copyright © 2023 by Premier Inc. All rights reserved.
