Using Financial Reporting Fields in © ERP
Contents
Overview
Site-specific financial reporting fields are available for ® ERP. When set up for a site, and entered on application records -- such as invoices and requisitions -- financial reporting fields propagate to general ledger transactions. The financial reporting fields can be then used to identify and categorize GL data in reports and on list panels. Up to three financial reporting fields can be set up for a site.
For each account in GL, you can specify whether each financial reporting field that you define is required.
Note that Project Code and Fund Code -- similar to the three financial reporting fields -- also propagate to GL transactions, and can be used in reports. (Project Code and Fund Code fields have been available in the application for a long time.)
- Once defined by your site, you can select financial reporting values when you create records that produce general ledger transactions; for example:
- quick issues and quick credits
-
requisitions (including par cart and order guide requisitions)
-
purchase orders (including PO lines, and panels for moving PO lines)
-
receipts
-
invoices
-
check requests
- order guide and par cart mass maintenance jobs
-
journal vouchers, recurring journal vouchers, and journal voucher imports.
-
Also, you can select financial reporting fields in these areas:
- As organizational overrides for vendors.
- On the JV Excel Import Template.
- The application displays financial reporting fields in GL transactions, available from several lists.
(e.g., MM > Inventory > File Item Transactions > GL Transactions)
- GL exports include the financial reporting fields.
The GL account import also includes the financial reporting fields.
Report objects (E.g., "Requisition Details," "Par Cart," "Requisition Header," and many others) that access records containing financial reporting fields make the fields available on report definitions.
Examples of Financial Reporting Fields on a Panel and Report
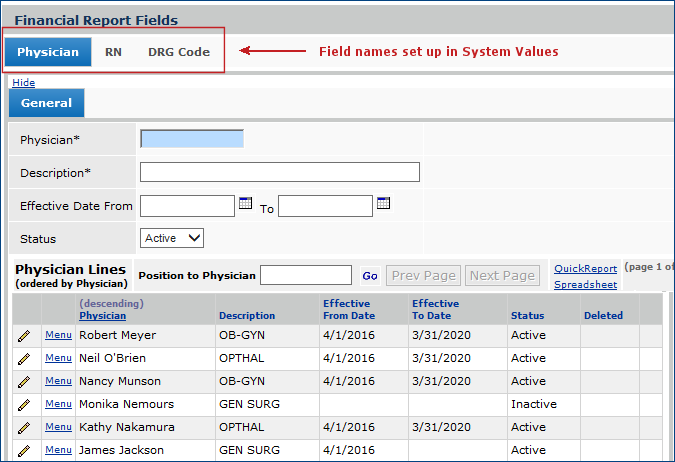
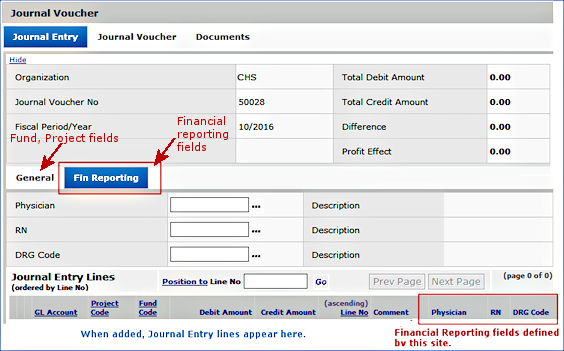
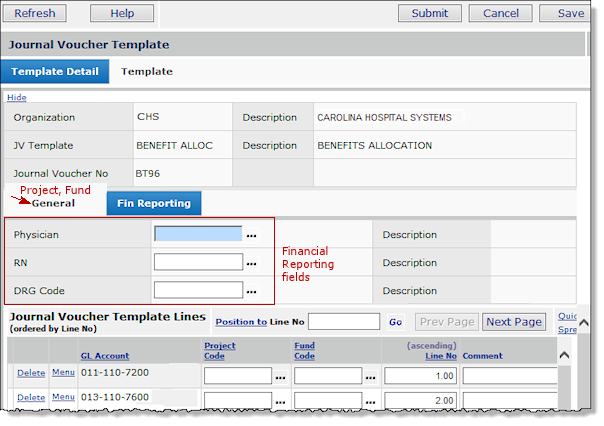
Figure 1 is a manual journal voucher for a site that has three financial reporting fields: Physician, RN, and DRG Code. These example fields were defined by the site, along with values that users can select. Your site will probably identify different fields that are of interest for your reporting purposes. (A journal voucher is only one area where you can use financial reporting fields -- others include requisitions, POs, invoices, and more.)
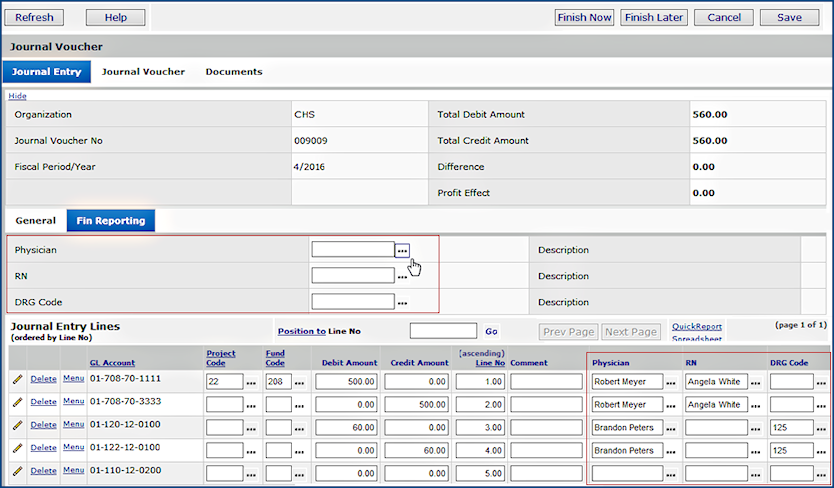
Figure 1 - A Journal Voucher with Financial Reporting Values on the Journal Entry Lines
- You can create new journal entry lines on the General tabbed panel, and enter Project and Fund Codes there.
- The Fin Reporting tabbed panel contains the selectable financial reporting fields.
- Each journal voucher line (at the bottom) can be edited and Project Code, Fund Code, and financial reporting values selected when editing.
Figure 2 is an example of a simple report for a department built from the "Order Guide" report object. The report definition includes the financial reporting fields Physician, RN, and DRG Code, as well as Project and Fund codes. The user has selected a single order guide, but could have selected a larger number, and from different organizations and departments.
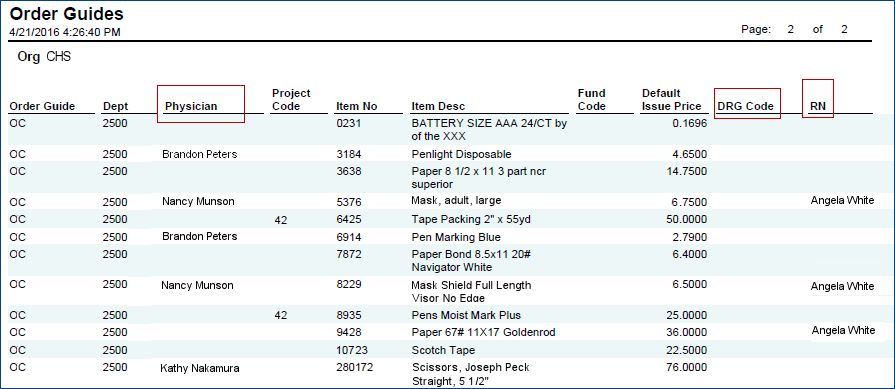
Figure 2 - Sample Order Guide Report with Financial Reporting Fields
To use financial reporting values, contact the Help Desk. The feature must be enabled for your site.
In addition, setup is required.
- You will need to assign names to the fields (in System Values), and create field values in a General Ledger table for users to select.
You can create field values in the GL table using an edit panel, or import the values in .csv form.
- If you wish to require financial reporting fields for some GL accounts, you must flag the accounts.
Security
Setting up financial reporting field labels in System Values is controlled by the role object "Administration." The minimum setting to edit system values is Modify.
The ability to create financial reporting field values in the GL Tables is controlled by the role object "GL Tables." To create values, the minimum setting is Create.
Set Up Financial Reporting Fields
Once the financial reporting feature is enabled for your site, the feature can be set up. During implementation, if you are a new site, your Consultant can perform the setup. This section is for your System Administrator if you need to set up financial reporting fields post-implementation.
Setup involves these steps:
- Defining the financial reporting fields that you will use. You need to assign names to the fields.
- Creating values for the fields that users can select. A table for the values is in General Ledger > Tables.
- Flagging any GL accounts for which you wish to require financial reporting fields.
Define Financial Reporting Fields in System Values
This step identifies the financial reporting fields. Up to three fields are available.
Note: You can also use the Project Code field for financial reporting. See Using Project Codes with GL Accounts. In addition, the Fund Code field is available.
- From
the main Contents, select Work in Administration > Administration
> System Values.
The System Values list appears.
- Select Menu > Edit or click the edit icon
 .
.
- Click the Financial Reporting tab.
The Financial Reporting panel appears (Figure 3).
On the panel, you can define up to three fields.
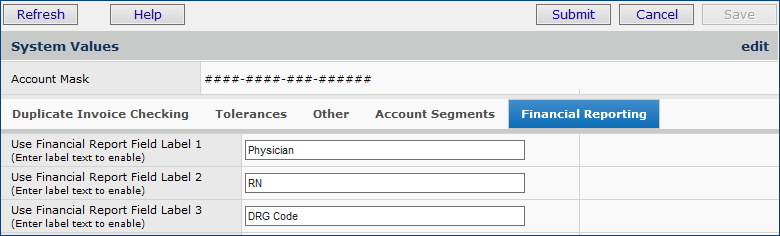
Figure 3 - The System Values Panel for Defining Financial Reporting Fields
- Enter a name for each field that you wish to use.
- Click Submit.
Next, you need to open the GL Financial Reporting Fields table and enter selectable values.
Click GL > Tables > Financial Reporting Fields. See the steps in the next section.
Specify Values for Financial Reporting Fields
A table in General Ledger with an edit panel is available for you to enter financial reporting field values. The values are then selectable by users in the various application features.
If you have many field values, you may wish to import values to the table. This strategy is simple: enter one or two values in the table, and download the values in a spreadsheet. With the downloaded spreadsheet, you have a template to enter more values in the format that the application expects. Then, upload and import the spreadsheet to populate the table.
Both methods are explained below.
To Enter Financial Reporting Fields' Values in the General Ledger Table
- From the General Ledger main Contents, select Tables > Financial Reporting Fields.
A list of financial reporting field values appears (Figure 4), if any have been created. Otherwise, No Data appears.
On the panel, the names for fields that you assigned in System Values are on the tabs.
- Click a tab to enter values for the field. Figure 4 is an example of entering a value for the financial reporting field "Physician."
- Enter values for each field on its General tab. Click Help for information on the fields.
- When you enter each value, click Save. Then click Refresh to display it at the bottom of the panel.
- Notice that you can use the standard Position To locator: Figure 4 displays physicians whose Description is OPTHAL.
- Click Finish Now when you complete entering values.

Figure 4 - Adding a Financial Report Field Value to the GL Table
For each financial reporting field line (bottom), Menu > View Audit Information displays when the value was added, changed, or deleted; when the action was taken; and the User ID of the person responsible.
Use an Import File to Populate Financial Reporting Field Values
Importing field values uses the standard upload/import panel and process, and lists import jobs and their detail lines, both those successfully processed and those with errors.
With this method, you need to first enter one or two fields in the Financial Reporting Fields table.
Create the Spreadsheet Values for Import
- Follow the instructions in the previous section to enter one or two field values in each of the financial reporting fields that you have defined.
- Click each tab to enter values for the field.
- For each field, on the General tabbed panel, click Spreadsheet. See Figure 4 (purple arrow).
- You must create a separate spreadsheet for each field that you have defined. The link is on each tabbed panel.
- Save each spreadsheet to a network location where you can access it and add data.
Important: To upload successfully, the spreadsheet must be in .csv format.
- You can Open the spreadsheet and save it to a network location as a .csv.
- Alternately, you can Save the spreadsheet as Excel, then re-open it, and save it as a .csv.
Figure 5 is an example of the Physician values spreadsheet with entries to be added to the Figure 4 table, and changes.
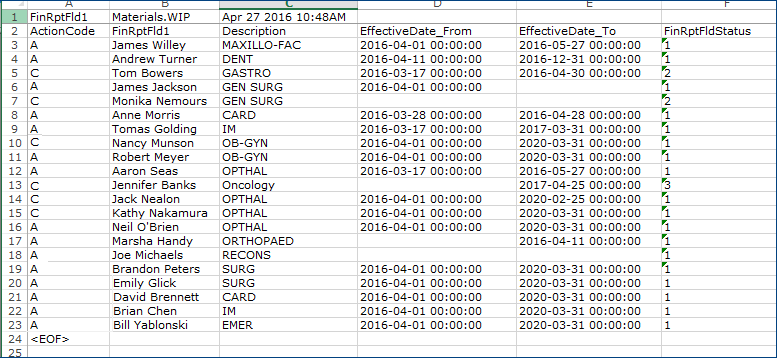
Figure 5 - Financial Reporting Field Values for Import to a Site's "Physician" Field
Spreadsheet Columns
ActionCode
The ActionCode column tells the application what to do with each uploaded record. The ActionCode is required for each record.
The ActionCodes are:
- A - New record: add the record to the GL financial reporting fields table.
- D - Current record: the status is set to delete.
- C - Current item record: update the record with information from the worksheet.
If you have a downloaded row with no changes, you do not need to delete the row. Just set the ActionCode to C and the row will upload again, as is.
FinRptFld1, FinRptFld2, FinRptFld3
This column contains values for the financial reporting field that you are creating. In the example, this field is physician names (FinRptFld1).
- Do not change the column header to the label you have selected for the field. The application automatically maps "FinRptFld1" to the label you have identified.
Values in this column are required.
Description
Enter a description for the field value. This is a required column.
EffectiveDate_From / EffectiveDate_To
These columns contain beginning and ending dates during which the value is valid. For example, perhaps this site has a group of interns or visiting staff that will only be available between specific dates. The physicians' names could be entered as valid between the From date and the To date only.
These columns are optional.
Effective dates can be used independently of each other, or not at all. Here is a summary:
Effective From Date without Effective To Date - Current date must be greater/equal than the Effective From Date.
Effective To Date without Effective From Date - Current date must be less/equal than the Effective To Date.
Effective From Date and Effective To Date - Current date must be between the 2 dates.
No effective dates - Date validation bypassed.
FinRptFldStatus
This column corresponds to the Status. Values that you can enter are:
1 - Active
2 - Inactive
3 - Deleted.
EOF - Must be entered on the first cell of the last line in the worksheet.
To upload the .csv spreadsheet
- From the General Ledger Import/Export menu, select Financial Reporting Fields Import (Figure 6).
|
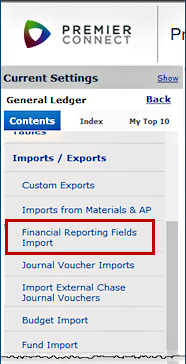
Figure 6 - The Financial Reporting Fields Import Link |
| The import panel appears (Figure 7).
- Click New.
- Enter the file that you wish to import in the File to Upload field.
- Click Browse to locate the file on your local network.
- Click the file to select it.
- At this step, you have a choice. You can work through the import process in two stages or in one stage. For new users of this feature, we recommend the two-stage approach.
Two-Stage Approach
- The two-stage approach first loads the .csv file and validates it. Once the file has successfully loaded, you can import the information into the system.
- Select the box labeled Load and Verify, No Import.
- Click Submit. The system attempts to upload your file and validate it. If successful, the system sends you a message. If the system cannot upload your file and validates it, error messages appear.
- Read and close the error messages.
- Make changes as needed in your .csv file and try the upload again.
The panel that displays imports appears. Figure 8 is an example. The panel at your site will contain the name of the fields...probably different from "Physician," etc.
- Click Refresh to see your file listed.
- Click Help for information on the columns.
One-Stage Approach
- The one-stage approach loads and immediately processes the file. This method is efficient if you are confident that your. csv file will not contain errors.
- Complete Step 2 and 3, as above.
- Click Submit. The system attempts to upload your file and validate it.
The list of imports appears (Figure 8).
Click Help for information on the columns.
- Click Refresh to see your file listed.
|
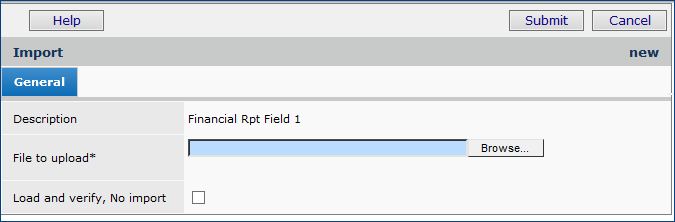
Figure 7 - Upload Panel for Financial Reporting Field Values .CSV File
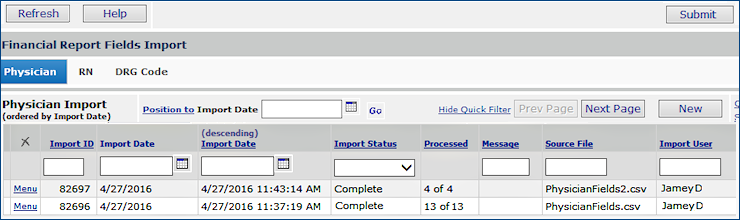
Figure 8 - The Imported .CSV Files with Values for the First Financial Reporting Field |
- Review the import list entry.
The following fields (Figure 8) provide useful information:
 Import Status - The successful or unsuccessful status of the upload.
Errors: The .csv file could not be read or validated.
Ready for Processing: If you have used a two-stage upload, the file is ready for the second (update) step.
Complete: Processing of data from the import file is complete and successful.
Processing: The file is currently processing.
Processed - The number of data records processed out of the total uploaded. This number indicates how many of the import file records successfully performed their respective actions.
n of X: X is the number of data records uploaded and n is the number of records processed.
For a one-stage upload, this field indicates whether the system could import the records, and, if so, how many records processed successfully. 0 of X means that the system was not able to process any of the imported file's records.
- To display details, click Menu > View Import Details next to the uploaded file. The Details list appears, and you can review your data for errors.
To complete processing of your import file:
If you are using the one-stage approach, the system has run the processing step for you. You can review any errors, and begin fixing any problems.
If you are using the two-stage approach, you need to process the file that you uploaded. Do the following:
- From the General Ledger main Contents, select
Imports/Exports > Financial Reporting Fields Import.
The list of imports appears (Figure 8).
- Locate the file that you wish to process.
- Click Menu > Reprocess. The system asks you to verify that you wish to reprocess the file.
- Click Submit.
- The system tells you how many records were successfully processed, and how many contained errors.
- If you have no processing errors, then you are finished, and the Import Status is Complete.
- If you have errors, Import Status contains the value Errors.
See To debug your import file to correct the errors. Then, click Menu > Reprocess again. You may need to make changes in your .csv file and re-import the file.
To debug your import file:
You can encounter errors at any or all of the stages of the import. Error messages provide information about problems with the .csv file. In most cases, you will wish to alter your .csv file.
A. At the validation and reading stages:
- Check that the file name and path are correct.
- Make sure that the import file is a .csv file.
- Verify that your file has the header line.
- Check that the file has a line containing the correct column names, in the correct order, and that none are missing.
- Check that the correct number of fields are in the import file for each record.
- Review the ACTION column entries to make sure they are correct.
- Check that the file contains <EOF> on the first cell of the last line.
B. At the processing stage:
When you select Menu > Reprocess, the system attempts to update (add, or delete) data using the imported data. The number of records successfully processed appears on the [Field] Import... list, and errors in processing each record are logged.
To see the errors:
- Next to the imported file on the list, click Menu > View Import Details. The imported records appear.
- Review the Processed and the Errors columns for each record to determine which have errors.
In the Processed column, Yes indicates that the record successfully updated, was deleted, or changed. If the field is empty, the record has a problem, and the system could not process it. The Errors column will then contain Yes.
- Click View Errors to get a list of the problems with the record. In most cases, you will want to go back to the .csv file, correct the data, and re-import the file.
When your file has successfully processed and is complete, return to the GL table for the financial reporting fields that you uploaded and verify that the contents are what you expect.
- From the General Ledger main Contents, select Tables > Financial Reporting Fields.
Require a Financial Reporting Field Value on GL Accounts
With any GL account, you can flag one or more financial reporting fields as "required" when you create records that generate transactions in the account. For example, on a requisition or a requisition line, a user must select a financial reporting field if the GL account for the supply expense requires the field. The requirement would apply to any record that supports financial reporting fields and that generates transactions for the account. (Table 1 lists the application areas where financial reporting fields can be entered.)
In some cases, such as with requisitions, users can enter a financial reporting field on the header or on individual detail lines. If the associated GL account requires a financial reporting field, and no field is selected on the header, then the user must enter a field on the lines. If no field is selected at all, a message appears to remind the user.
If you use project codes with General Ledger accounts, you will find that using financial reporting fields is similar.
To require a financial reporting field for a GL account,
- From the ERP main General Ledger contents, select Account Management > GL Accounts.
- The list of your accounts appears.
- Locate the account code of interest.
- Click the edit icon or Menu > Edit. The account information panel appears.
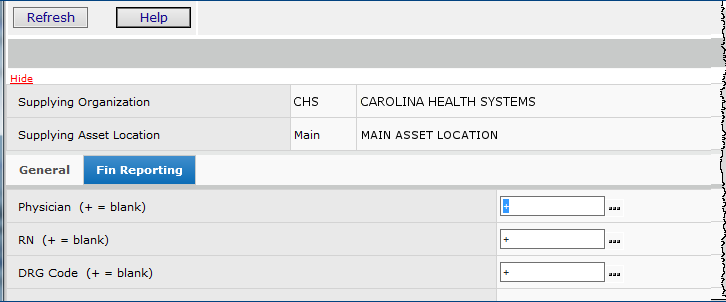
- Click the Fin Reporting tab (Figure 9).

Figure 9 - Requiring Values for a Financial Reporting Field for a GL Account's Transactions
- Select the financial reporting field for which you wish to require values when a transaction is created in the account. In Figure 9, the user is requiring values for the Physician field for the given account.
- Click Submit.
Application Panels with Available Financial Reporting Fields
Table 1 lists application features where financial reporting fields, Project, and Code fields are available for selection or simply displayed.
The Path column summarizes how to access the financial reporting fields. Project and Fund Codes are also referenced in the table, since those values can be used as reporting fields as well. The table does not attempt to explain how to use each application feature in depth. To get detailed instructions -- e.g., how to create a purchase order or invoice -- click the Details link.
The figures in Table 1 are for a hypothetical site with financial reporting fields: Physician, RN, and DRG Code. Your site may have different financial reporting fields, and may have fewer than three.
Notes:
- For records that contain both a header and detail lines -- purchase orders, invoices, and others -- you can set default values for Project, Fund, and financial reporting fields on the header. Those values apply to the entire set of lines -- e.g., invoice lines -- unless one or more lines has had these values specified individually. In that case, the line value overrides the header default (if any). You can also specify financial reporting fields for lines only, and not in the header.
- Also, keep in mind that if a financial reporting field is required by the GL account where transactions are generated -- e.g., a departmental expense account for a requisition -- you must select a financial reporting field value. An error message will appear, otherwise.
Abbreviations:
MM = Materials Management
GL= General Ledger
AP = Accounts Payable
Links to contents in Table 1:
Table 1 - Financial Reporting Fields, Project, and Fund Codes in ERP Application Features
Application Area |
Paths and Example Panels All paths begin with the MM, AP, or GL main Contents. |
Set Up Funds: Fund Table
List, create, edit Fund Codes
|
MM or AP > Tables > Funds
A list of fund codes appears, if any exist.
The List of Fund Codes
- To create a new Fund Code, click New.
- Enter values in fields as needed.
- To edit an existing fund code, next to the Fund Code, click the edit icon or Menu > Edit.
Details: Using Accounts Payable Tables.
|
Set Up Projects; Project table
List, create, edit Project Codes
|
MM or AP > Tables > Projects
A list of project codes appears, if any exist.
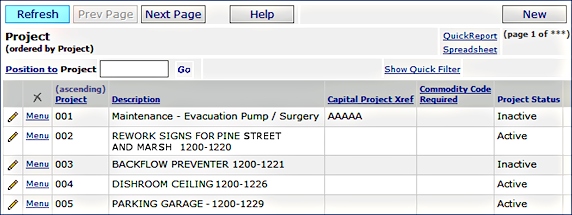
The List of Project Codes
- To create a new Project Code, click New.
- Enter values in fields as needed.
- To edit an existing project code, next to the Project Code, click the edit icon or Menu > Edit.
Details: Using Accounts Payable Tables.
|
Set Up Financial Reporting Fields
List, edit
|
GL > Tables > Financial Reporting Fields
The Financial Report Fields panel appears. If values have been defined, they are listed. Otherwise, No Data is displayed.
Entering Values for Financial Reporting Fields
- To create a new value for a financial reporting field,
- Select the tab for the field name. The General panel appears.
- Enter values in fields on the General panel.
- Click Save.
You can enter more values, click Finish Now, or Finish Later.
- To edit a financial
reporting field value,
- Click the edit icon
or Menu > Edit next to the value in the list at the bottom.
The values will be available for selection in financial reporting fields on other records, such as invoice lines and journal vouchers, among others (as below).
Details: Entering Values for Financial Reporting Fields in the GL Table
|
Journal Vouchers
Journal Voucher Imports
Journal Voucher Inquiry
Create, edit, inquire
|
GL > Journal Vouchers > Journal Vouchers
The Journal Vouchers list appears.
- To edit a journal voucher and display its lines,
- Click the edit icon or Menu > Edit.
Note: You cannot edit a posted JV.
- Click New to create a new journal voucher. The journal voucher header appears.
Journal Voucher Header
- Enter header information and click Submit. The Journal Entry panel opens for you to enter journal voucher lines.
Journal Entry Lines
- As you enter each line and click Submit and Refresh, the line appears at the bottom.
Panel for Entering Journal Voucher Lines
Project and Fund code fields are on the General tabbed panel.
The Fin Reporting tabbed panel contains the financial reporting fields for selection.
Each journal entry line displays the selected financial reporting fields, which can be edited.
Journal Voucher Inquiry
- Click i or Menu > Inquiry next to a journal voucher on the Journal Vouchers list.
The Journal Voucher Inquiry panel appears:
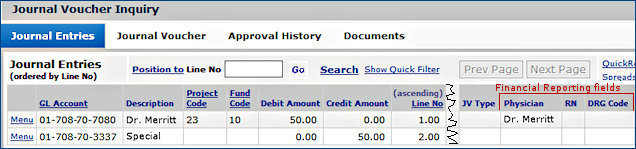
Journal Voucher Inquiry
Journal Voucher Chase
- On the JV Inquiry panel, next to a line, click Quick Chase; or Menu > Quick Chase; or Menu > Chase to GL Transactions. The chase appears. Financial reporting fields are on the far right.
Quick Chase for a JV Voucher Line
(Chase to GL Transactions is similar)
Journal Voucher Imports List
GL > Imports/Exports > Journal Voucher Imports
The Journal Vouchers Imports list appears.
- Locate the journal voucher import file of interest on the list.
- Click Menu > View Import Details.
The Journal Voucher Import Header panel appears.
- Click View Details.
The Journal Voucher Import Details panel appears. Lines on the journal voucher are listed.
- To display the financial reporting columns on a detail line, scroll right.
Imported Journal Voucher Detail Lines
Edit Journal Voucher Import Lines
- To change the values of a financial reporting field on any detail line of interest,
- On the Journal Voucher Import Details panel, next to the line of interest, click Menu >Edit or the edit icon.
- The edit panel appears.
- Financial reporting fields are on the Fin Reporting tabbed panel.
Imported Journal Voucher Detail Line - Edit Panel
Details: Work With Journal Vouchers |
Recurring Journal Vouchers
Create, edit, inquire
|
GL > Journal Vouchers > Recurring Journal Vouchers
A list of recurring journal vouchers appears, if any exist.
- To edit a recurring JV, click the edit icon or Menu > Edit.
- To create a new recurring JV, click New. The header panel appears.
Recurring Journal Voucher Header
- Enter header data.
- Click Submit. The Recurring Journal Voucher panel opens.
Recurring Journal Voucher Lines
- Enter data for each JV line on the General tabbed panel.
- Project and Fund code fields are on the General tabbed panel.
- Financial reporting fields are on the Fin Reporting tabbed panel.
Recurring Journal Voucher Lines
- Click Save.
- Click Refresh. Lines appear at the bottom under Recurring Journal Voucher Lines.
Each selected financial reporting field is visible and can be edited.
Details: Work with Journal Vouchers - Recurring JVs |
Journal Voucher Template
Create, edit
|
GL > Journal Vouchers > Journal Voucher Templates
A list of journal voucher templates appears, if any exist.
- To edit a JV template, click the edit icon or Menu > Edit.
- To create a new JV template, Click New. The header panel appears.
Journal Voucher Template Header
- Enter header data.
- Click Submit.
- The Journal Voucher Template panel opens for you to enter lines.
Journal Entry Lines on Template
- Enter data for each JV line on the General tabbed panel.
- Project and Fund code fields are on the General tabbed panel.
- Financial reporting fields are on the Fin Reporting tabbed panel.
Financial Reporting Fields on a Journal Voucher Template
- Click Save.
- Click Refresh. Lines appear at the bottom under Journal Voucher Template Lines.
- For each line, the financial reporting fields are on the far right.
- Each selected financial reporting field is visible and can be edited.
Details: Work with Journal Vouchers - JV Template |
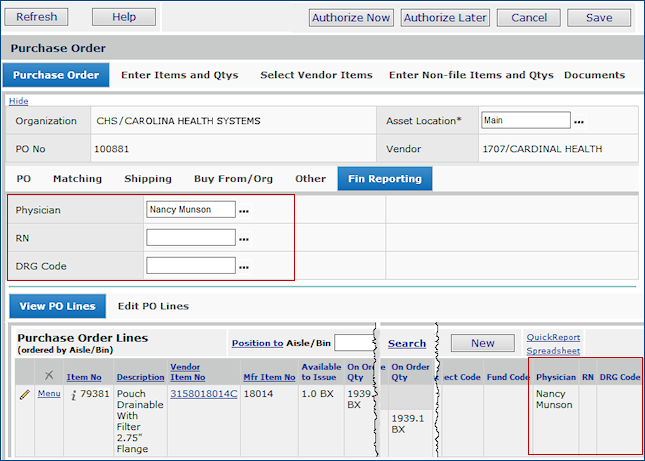
Purchase Orders
Create manually, edit
|
MM > Purchasing > Purchase Orders (by PO) or MM > Purchasing > Purchase Orders (by Create Date)
The list of purchase orders appears.
- To edit an existing, unauthorized PO, next to the PO, click the edit icon or Menu > Edit.
- To create a new PO, click New. The header panel appears.
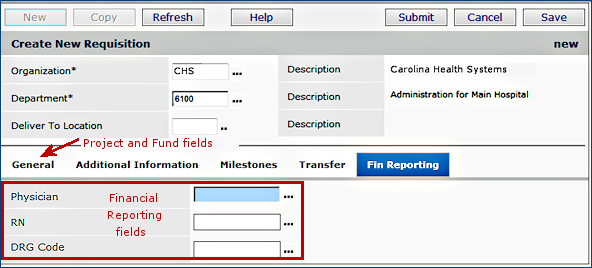
Purchase Order Header
- Enter data on the header panel.
- Financial reporting fields are on the Fin Reporting tabbed panel. Project, and Fund codes are on the additional information panel. These fields specify default values for the entire PO.
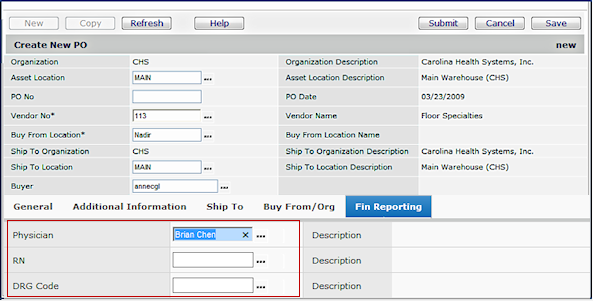
The Purchase Order Header Panel
- Click Submit. A panel that summarizes the PO data (so far) appears, with a section for entering PO lines.
New Purchase Order Lines - File Items
On the Purchase Order tabbed panel, View PO Lines and Edit PO Lines tabs are at the bottom.
Financial reporting fields that you selected in the PO header propagate to each line. You can select different values in these fields for individual PO lines. You can also delete financial reporting fields for a line. If no fields have been entered for the header, you can specify fields for any lines, as needed. Values that you select for a PO line override any defaults from the header for that line.
New Purchase Order Lines - Non-File Items
- On the top of the Purchase Order panel, click Enter Non-file items and Quantities add purchase order lines for non-file items.
- Enter item information on the General tabbed panel.
-
Enter financial reporting field values on the Fin Reporting tabbed panel.

The Purchase Order Line Panel: Non-File Item
Existing Purchase Order Lines - Editing
- To edit a PO line and add, delete, or change financial reporting field values:
- On the Purchase Order panel, at the bottom, click the tab Edit PO Lines.
- Locate the line of interest.
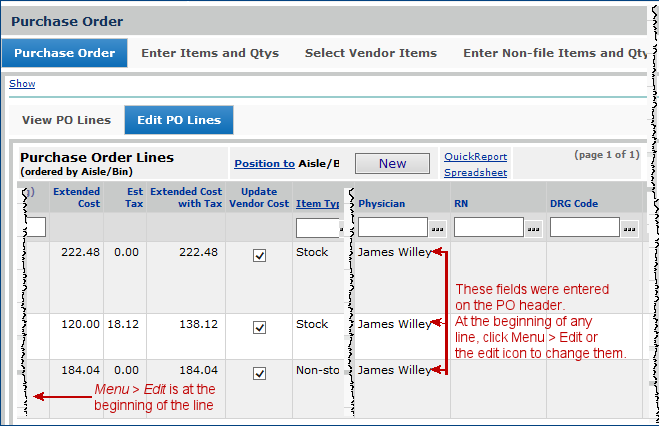
Editing a Purchase Order Line on an Unauthorized PO
- Click Menu > Edit or the edit icon at the beginning of the line. The edit panel appears.
- Click the Fin Reporting tab to edit the financial reporting fields.
Requisitions auto-created from manual POs: When you create a purchase order manually, the system generates a matching requisition. Any financial reporting fields that you selected for the PO propagate to the system-generated requisition, and can be displayed. See the section on Requisitions.
Details: Create a Purchase Order Manually
Moving a Purchase Order Line
- On the Purchase Orders list, next to the purchase order you wish to change, select Menu > Move
PO Lines.
- A panel appears that asks you to enter the new vendor for the PO line or
lines.
- Enter information on the panel and click Submit.
- The system displays the purchase order's lines.
- Select the lines for which you are changing the vendor.
- Click Next.
- The panel refreshes and displays the moved purchase order line(s) at the bottom.
- Click the Fin Reporting tab to enter financial reporting field values.
- Edit the line to display/change financial reporting field values on the Fin Reporting tabbed panel.
Moving a Purchase Order Line
Details: Moving a PO Line/Changing the PO Vendor |
Match Purchase Order Invoices
Create, edit
|
MM or AP > Invoicing > Create Invoice From Purchase Order
QuickClick appears.
- Click Show All. A list of POs available for invoice matching appears.
- Locate the PO of interest on the list.
- Click Create Invoice From PO. The invoice header appears.
Invoice Header
- Enter invoice header data.
On the Fin Reporting tabbed panel, financial reporting fields are available for you to enter values. The values apply to the entire invoice. Similarly, on the General tabbed panel, you can select Project, and Fund codes for the entire invoice. (You can also enter values when you create each invoice line.)
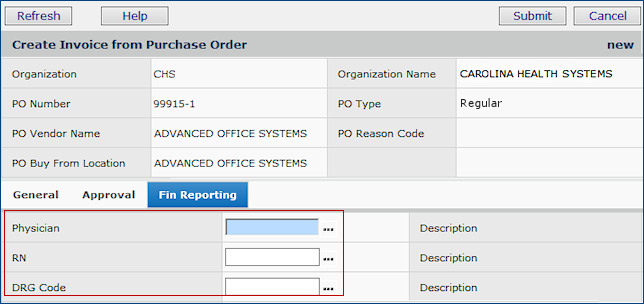
Matching a PO with an Invoice - Header
- Click Submit. The Invoice for PO panel opens for you to enter lines.
Invoice Distribution Lines
On the Invoice for PO panel,
- Use the the Distribution panel to create lines for the invoice.
- Project and Fund code fields for each line are on the Distribution panel.
- Open the Fin Reporting tabbed panel to select fields for each separate line.
- For lines that you have already entered, financial reporting fields are on the right. You can edit the values in these fields, or enter missing values.
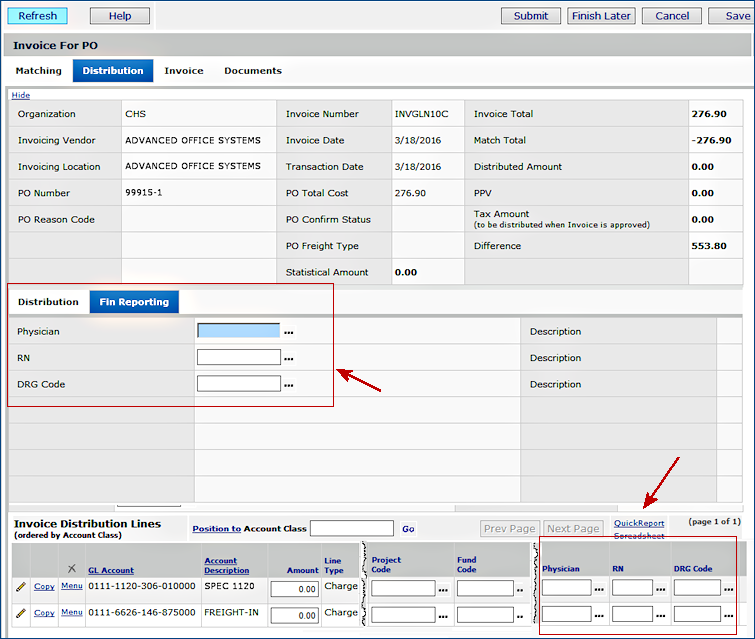
Matching a PO with an Invoice - Lines
Details: Match Purchase Order Receipts with Invoices |
Manual Invoices
Create, edit
|
AP > Invoicing > Invoices
The Invoice List appears.
- To edit an existing invoice,
- Locate the invoice.
- Click the edit icon or Menu > Edit
- To create a new invoice, click New. The header panel appears.
Manual Invoice Header
- Enter invoice header data.
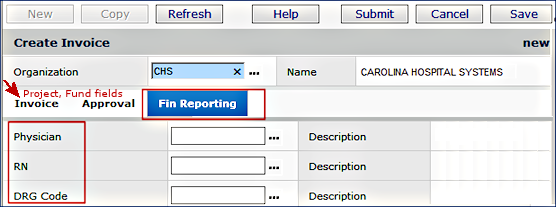
Manual Invoice Header
On the Fin Reporting tabbed panel, you can select default financial reporting fields for the entire invoice.
On the Invoice tabbed panel, you can select default Project and Fund codes. (You can also enter values to override default project and fund codes when you create each invoice line.)
- Click Submit. The Manually Created Invoice panel opens for you to enter lines.
Invoice Distribution Lines
- To create invoice lines and enter Project, Code, and/or financial reporting fields, use the center of the Manually Created Invoice panel.
- Click the Fin Reporting tabbed panel to enter financial reporting fields.
- Click the Distribution tab to enter Project and Fund codes for any line.
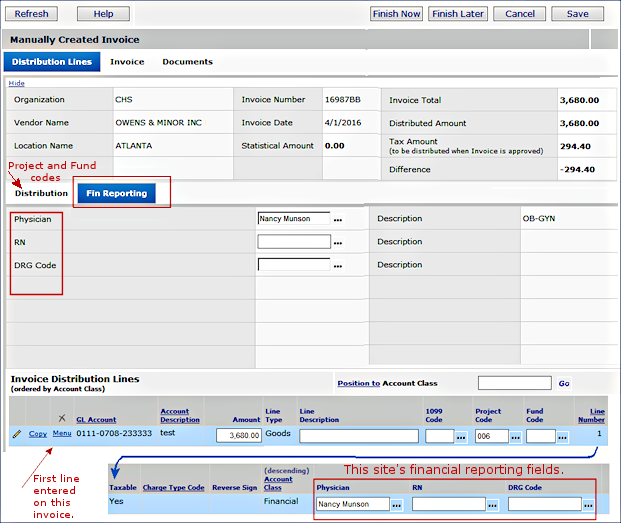
Manual Invoice Line - Create/ Edit
- To edit an existing line, at the bottom of the panel under Invoice Distribution Lines, click the edit icon, or Menu > Edit.
Details: Create Manual Invoices |
Invoice Approval
Review invoice
|
AP or MM > Invoices > My Invoice Approval Queue or All Invoice Approval Queues
The list of invoices awaiting approval appears.
- Locate the invoice of interest.
- Click Review Invoice.
- Click the Invoice tab. A panel displays the invoice.
Invoice Review for Approval
The Financial Reporting fields are on the Fin Reporting tabbed panel.
The Default Project Code and Default Fund Code fields are on the General tabbed panel.
Details: Invoice Approval Processing |
Unapproved Invoice Accruals
|
AP > Invoices > Unapproved Invoice Accrual
A panel appears to select the invoices for accrual.
For any invoices containing financial reporting fields, the accrual process picks up and includes the fields.
Details: Unapproved Invoice Accrual |
Inventory Quick Issue, Charge Only
Create, edit from Item Inventory
|
MM > Inventory > Item Inventory or Inventory > Item Inventory - All Locations
The list of items in the inventory appears.
- Locate the item of interest.
- Click Menu > Quick Issue To Department.
A panel appears to enter lines for the departments that the item is being issued to, and quantities.
As you add lines, they appear at the bottom of the panel, and can be edited.
After you create a quick issue line, you can edit the line to select a Project code, Fund code, and financial reporting fields.
- To create a new line, enter values on the General tabbed panel.
- Click Save and Refresh. The line appears at the bottom of the panel.
- To edit a line and add financial reporting fields, project, or fund codes, at the bottom of the Inventory Quick Issue Charge Only panel, locate the line and click the edit icon or Menu > Edit.
- The Quick Issue Line panel appears.
- Financial reporting fields are on the Fin Reporting tab.
Financial Reporting Fields for a Quick Issue Line
Note: From the Warehousing menu, you can create quick credits for multiple different items.
Details: Create Quick Issues - Charge Only |
Inventory Quick Credit, From Department
Create, edit from Item Inventory
|
MM > Inventory > Item Inventory or Inventory > Item Inventory - All Locations
The list of items in the inventory appears.
- Locate the item of interest.
- Click Menu > Quick Credit from Department.
The Inventory Quick Credit from Department panel appears for you to enter item quantities, organizations, and departments for the credit, and a Reason Code.
- Enter values on the File Items tabbed panel
- Project and Fund codes are on the Overrides tabbed panel. These fields apply to all the lines on the Quick Credits. You can also set Project and Fund codes for individual lines.
-
Click Save and Refresh. The line appears at the bottom of the panel.
- To edit a line and add financial reporting fields, project, or fund codes, at the bottom of the Inventory Quick Credit from Department panel, locate the line and click the edit icon or Menu > Edit.
The Department to Inventory Credit panel appears.
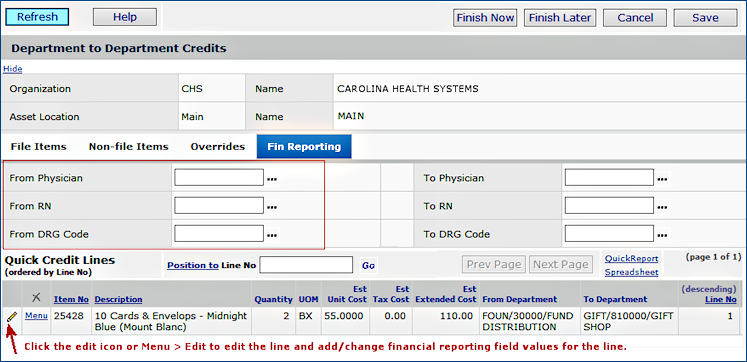
Financial reporting fields are on the Fin Reporting tab.
Financial Reporting Fields for a Department-to-Inventory Quick Credit
Details: Department-to-Inventory Quick Credits
Note: You can also create quick credits for multiple items (including non-file items) from the Warehousing menu. You can inquire on a quick credit and edit quick credits that have not been finished. |
Inventory Quick Issue
Order Guide Quick Issue
Inventory Quick Issue Charge Only
Create, edit from Warehousing |
MM > Warehousing > Quick Issues
The list of quick issues appears, if any exist.
- Click New. The header appears.
- In the Quick Issue Type field, select one of these:
- Inventory Quick Issue
- Inventory Quick Issue - Charge Only
- Order Guide Quick Issue
- Click Submit. The Quick Issue panel appears.
Inventory Quick Issue and Inventory Quick Issue - Charge Only
Here is the Inventory Quick Issue panel. Financial reporting fields are on the Fin Reporting tabbed panel.
When you add a line to the Quick Issue, the financial reporting field appear in the columns on the right. The values can be edited if you edit the line. Panels for all three types of quick issues are similar.
Inventory Quick Issue Panel
- On the General tabbed panel, you specify item information. You can assign a Project Code and/or Fund Code to each item line.
- On the Fin Reporting tabbed panel, financial reporting fields are available for selection.
For each line that you create, at the bottom of the panel, the line appears, with the Project and Fund codes, if any, and the financial reporting fields.
- Click the edit icon or Menu > Edit to edit the line and the financial reporting field values.
Order Guide Quick Issue
Order Guide Quick Issues have no financial reporting fields or tabs.
When you create an Order Guide Quick Issue, the lines from the order guide with financial reporting fields assigned transfer to the requisition. You can edit the requisition line or inquire to display the financial reporting fields. Once the requisition has been approved, then any lines for non-stock items are written to a purchase order.
Details:
Using Inventory Quick Issue
Using Order Guide Quick Issue
Using Inventory Quick Issue Charge Only |
Department to Department Credit
Return to Vendor Credit
Department to Inventory Credit
Department Cost Adjustments
Create, edit from Warehousing
|
MM > Warehousing > Quick Credits
The list of quick credits appears, if any exist.
- Click New. The header panel appears.
- In the Quick Credit Type field, select one of these:
- Department to Department Credit
- Return to Vendor Credit
- Department to Inventory Credit
Note: You can also select Department Cost Adjustment if you need to create a cost adjustment. But, financial reporting fields are not available on cost adjustments records created from Warehousing.
- Click Submit. The Quick Credit panel appears.
Here is the Department to Department Credit panel. Financial reporting fields are on the Fin Reporting tab.
Each line in the Quick Credit contains columns for each financial reporting field. The values can be edited if you edit the line.
Panels for all three types of quick credits are similar.
Department-to-Department Quick Credits
Details:
Department-to-Department and Department-to-Inventory Quick Credits
Return-to-Vendor Quick Credits and Department Cost Adjustment |
Requisitions, manual
Create, edit, inquire
|
MM > Requisitioning > Requisitions - All Depts or MM > Requisitions - Current Dept
QuickClick appears.
- Click Show All. The list of requisitions appears.
- To edit an open requisition, click the edit icon
or Menu > Edit next to the requisition of interest.
- To inquire on the requisition, click i or Menu > Inquiry.
- To create a new requisition, click New.
- For a new requisition, the requisition header panel appears.
- If you are editing or inquiring on a requisition that already has lines, the lines are at the bottom.
Requisition Header
- Enter or edit requisition header data.
The Requisition Header Panel
- On the Fin Reporting tabbed panel, you can select default financial reporting fields for the entire requisition.
- On the General tabbed panel, you can select default Project and Fund codes. (You can also enter values when you create each requisition line.)
- Click Submit. A panel opens for you to enter lines.
Requisition Lines
-
On the bottom of the panel (Requisition Lines), click New to create each requisition line.
-
To edit an existing line, click the edit icon or Menu > Edit.
- For each line, you can override the default Project and Fund code values specified in the requisition header (if any).
Or, if no defaults are set, you can enter values just for the line.
- Similarly, you can enter values on a line's financial reporting fields to override the default header values.
-
Project and Fund code fields for each line are on the Overrides tabbed panel.
-
Financial reporting fields for each line are on the Fin Reporting tabbed panel.
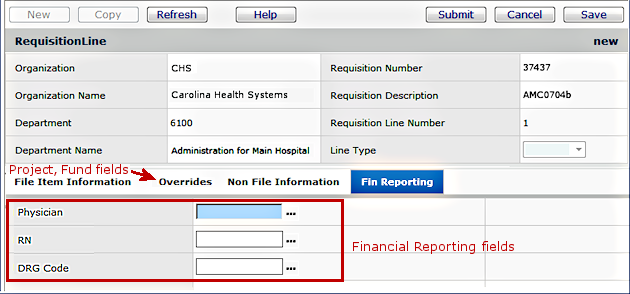
The Requisition Line Panel Open to the Fin Reporting Tab for Editing
- As you add each line to the requisition, it appears at the bottom of the Requisition panel. Columns for financial reporting fields are on the right.

A Line on a Requisition For Editing
- To inquire on an requisition line, from the list of requisitions,
- Click i or Menu > Inquiry next to the requisition.
The Requisition Inquiry panel opens. The Lines Inquiry panel is visible.
- Click
i or Menu > Inquiry next to the line of interest. The financial reporting fields are on the line's Fin Reporting tab.
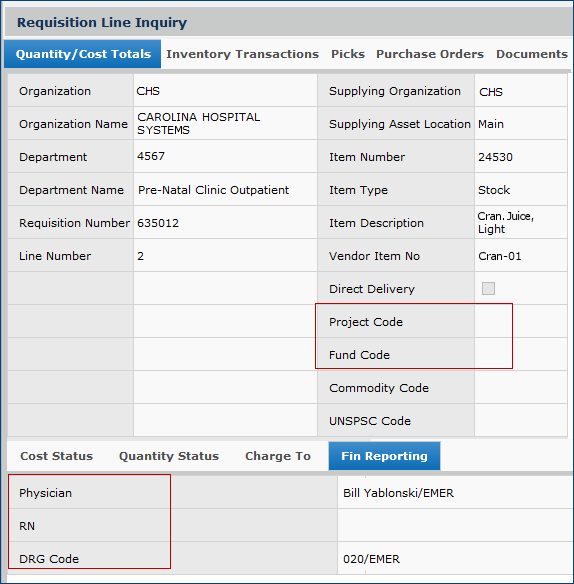
The Requisition Line Inquiry Panel Financial Reporting Fields
Details: Requisition File and Non-File Items |
Check Requests
Create, edit
|
MM or AP > Check Requests > My Check Requests
A list of check requests appears, if any have been created.
- To edit a check request, click the edit icon or Menu > Edit.
- To create a new check request, Click New. The Create Check Request header panel appears.
Check Request Header
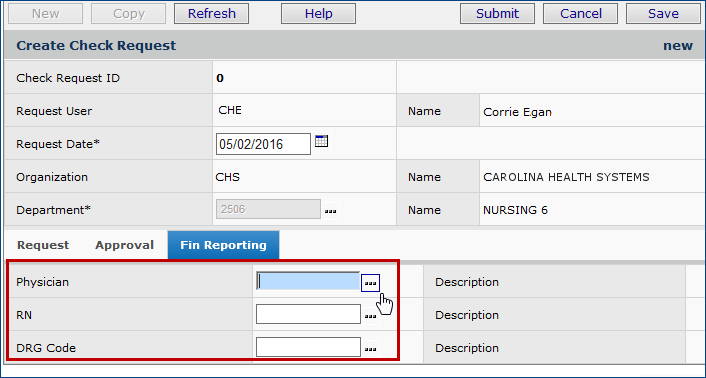
The Check Request Header Panel
- On the Fin Reporting tabbed panel, you can select default financial reporting fields.
- On the Request tabbed panel, you can select default Project and Fund codes.
If selected on the header, the financial reporting fields, Project, and Fund codes are the default values for the entire check request. (You can override these values for any line.)
- Click Submit. The Check Request Distribution panel opens for you to enter lines.
Check Request Lines
The Distribution panel appears in the center. As you enter lines, they appear below in the bottom panel Check Request Distribution Lines.
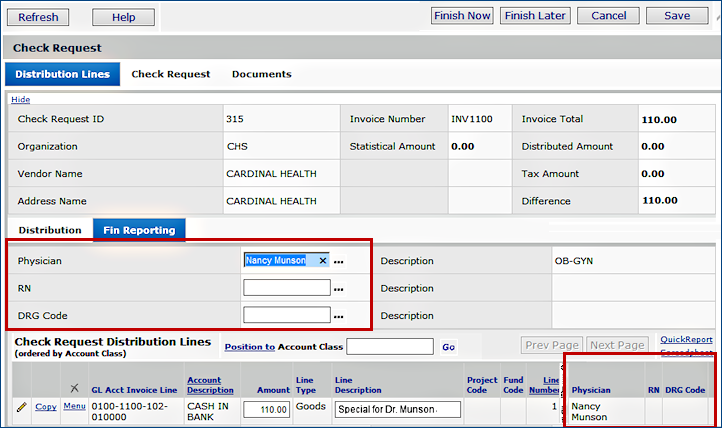
Check Request Edit Panel: Distribution Lines
- Enter data for check request lines on the Distribution panel.
For each line,
- On the Fin Reporting tabbed panel, you can select financial reporting fields for the line. If financial reporting fields exist on the header, when you enter them for a line, the line values override the header.
- Similarly, you can enter Project and Fund code fields on the Distribution panel for the line.
- Click Save. The line moves to the bottom of the panel.
Edit Check Request Lines
- To edit existing lines, on the Check Request Distribution Lines list (bottom of the edit panel) click the edit icon or Menu > Edit. The Fin Reporting tabbed panel lets you edit financial reporting fields for the line.
Edit Check Request Header
- To edit financial reporting field values for the header (so that the values will apply to any line that does not have its own financial reporting values set), click the top Check Request tab (next to the Distribution Lines tab), then click the Fin Reporting tab.
Check Request Review/Approval
MM or AP > Check Requests > My Check Request Approval Queue or All Check Request Approval Queues
A list of check requests appears for approval appears.
-To review a check request and edit or add financial reporting fields, locate the check request on the list.
- Click Review Check Request or Menu > Review Check Request.
The Check Request Review panel appears, similar to the Check Request Edit panel.
- To edit financial reporting fields for the check request header, click the top Check Request tab, then click the Fin Reporting tab.
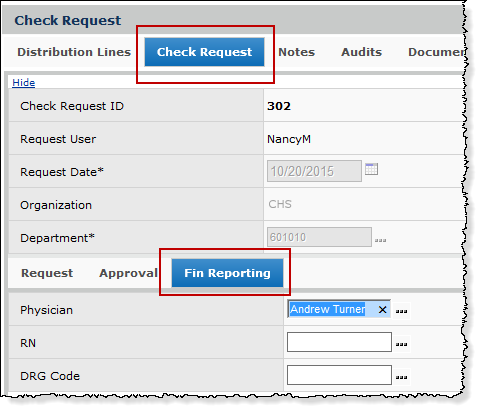
Editing the Financial Reporting Fields on a Check Request Header (Approval Queue)
- To edit financial reporting fields for any line, next to the line, click Menu > Edit or the edit icon.
- Then click the Fin Reporting tab.
Details Check Request Processing
|
Invoice Groups
Create, edit
|
MM or AP > Invoicing > Invoice Groups
QuickClick appears.
- To edit an existing invoice group, click I would like to ... Edit and enter an invoice group identifier.
- To view the list of all invoice groups, click Show All. You can also click Menu > Edit or the edit icon next to a group on the list.
- To create a new invoice group, click New. The Invoice Group panel appears.
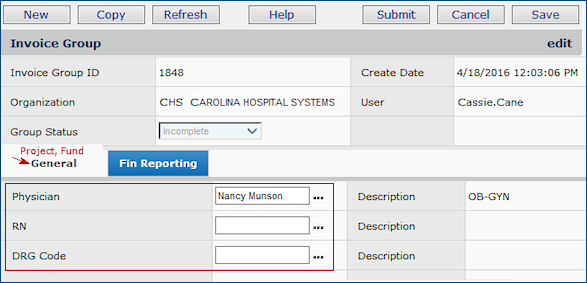
The Invoice Group Create Panel
- The Default Project Code and Default Fund Code fields are on the General tabbed panel. If you enter values, they apply to all invoices in the group, unless you set values independently for an invoice.
- The Fin Reporting tabbed panel contains default financial reporting fields for the invoice group. You can also override these values on individual invoices.
Details: Working with Invoice Groups |
Vendor Override by Organization
Create, edit
|
MM or AP > Vendors > Vendors
QuickClick appears.
- Click Show All to display the vendors list.
- Locate the vendor of interest.
- Next to the vendor,
select Menu > Overrides by Organization. If overrides have been created, they are listed.
- To edit values in an existing vendor override, click the edit icon or Menu > Edit.
- To create a new set of vendor overrides, click New.
- The Vendor Overrides by Organization panel appears.
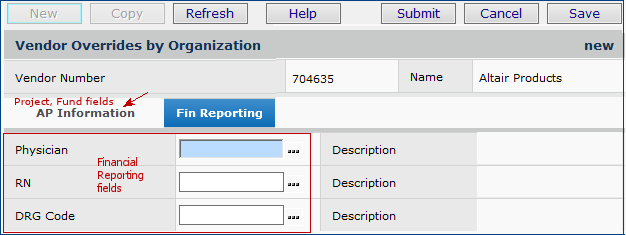
The Vendor Overrides by Organization Panel
The Fin Reporting tabbed panel contains default financial reporting fields.
- Select fields as needed for the vendor.
The Default Project Code and Default Fund Code fields are on the AP Information tabbed panel.
Details Override Vendor AP Locations by Organization |
Vendor Record: AP Information
Create, edit
|
MM or AP > Vendors > Vendors
QuickClick appears.
- To add a new vendor,
- Click New. The Add Vendor - Select Type panel appears.
- Enter data in the Add Vendor panel fields.
- Click Submit.
- To edit an existing vendor,
- Click Show All to display the vendors list.
- Locate the vendor of interest.
- Next to the vendor, select Menu > Edit or click the edit icon.
The Vendor panel (with many tabs) appears.
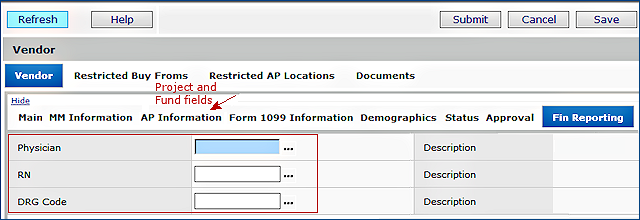
The Vendor Edit Panel
- In the second row, click the Fin Reporting tab.
- The Fin Reporting tabbed panel contains default financial reporting fields.
- In the second row of tabs, click AP Information.
- The Default Project Code and Default Fund Code fields are on the AP Information panel.
Details: Add a Vendor Record |
Par Carts
Create, edit
|
MM > Warehousing > Par Cart - All Locations
The list of par carts appears.
- To create a new par cart, click New.
- To edit an existing par cart, locate the par cart of interest and click the edit icon or Menu > Edit.
The Par Cart Header panel appears.
Par Cart Header
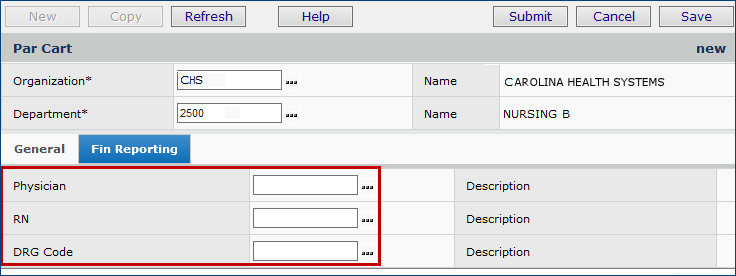
The Par Cart Header Panel - Create a New Par Cart
The Par Cart Header Panel -- Editing an Existing Par Cart
- You can select default financial reporting fields on the Fin Reporting tabbed panel.
If you enter default values, they apply to all items in the par cart, unless you set values on an item line.
- Default Project and Fund codes are on the General tabbed panel.
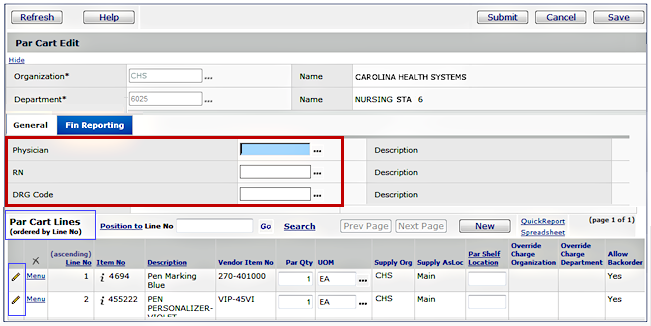
Par Cart Lines
When you create par cart lines, they appear at the bottom of the Par Cart panel.
To specify financial reporting values, Project, and/or Fund codes for an individual par cart line,
- On any par cart line, click Menu > Edit or the edit icon.
-
Financial reporting fields are on the Fin Reporting tabbed panel.
The values that you enter for a line override any defaults set for the entire par cart.
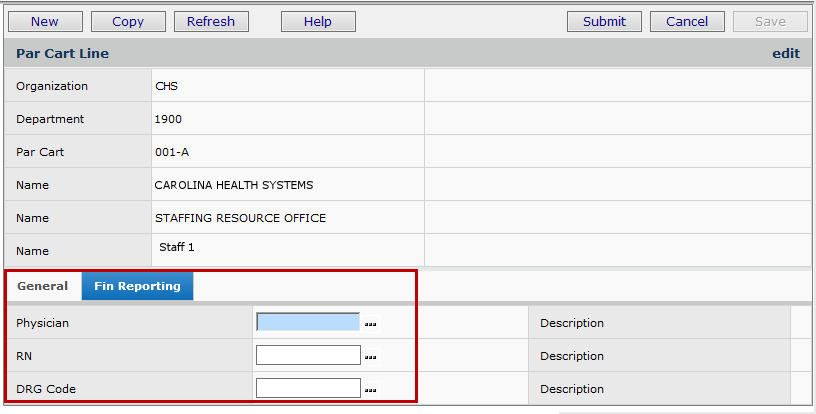
Financial Reporting Fields on a Par Cart Line
Details: Par Level Replenishment |
Order Guides
Create, edit
|
MM > Warehousing > Order Guides - All Locations
The list of order guides appears.
- To edit an existing order guide header, locate the order guide of interest and click the edit icon or Menu > Edit.
- To create a new order guide, click New. The Order Guide header panel appears.
Order Guide Header
- For a new order guide, enter header information on the General tabbed panel.
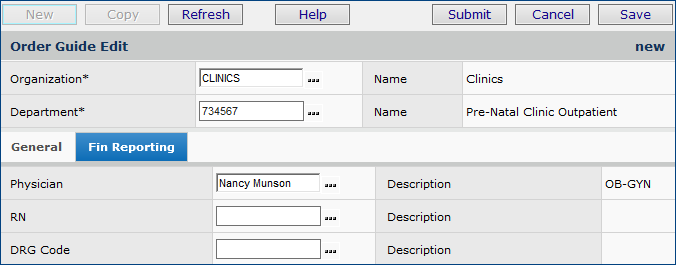
Order Guide Header Panel: Financial Reporting Fields
- Default Project and Fund codes are on the General tabbed panel.
- You can select financial reporting fields on the Fin Reporting tabbed panel.
- If you enter default values, they apply to all item lines in the order guide, unless you set values on an item line.
- For a new order guide, click Submit. The Add Items To Order Guide panel appears.
Order Guide Lines
- Financial reporting fields are on the order guide line. Scroll to the far right side. You can select values for just the line.
- For an existing order guide, click Menu > Edit or the edit icon to edit the line and enter financial reporting field values.
- The financial reporting field values that you enter for a line override any defaults set for the entire order guide.
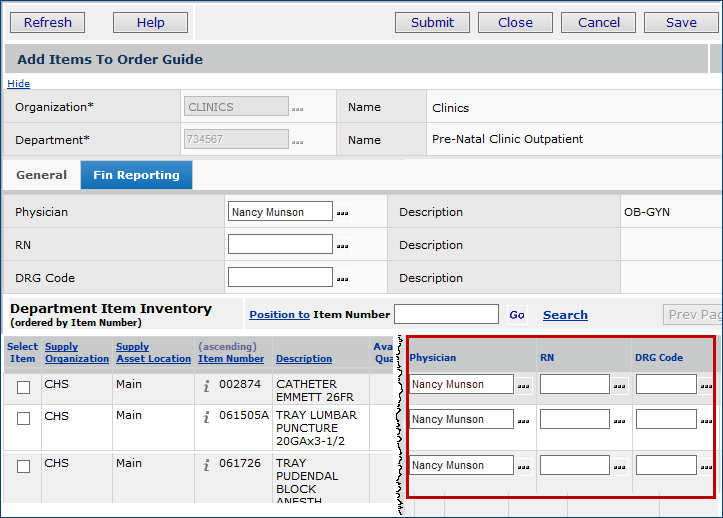
Order Guide Lines Panel: Financial Reporting Fields
Details: Create an Order Guide |
Order Guide Requisitions
Create
|
MM > Requisitioning > Order Guides for Requisitioning or Order Guides for Requisitioning - My Departments
Quick Click appears.
- Click Show All. The list of order guides available to you appears.
- On the list, locate the order guide of interest.
- Click Create Requisition from Order Guide. The order guide header appears.
- Click the Fin Reporting tab to enter financial reporting fields for the entire order guide requisition.
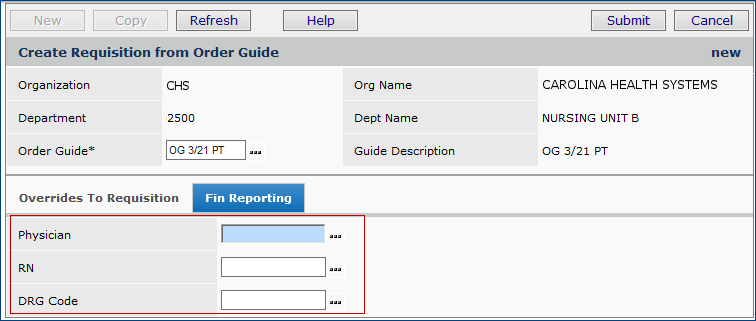
Creating an Order Guide Requisition - Header
- Click Submit. The Requisition panel appears. The panel contains lines for the requisition.
- Enter quantities on the lines of interest.
- Click Save.
- To enter or change financial reporting fields on a line,
- Click Preview Requisition Lines. A list of lines appears.
- Each line contains the financial reporting fields entered on the order guide requisition header (if any).
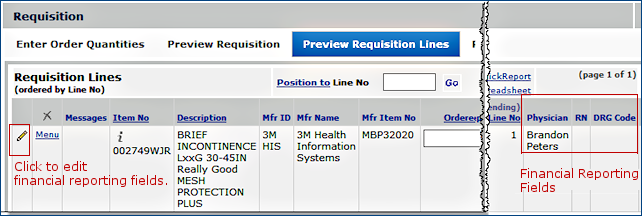
Order Guide Requisition Line Preview
- Next to the line of interest, click the edit icon or Menu > Edit.
- The financial reporting fields are on the Fin Reporting tabbed panel.
- You can change, add, or deleted values of the financial reporting fields for the line.

Order Guide Requisition Line Edit Financial Reporting Fields
Details: Using an Order Guide to Requisition Items |
Order Guide/Par Cart Mass Maintenance
|
MM > Warehousing > Mass Maintenance for Order Guides and Par Carts
A list of Mass Maintenance jobs appears.
- To create a new order guide or par cart mass maintenance job,
- Click New. The Mass Maintenance header panel appears.
- In the Mass Maintenance Object Type field,
specify whether
you are adding an item to par carts or order guides.
- In the Mass Maintenance Action field, select the action: add, delete, update, or replace.
- Enter the Selected Item Number, and if relevant, the Replace With Item Number.
- Click Submit. The selection panel appears. Select one or more par carts/order guides.
Below is an example of the mass maintenance panel where you can select order guides for mass maintenance. The par cart list is similar.
On the list of order guides/par carts, financial reporting fields associated with the order guide/par cart appear on the far right.
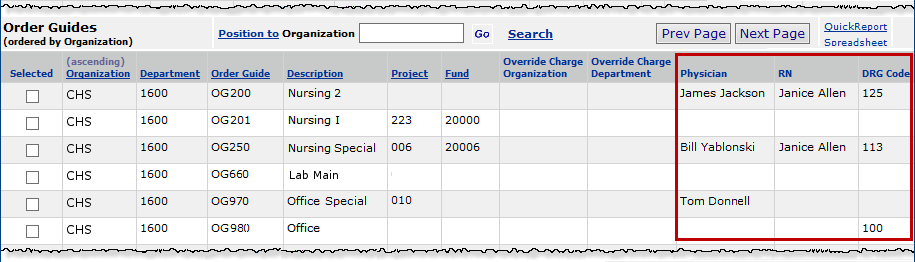
Order Guides for Selection -- Mass Maintenance
- On this panel, select order guides where the action you identified (replace, add, delete, or update) should occur.
- Click Submit. A panel appears for specifying values for the identified action (replace, add, or update).
- Click the Fin Reporting tab to set the financial reporting field values. Below is an example for order guides. The par cart panel is similar.
Order Guide Mass Maintenance Panel for Financial Reporting Fields.
Details: Maintain Par Carts and Order Guides |
GL Transactions
View
|
These paths let you view GL transactions. Each GL transaction includes financial reporting fields, if set up at your site.
The example below is a GL transaction for an invoice.

GL Transactions for an Invoice
For invoices:
MM > Invoicing > Invoices > Menu > AP Transactions > GL Transactions or AP > Invoices > Menu > AP Transactions > GL Transactions
Details:
Match Purchase Order Invoices with Receipts
Create Manual Invoices
For inventory:
MM > Inventory > File Item Transactions or Non-File Transactions > GL Transactions
For GL Exports:
On the GL Transaction Preview panel, when creating a GL export file,
MM or AP > Imports/Exports (and Financials) > GL Exports > New
Details: Create a GL Export File
For pending GL export files whose status for transfer via Pulse is Ready:
MM > Imports/Exports and Financials > GL Exports > Menu > View Transactions or AP > Imports/Exports > GL Exports > Menu > View Transactions
Details: View a General Ledger Export File
For General Ledger journal voucher import details:
GL > Imports/Exports > Journal Voucher Imports > Menu > View Import Details > menu > View Details
Details: Importing Journal Vouchers from an Excel Spreadsheet
For GL journal voucher chase to inventory transaction:
GL > Journal Vouchers > Menu > Inquiry
- Journal entries appear.
- Next to a journal entry, click Quick Chase or Menu > Chase to GL Transactions.
Details: Work with Journal Vouchers |
Report Objects that Contain Financial Reporting Fields
The report objects include financial reporting fields.
| General Ledger Detail by Account |
Invoice PO Detail |
Par Cart |
| General Ledger Detail By Account YTD |
Invoice Distribution Details with Payment Info |
PO Header (no detail lines) |
| General Ledger Detail By Department |
Invoice Expense Analysis Detail |
PO: Summary Header and Complete Line Data (PO Header & Line View 1) |
| General Ledger Detail By Department YTD |
Invoice Expense Analysis Detail with Check Number |
PO: Complete Header and Summary Line Data (PO Header & Line View 2) |
| General Ledger Detail by Source |
Invoice Header and Distribution Detail |
PO Requisition Analysis |
| General Ledger Transactions MM |
Invoice Match Header |
PO with Related PO Lines, Receipts, Receipt Lines
(PO/PO Line/Receipt/Receipt Line) |
| General Ledger Transactions MM and AP |
Invoice Match Header, Detail, and PO Line |
Receipt Distribution Analysis (Receipt, Issue and Stock Transaction Detail) |
| Inventory Transactions File Items (Stock and Non-stock Items) |
Invoice PO NonFile Detail |
Requisition Details |
| Invoice Activity |
Invoice Recurring |
Requisition Details - Warnings and Errors |
| InventoryTransactions (File and Non-file Items) |
Journal Voucher |
Requisition Headers |
| Invoice Activity Summary |
Order Guide |
Department Expense Report
|
| |
|
Department Expense Report Custom |
Copyright © 2023 by Premier Inc. All rights reserved.
