Return-to-Vendor Quick Credits and Department Cost Adjustment
Version
Contents
Overview
Return to Vendor Quick Credits generates credit purchase orders for multiple items returned to vendors from departments (including asset locations) in a single step.
When you create a Return To Vendor Quick Credits transaction, you can specify stock items and non-stock items from purchase orders that are not direct delivery. Stock items that are not direct delivery do not require the From Organization and From Department fields to be completed. You can also specify non-file items.
On the Quick Credit edit panel, you can enter a restocking fee -- amount or percentage -- for returned items. The restocking fee propagates to the system-generated credit PO and to the invoice (when the credit memo from the vendor is available for matching).
Your organization may require return-to-vendor quick credits to undergo a process of review and shipment confirmation. This process is enabled by a flag on the MM Info tab of the Organization Edit panel: Credit PO Review Process Enabled. If this flag is selected, credit POs generated by Return-to-Vendor Quick Credit are routed through buyer review and shipment confirmation. (See Review of Return-to-Vendor Quick Credits.)
Tip: For non-stock items, use Department to Vendor quick credits, rather than Department to Inventory Quick Credits. Otherwise, you will need to create a credit PO.
Financial Reporting Fields
Your site may be set up to use Financial Reporting Fields in various parts of the application. Similarly, you may also be using Project Codes and Fund Codes.
Financial Reporting Fields, along with Project Code and Fund Code let you generate reports on non-account code fields. For example, your site might define Physician as a financial reporting field. Users could then select the physician name associated with a quick credit, for example.
If financial reporting fields are used by your site, the tab Fin Reporting appears on the panels. (Otherwise, this tab does not appear.) You can enter field values on the tabbed panel.
Details are in Using Financial Reporting Fields in ERP.
Security
Users who create Quick
Credits must have the proper authority set in the application. To assign authorities
to a user, see the discussion of User Settings.
For users who will create Return-to-Vendor Quick Credits, User is Buyer must be selected on the User Roles tab of the User setup/edit panel, and the Allow Return to Vendor Quick Credit field must be selected on the Authorities tab. Also, the role object "Credits" must be set to Create or higher.
For users who will review Return-to-Vendor Quick Credits, the field must be selected on the User Roles tab of the User setup/edit panel.
- For users performing Buyer Review, the role object "Credit PO Review" must be set to All for users who accept Credit POs on the Credit POs for Review panel.
- For users performing shipment confirmation, the role object "Credit PO Receipt Confirm" must be set to All for users who confirm shipment of returns on the Credit PO Confirm Receipt panel.
To
create quick credits to vendors:
-
From the main Contents,
select Warehousing > Quick Credits. The Quick Credits transactions list appears (Figure 1).
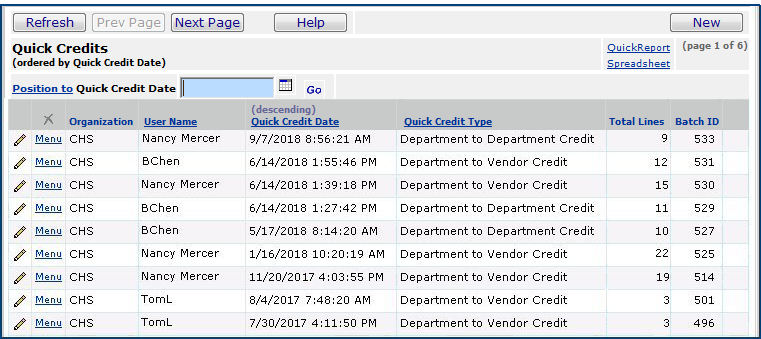
Figure 1 - Quick Credits Transactions List
- Click New. The Quick Credits header panel
appears (Figure 2).
Figure 2 - New Quick Credits Panel
-
In the Credit
Type field, select Return to Vendor Credit.
-
Click Submit.
The File Items, Non-file Items, and Overrides tabbed
panels appear. At the bottom is the Quick Credit Lines panel with
No Data for file items (Figure 3) and for non-file items (Figure 4).
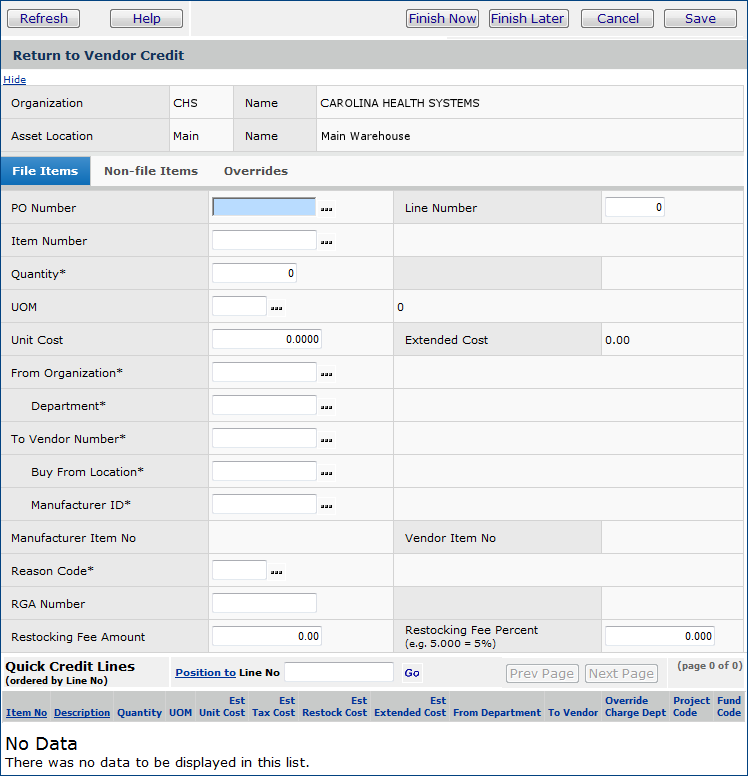
Figure 3 - Return to Vendor Quick Credits Edit Panel: File Items
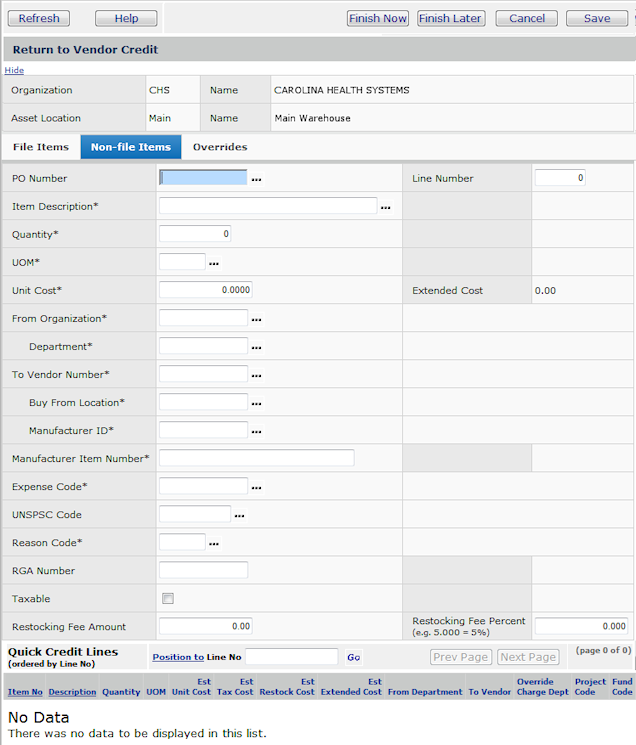
Figure 4 - Return to Vendor Quick Credits Edit Panel: Non-File Items
- Complete the information for any file item fields. (Click Help for information
on the fields.)
- Complete the information for any non-file item fields for credit.
- If you do not select a value in the PO Number field, the application assigns a number to the credit PO.
Note:
Selecting a PO is preferable since the system will use the original PO number with "C" attached for the credit PO. You will have a clearer association between the original PO and the credit PO.
- You can add a restocking fee amount or percent (but not both), and have the restocking cost included in the total credit amount.
- Enter the correct charge override information on
the Overrides panel, if needed.
- When you have entered information in the fields for each item, click Save.
- Click Submit.
- The item appears on the Quick Credit Lines panel.
- You can enter more items, if you wish.
Note:
To hide the header panel and show only the lines, click Hide.
Clicking Show opens the header again.
- When you are finished entering items, click Finish
Now (to submit the quick credit immediately) or Finish Later
(if you want to come back to it for more work later).
- Click Finish Now. The system asks you to verify submitting the quick credit.
- Click Submit. The system returns you to the Quick
Credits list.
- Clicking Finish Later returns you to the Quick
Credits list.
- Click Refresh to see your quick credit on the list.
Review and Shipment Confirmation of Return-to-Vendor Quick Credits
Organizations have the option to enable the review of Quick Credit, Return-to-Vendor batches by selecting a flag on the MM Info tab of the organization record (Figure 5).
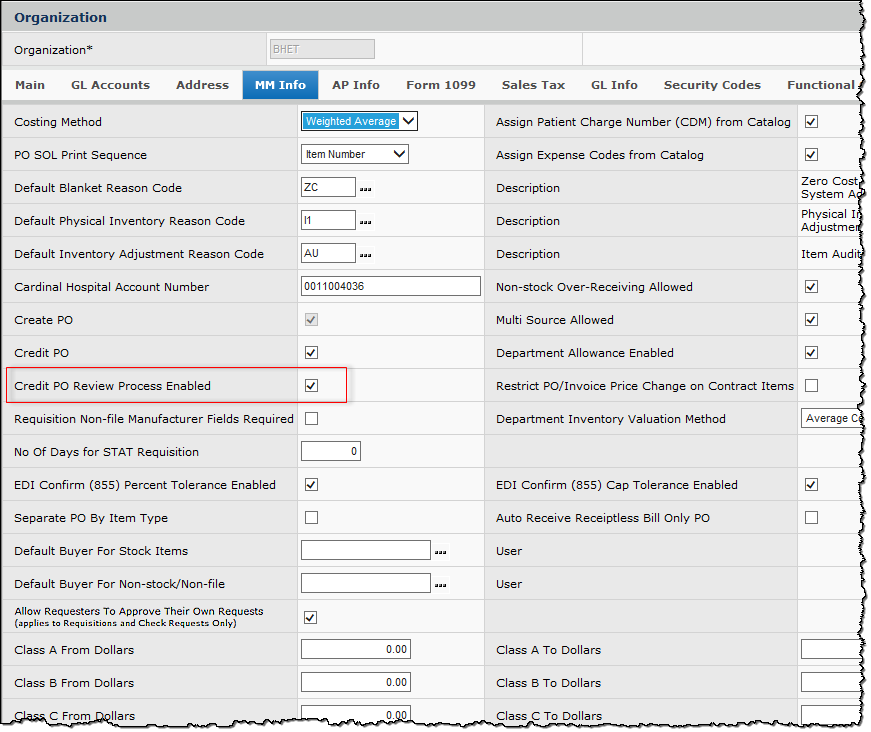
Figure 5 - Credit PO Review Process Enabled
For organizations with this feature enabled, Return-to-Vendor Quick Credits will be listed and editable on the Purchase Orders list panel, but they will also be directed through a two-part review: 1) a buyer review and 2) shipment confirmation.
The credit PO is first listed on the Credit POs for Review panel, accessible under the Purchasing menu (Figure 6). When the credit PO has been reviewed and accepted by the buyer, it is moved to the Credit POs for Confirm Shipment panel (Figure 7), accessible under the Receiving menu.
On the Credit POs for Review panel (Figure 8), the PO can be reviewed, edited, accepted, or canceled.
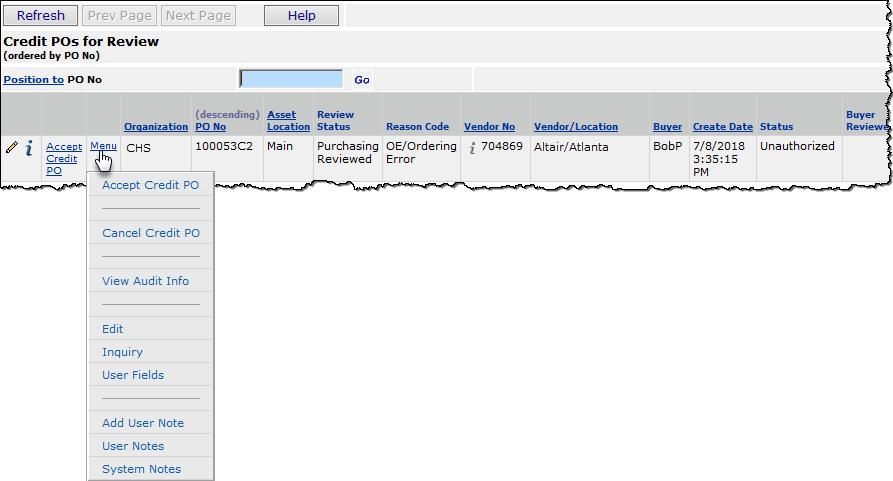
Figure 8 - Credit POs for Review
- To review: Click the inquiry i or edit
 icon, or Menu > Inquiry or Edit.
- To accept: Click the Accept Credit PO link or Menu > Accept Credit PO.
- To cancel:
- Click Menu > Cancel Credit PO, or
- Edit the PO and change all quantities to zero. When the edits are finalized, the credit PO is flagged as Purchasing Canceled.
On the Credit POs for Confirm Shipment panel (Figure 9), the PO can be reviewed and confirmed.
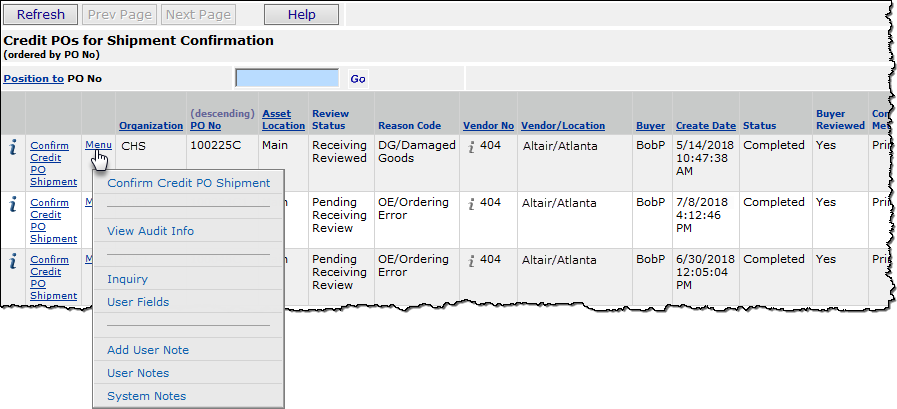
Figure 9 - Credit POs for Confirm Shipment
- To review: Click the inquiry i icon or Menu > Inquiry.
- To confirm shipment: Click the Confirm Credit PO Shipment link or Menu > Confirm Shipment.
Note: If the credit PO shipment is not yet confirmed, the credit PO may still be canceled. Locate the credit PO on the Purchase Orders list; edit the credit PO and change all quantities to zero. The credit PO will be flagged as Return Shipment Canceled.
On the Purchase Orders list, the new Credit Review field is a sortable field indicating whether the PO is flagged for the buyer review and shipment confirmation process. A second new field, Credit Review Status, displays one of the following review statuses:
- Pending Purchasing Review: The credit PO has been created and is currently awaiting review and acceptance by the purchasing personnel.
- Purchasing Reviewed: Purchasing personnel reviewed the PO, and no action has been taken to date.
- Purchasing Canceled: The credit PO was reviewed and canceled. No transactions were created and no further processing was performed. The credit PO is completed with zero quantities.
- Pending Receiving Review: The credit PO was reviewed and accepted by the purchasing personnel and now awaits review and confirmation of return shipment to the vendor by receiving personnel. The completed credit receipt awaits confirmation.
- Receiving Reviewed: Receiving personnel reviewed the PO, and no action has been taken to date.
- Return Shipment Canceled: The credit PO and receipt were reviewed and all quantities canceled by purchasing personnel. The credit PO and received quantities were removed.
- Shipment Confirmed: The credit PO and receipt were accepted and returned to the vendor. The date of the confirmation is stamped on the credit PO.
*The Credit Review Status is also visible on the Credit POs for Review and Credit POs for Confirm Shipment panels.
*Updated PO reports also include Review Status information.
Buyer Review
- Open the Credit POs for Review panel under the Purchasing menu. (See (Figure 6).
- Select the Credit PO for Review. (See Figure 10.)

Figure 10 - Review a Credit PO
Initially, the Review Status for the credit PO will be "Pending Review."
- Click the inquiry icon  or Menu > Inquiry.
- Upon refresh, the PO's Review Status will change to "Purchasing Reviewed."
- To review or edit the PO:
- Click the edit icon  or Menu > Edit.
- When the edit panel is closed, the PO's Review Status will change to "Purchasing Reviewed," even if no changes are made.
- Click the Accept Credit PO link or Menu > Accept Credit PO.
-
The PO will be moved to the Credit POs for Confirm Shipment panel.
-
The status of the PO on the Purchase Orders list panel will be "Pending Receiving Review."
- Click Menu > Cancel Credit PO.
- Edit the PO and change all quantities to zero.
-
If the PO is canceled, it will no longer be listed on the Credit POs for Review panel. Its Review Status on the Purchase Orders list panel will be "Purchasing Canceled."
Shipment Confirmation
- Open the panel Credit POs for Confirm Shipment under the Receiving menu. (See Figure 7.)
- Select the credit PO from the list. (See Figure 11.)

Figure 11 - Confirm Shipment of a Credit PO
- To review the PO:
- Click the inquiry icon or Menu > Inquiry.
- The PO's Review Status will change to "Receiving Reviewed."
- A credit PO cannot be edited on the Credit POs for Confirm Shipment panel.
- To confirm the shipment:
- Click the Confirm Credit PO Shipment link or Menu > Confirm Credit PO Shipment.
- The PO will no longer be listed on the Credit POs for Confirm Shipment panel. Its Review Status on the Purchase Orders list panel will be "Shipment Confirmed."
- The return shipment cannot be canceled from the Confirm Credit PO Shipment panel. To cancel the return shipment (prior to confirmation):
- Locate the Credit PO on the Purchase Orders list panel.
-
Edit the Credit PO; change all quantities to zero.
-
The Review Status of the Credit PO will be "Return Shipment Canceled."
-
The Credit PO will no longer appear on the Credit POs for Confirm Shipment panel
Process flow and transactions
generated by Vendor Quick Credits
- For each quick credit that references a single original PO and vendor buy-from location, a credit PO is created with the same original PO number, plus the designator "C." For example, if the original PO number was 67891, the credit PO number is 67891C.
- Additional quick credits from the original PO generate credit purchase orders numbered in order as "...C1, ...C2" (e.g., 67891C1, 67891C2). This approach avoids creating duplicate POs.
- Both file and non-file items can be included on a single credit PO.
- The organization and asset location for each
generated PO are set to the organization and asset location
specified on the quick credit From Organization and Department fields.
- For non-file item credit POs, the Vendor
Number and Buy From Location are set to the values on the
quick credit.
- When specified, a restocking fee propagates to the system-generated credit PO and to the invoice (when the credit memo from the vendor is available for matching). The PO inquiry (i) displays the extended cost minus the restocking fee. Figure 12 is an example of a credit PO header with a restocking fee.

Figure 12 - Credit PO Header from PO Inquiry
- On the PO header (Figure 9), the Total Estimated Restocking Cost is the total restocking cost of all lines.
- The Total Extended Cost with Restocking is the total cost + tax cost – restocking cost.
Figure 10 displays the lines on the purchase order header from Figure 13.
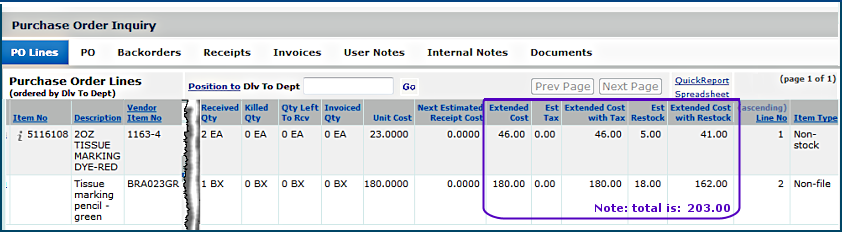
Figure 13 - Purchase Order Lines
- The application creates requisitions for non-stock items and direct delivery items (file items) for generated credit POs. The requisitions are created for each
department specified in the Quick Credits From Organization and Department fields.
- No requisition is generated for non-file items and stock items (that are not direct delivery).
- All credits for one department are grouped before
a new credit requisition for a different department is produced.
- The credit requisition lines include any restocking fields. Figure 14 is an example of a credit requisition line for a non-stock item.
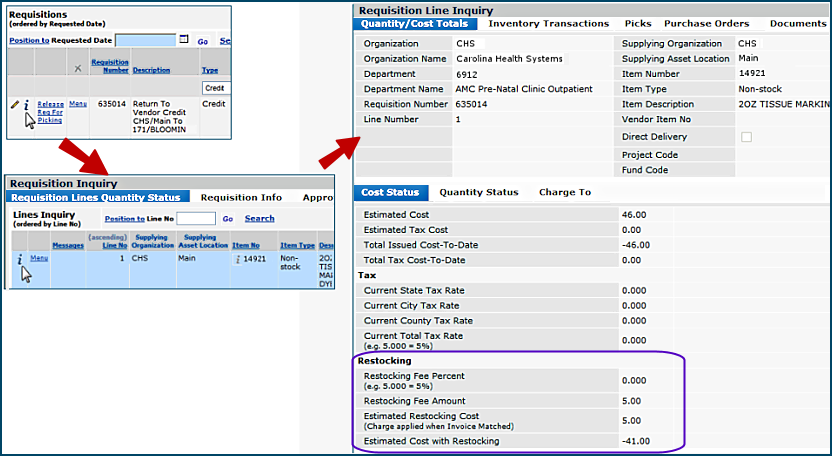
Figure 14 - Requisition Created for a Credit PO with Restocking Fees
- The application sets the credit requisition to Complete
and the purchase order Status to Complete. A credit receipt is created for the PO. You can match the receipt with the vendor's invoice (credit memo).
Item on-hand quantity and inventory
value are decremented.
- The application automatically creates a distribution line for any restocking fee when you invoice match the credit PO. The information on the distribution line can be edited. Figure 15 is the invoice's distribution charge for a credit PO item with a restocking fee.
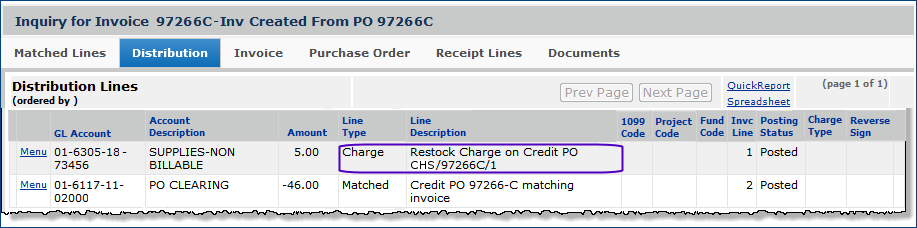
Figure 15 - Restocking Charge Distribution Line on an Invoice for a Credit PO
Transactions
For each file item, the system creates an inventory transaction
of type Dept Return to Inventory.
The transaction shows that the item
is leaving the source department and returning to the asset location.
- Usage for the item in the source department is decremented.
- The item expense in the source department is decremented.
- A credit expense to the source department is created in GL transactions.
- The GL Inventory account is debited.
For each file and non-file item, the system creates a new inventory
transaction of type Return to Vendor.
The transaction shows that
the item is leaving the asset location and returning to the vendor. (For file
items, this is the second transaction generated.)
- Project and/or Fund current expense amounts are adjusted,
if needed.
- The GL Inventory account is credited.
- The PO Liability account is debited.
If the return to vendor has a restocking fee, restocking costs are written to general ledger accounts as follows:
- Stock items - to the Inventory Adjustment Account.
- Non-stock and non-file items - to the Department Expense Account.
Department Cost Adjustment
If a department is issued an item with an incorrect average cost, the cost
can be changed without affecting the quantity issued. Department Cost Adjustment
is available as a selection on the Quick Credits panel for the field Credit
Type.
To use Department Cost Adjustment:
- Follow steps 1 and 2 for creating quick credits between departments.
- On the Quick Credits panel, select Department Cost Adjustment in
the Credit Type field.
The Department Cost Adjustments panel appears.
- Enter information for the Item Number, Cost, Department,
and Reason Code.
Note that you can enter information on the File Item or Non-File Item panels.
You can also set overrides.
- Click Save.
- Click Finish Now or Finish Later.
The quick credit for department cost adjustment adjusts requisition costs for
the item; except:
- No GL transactions for the inventory account or the PO liability account
are created.
Note on Refresh button
Refresh refreshes lines. Use F5 to refresh the
entire panel.
Copyright © 2023 by Premier Inc. All rights reserved.


