Making Payments and Processing Checks Version
Contents
Overview
of Payments and Check Processing
You can use the Accounts Payable invoices panels to manually pay approved invoices. However, a simpler method
is to let the system handle the payments automatically. This section describes
how to direct Accounts Payable to select invoices, generate payments, and process checks. You can create payments and process checks for a single organization, or for multiple organizations assigned to a payment group.
The discussion in this
topic is split into two sections: Processing Payments, in which you select
invoices to create a payment run, and Processing Checks, in which you
generate checks. Several methods are available for check
output--you can use the method that most suits your needs, or the vendors' preferences.
If you are using Consolidated Payment Exports, this topic explains how to process payments. However, you should also read the separate discussion Creating Payment Exports for a Bank's Integrated Payments System, because consolidated payment exports has setup steps, independent of payment processing.
Your organization may also use check requests. A check request triggers the creation of an invoice which can then be paid following the processes outlined in this topic. For details on check requests, see Check Request Processing.
Security
The role object that controls access to payment functions is "Payments," minimally set to View. To create payment runs, "Payments" must be set to Create. To delete payment runs, "Payments" must be set to All.
To work with checks, set the role object "Bank" to Modify.
To work with invoice groups, the role object "Invoicing" must be minimally set to View.
To work with custom exports, the role object "Administration" must be minimally set to View.
To view AP transactions for payment, the role object "APTransactions" must be minimally set to View.
Setup
Depending on the check output
method that you use, you may need to select options on the Bank Account Edit panel, the Payment Profile panel, and the Vendor AP Location panel. You may also need to create a payment profile to associate with payment runs.
Check Output Methods
- Print checks locally (single organization payment run only)
- Create a check file for EFT export
- Create a check image export file
- Create a custom export for checks
- Create and send an EDI 820 payment document
- Use a consolidated payment export.
- Vendors that use EFT (electronic funds transfer) or EDI 820 payments need to be set up in the application. (Contact the Help Desk if you work with EDI vendors and need setup.) On the vendor AP Location panel, the EFT/EDI 820 Location must be checked and the vendor's bank, bank account, and bank routing number must be entered. See Using EDI 820 Payment Documents.
- For an EFT vendor, for a single organization's payments, you must also use a payment profile. You set up your banking information in the payment profile. When you run payments for the vendor, you specify the payment profile name.
Payments for payment groups (multiple organizations) do not use payment profiles. The bank and bank account are pulled in with the organization data.
- Some vendors may also use consolidated payments. The consolidated payment exports feature provides an interface between the application and bank payment systems such as the Wells Fargo Integrated Payment System. This feature lets you create a payment export file for a bank formatted for vendors' preferred payment methods, such as a credit card payment.
-
To use consolidated payment exports, set a payment method on the vendor AP Location panel and select Consolidated Payment Export for the field Send AP Check Output To when you build the payment run.
-
On the Bank Account Edit panel, select the option Consolidated Payment Export for the check output.
- You can also specify Consolidated Payment Export for the check output on a payment profile, and then assign the payment profile to a payment run.
To select a check output option on the Bank Account panel:
- From the Accounts Payable Contents, select Bank
Accounts.
A list of bank accounts established for your organization appears.
- Locate the bank account of interest in the list (or click New
if you wish to create a new bank account.)
- Click the edit icon
 next to the bank account.
The Bank Account edit panel appears (Figure 1).
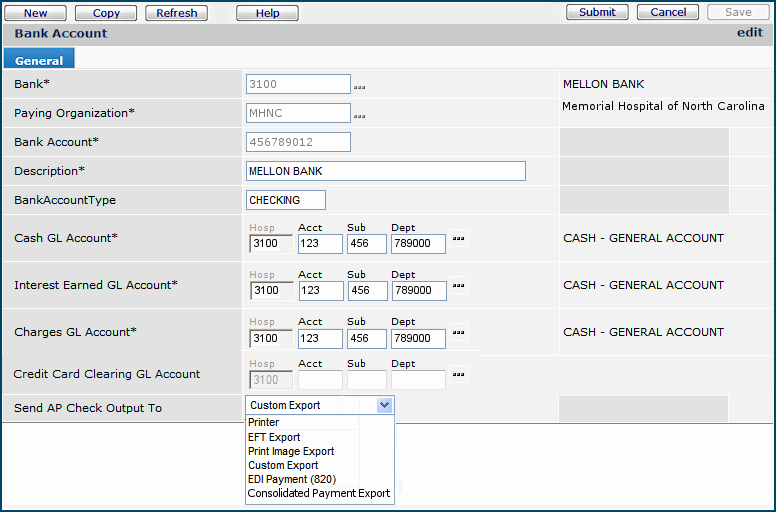
Figure 1 - Bank Account Edit Panel
- On the Bank Account edit panel, click the prompt next to Send AP Check
Output To and select a check output method.
- If you are using Consolidated Payment Exports, read the separate discussion Creating Payment Exports for a Bank's Integrated Payments System,
- Click Save.
- Click Submit.
You are returned to the Bank Accounts list.
To specify a check output method on a payment profile:
- From the Accounts Payable main Contents, select AP Tables > Payment Profiles.
A list of payment profiles appears.
- Locate the payment profile of interest in the list (or click New
if you wish to create a new payment profile).
- Click the edit icon
next to the payment profile.
The Payment Profile edit panel appears (Figure 2).

Figure 2 - Payment Profile Edit Panel
- On the Payment Profile edit panel, click the prompt next to Send
AP Check Output To and select a check output method.
- For Consolidated Payment Export, see Creating Payment Exports for a Bank's Integrated Payments System,
- Click Save.
- Click Submit.
You are returned to the Payment Profiles list.
To flag a vendor AP location for EFT/EDI 820 payments
Figure 3 shows the vendor AP Location edit panel.
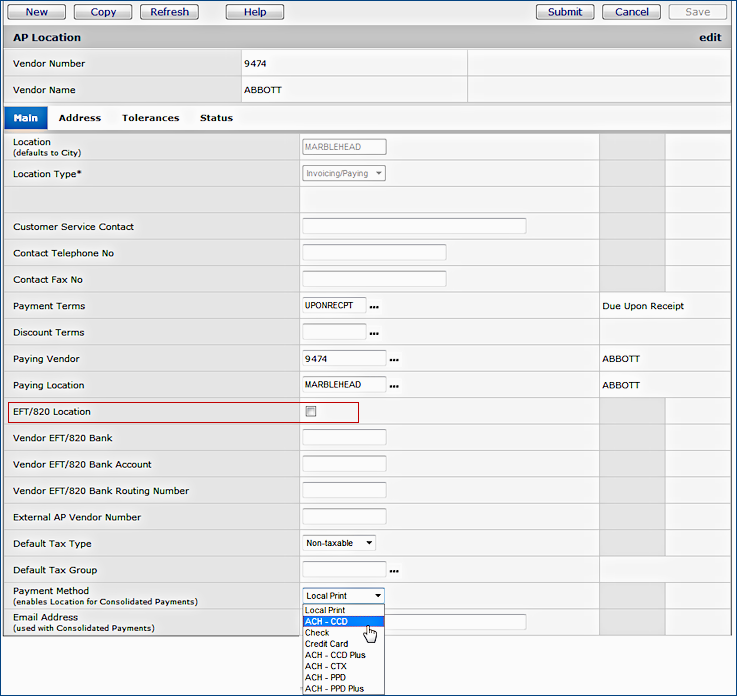
Figure 3 - AP Vendor Location Panel
Notice the EFT/820 Location selection field. This field must be selected for EFT or EDI 820
payment processing. Enter the values for the vendor's EFT/820 Bank, Bank Account, and Bank Routing Number.
See Working With Vendor Information
for details on editing vendor AP location records. For EDI 820 documents, see Using EDI 820 Payment Documents.
If you are using the consolidated payment exports feature, select the vendor's preferred Payment Method for the payments in the export file. See Creating Payment Exports for a Bank's Integrated Payments System. When an AP vendor location is set up for consolidated payment exports, all payments for the vendor use that method.
Making
Payments and Processing Checks - The Big Picture
Below is the broad sequence of steps
in creating payment runs and processing checks for the payments.
- Match the invoices to be paid
Before you can make payments,
vendors' invoices must be entered into the system and matched with receipts.
The invoice must balance, and exceptions must be resolved. Invoice matching
is discussed in detail in Matching Purchase
Order Receipts with Invoices.
- Approve the matched invoices
- If you are an authorized invoice approver, you can approve individual
invoices during the matching process. When you click Finish Now
to match a balanced invoice, the invoice is also approved. (See
Matching Purchase Order Receipts with
Invoices.)
- If you use invoice groups, approval is separate from the matching
process. If you are an authorized invoice approver, the invoices in the
group are approved when you select Complete this Group. (See To
approve an invoice group.) If you do not have invoice approval permission,
you can complete the invoice group, but it must be approved by another
user with the appropriate permission.
- Build a payment run
Building
a payment run generates payments for selected invoices. You specify the
criteria that the system uses to select the invoices. A payment run can contain
multiple payments for a set of invoices -- for example, if the invoices are
from different vendors -- or only one payment.
- The system assigns a Payment ID to each generated payment.
- The system also assigns a single Payment Run ID to the group of
invoices and payment(s) in the payment run.
Note that a payment run can contain as few as one invoice and one payment.
Once the payment run is built, you can view and adjust any of the individual
payments, or exclude payments.
- Commit to the payment run
Up to the time when
you commit to payment, you can make adjustments
to the payments in the payment run. (For example, you can instruct the system
to take an additional discount on an invoice.) After you commit to
the payment run, you cannot edit or delete anything.
- Process the checks for exporting or printing locally.
This step numbers the checks
and either prints them locally, or makes them available for export.
When you reach this point in your payments process, you can follow one of
several paths, listed below. (For instructions, click the method that you
use.)
- Mark the payment run as completed.
- Record the numbers of any unused checks.
Payment Run Steps
To approve an invoice group:
- From the Accounts Payable main Contents, select Invoicing in AP > Invoice
Groups.
- If you are working in Supply Chain (Materials Management), select Invoicing > Invoice
Groups.
The Quick Click menu appears.
- Under "I would like to..." select View the Invoice Groups
List.
- Enter the Invoice Group ID and click Go. Or, click
Show All to view all invoice groups.
The Invoice Groups list appears (Figure 4). (The system displays No Data
if no invoice groups exist.)
- If you entered an Invoice Group ID, the group with that ID is first
in the list.
- If you clicked Show All, use the Position To box to find your
invoice group in the list.

Figure 4 - Invoice Groups List
- Click the W
to "work with" invoices in the invoice group. The Work With Invoice
Group panel appears (Figure 5).
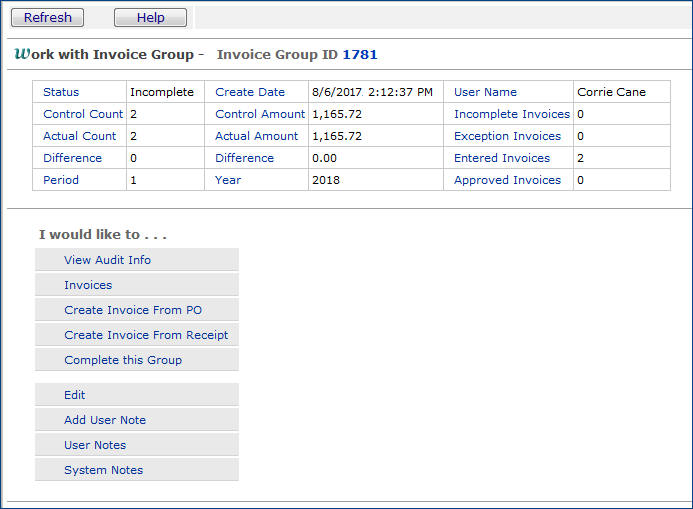
Figure 5 - Work With an Invoice Group
- On the Work With Invoice Group panel (Figure 5), select Complete
This Group. (Completing an invoice group approves the group and makes
the invoices available for payment.)
- Click Go. You are asked to confirm that you want to complete
the group.
- Click Submit.
You are returned to the Work With Invoice Group panel. The Status of the group changes to Approved. The invoices in
the group can now be paid.
To build a payment run:
This section addresses payment runs for a single organization. It will be helpful, even if you are processing payments for multiple organizations, to review this section, since the process is similar in both cases.
- From the Accounts Payable main Contents, select Payments > Payment Runs.
The Quick Click menu appears (Figure 6).
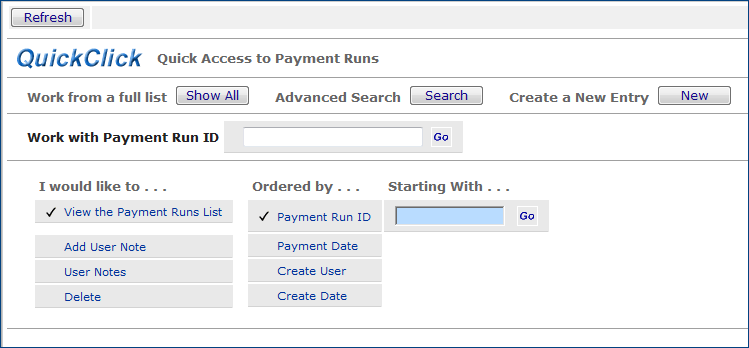
Figure 6 - Payment Run Quick Click Menu
- Select New.
The Payment Run Parameters panel appears (Figure 7). Use this panel to select
the invoices that you wish to pay.
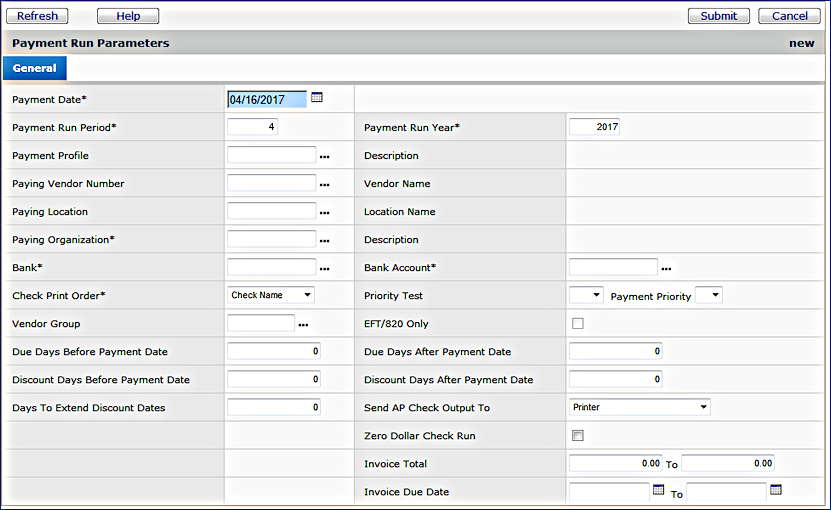
Figure 7 - Payment Runs Parameters Panel
Enter information in fields marked with an asterisk (*). Use the other fields
to specify your criteria for invoices that the system should select. For example,
you may want to pay all invoices with four Discount Days Before the Payment
Date. Or, you may wish to select invoices from a certain Vendor Group
that have a particular Payment Priority. If you enter no selection
criteria, the system includes all approved invoices for the Paying Organization
in the payment run. (Click Help for detailed descriptions
of fields.)
- The field Send AP Check Output To selects the check processing
method. The default is Printer (shown in Figure 7), which
sends checks to a local printer. Click the drop box to select a different
check processing method. Instructions for each of the check processing
methods are in this topic. (See the Contents.)
- If you wish, you can change the check processing output method later when the payment run is built. The check processing method can be changed as long as the payment run is in Open, Selected, or Committed Status.
Payment Profiles
You may specify a Payment Profile for a payment run. Payment profiles
are defined in the Accounts Payable Tables. A payment profile contains defaults
for values such as check processing method. Payment profiles also define the
characteristics of invoices selected for payment, for example:
- All invoices within the discount period, up to $500.00
- All invoices older than 30 days, and less than $100.00
- All invoices whose vendor is assigned a particular payment priority.
You can create payment profiles and display existing payment profiles from the Accounts Payable > Tables. Figure 8 is an example of a payment profile.
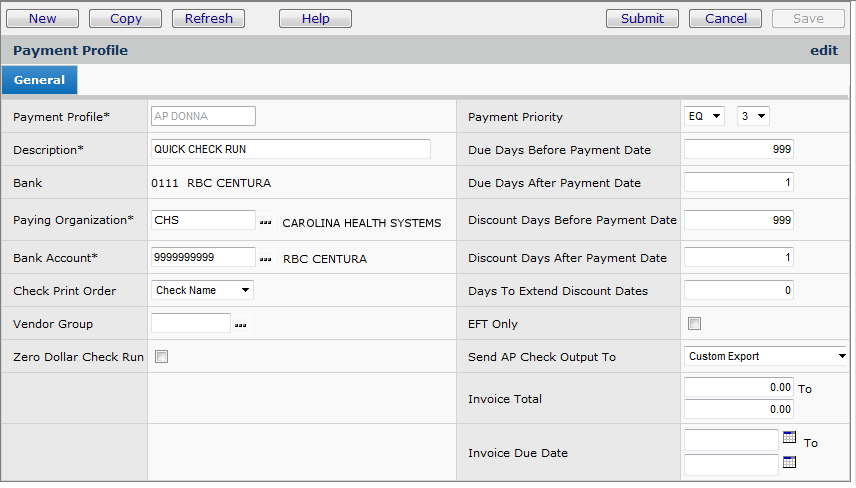
Figure 8 - The Payment Profile Edit Panel
On the Payment Run Parameters panel, when you select a Payment Profile
from the prompt, the system completes several fields with values from the payment
profile. If the Vendor Pay-To Location uses EFT (electronic funds transfer)
for payments, a payment profile is not required but can be used to provide
default values.
- If a you select a payment profile, but you want to restrict the payment
run to a particular vendor, either use the prompt to get the vendor and location
or, enter the vendor, and then blank out any value in the Payment Profile field.
Zero Dollar Check Run
The field Zero Dollar Check Run on the Payment Run Parameters panel (Figure 7) (and on the Payment Profile Edit panel - Figure 2) lets you specify how the system should handle payment runs that contain payments with a zero dollar amount. The setting of the Zero Dollar Check Run field takes effect when you Commit to a payment run.
- When Zero Dollar Check Run is selected and the payment run is committed:
- All payments not equal to zero are dropped (deleted). If, as a result, the payment run has no payments, the system automatically sets the payment run Status to Completed, and writes a system note.
- Payments that equal zero, but where the invoice count equals zero, are deleted.
- Zero dollar invoices are marked as "Paid in Full." No GL transactions are created for these payments.
- Invoices with a hold amount are not eligible for zero dollar check runs.
- Any payments with a zero dollar amount that remain on the payment run are processed as normal checks and can be printed and completed.
- When Zero Dollar Check Run is not selected:
- All payments that are equal to or less than zero are dropped (deleted). If, as a result, the payment run has no payments, the system automatically sets the payment run Status to Completed, and writes a system note.
- Any payments with positive dollar amounts that remain on the payment run are processed as normal checks and can be printed and completed.
The Zero Dollar Check Run field appears on the Payment Runs list (Figure 11) and can be used to filter the list. The Zero Dollar Check Run also appears on the Work With Payment Run panel
(Figure 9).
Tips for Using the Payment Run Parameters Panel
- The simplest way to capture invoices for a payment run is to enter a value for the Payment Profile.
- Another way to capture many invoices, especially if you want to include all invoices for a vendor, is to enter the Paying Vendor Number and Vendor Location; then, set the Due Days After Payment Date to a large number, such as 999.
- Another possibility is to leave the Paying Vendor Number and Paying Location blank to capture invoices for all vendors, based on other parameters that you enter -- such as the Invoice Due Date range or the Invoice Total range. This strategy will likely generate many invoices for the payment run, but once the payment run is built, you can review invoices in it, and delete those that you don't wish to pay immediately.
- Finally, you can use the field Send AP Check Output To to specify a range of invoices. For Send AP Check Output To values:
- Select EDI Payment 820 to collect invoices that specify this payment method.
- EFT Export collects invoices that use electronic funds transmission. The EFT flag on the Paying AP Location record must be set.
- Consolidated Payment Export exports payments -- such as credit card payments -- to banks' integrated payables systems. This value collects invoices that have a payment method other than Local Print, also excluding EFT Export and EDI Payment 820.
- If you specify a value other than Consolidated Payment Export, EFT Export, and EDI Payment 820, the system collects invoices whose payment method is Local Print. Then, the system uses values in these fields -- if entered -- as further criteria for selecting invoices: Paying Vendor No (if entered), Invoice Due Date, Due Days After Pay Date, Due Days Before Payment Date, Discount Days Before/After Payment Date, and others.
- Click Build.
The system builds the payments and displays the Work With Payment Run panel
(Figure 9). The Work With Payment Run panel shows the message "Build
Payment Run Pending." Also, notice that checks from this payment
run are destined for a local printer: Send AP Check Output To is set to "Printer." The value in this field
could be "EFT Export", "Custom Export", or "Print
Image Export" if any of those processing methods had been chosen.
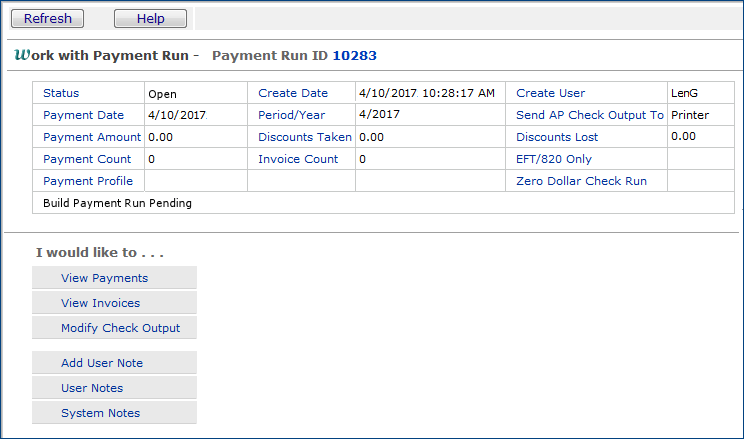
Figure 9 - Payment Run Build Pending
- Click Refresh. When the build is complete, the message
disappears, and the Payment Count field displays the number of payments
(Figure 10) and the Invoice Count displays the number of invoices.
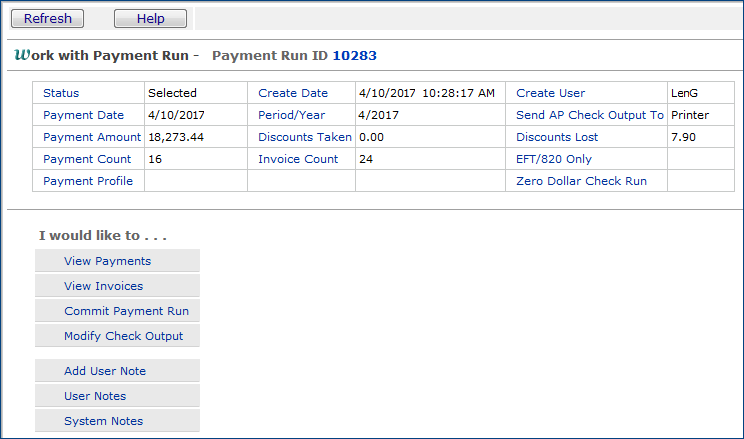
Figure 10 - Payment Run Build for Vendor 383
Notice that two payments were generated for six
invoices.
To view a payment run on the Payment Runs List:
- From the Accounts Payable main Contents, select Payments > Payment Runs.
The Quick Click menu appears (Figure 6).
- On the Quick Click menu, click Show All or enter the Payment Run ID of the payment run that you wish to view.
The Payment Runs list appears. Figure 11 is an example.
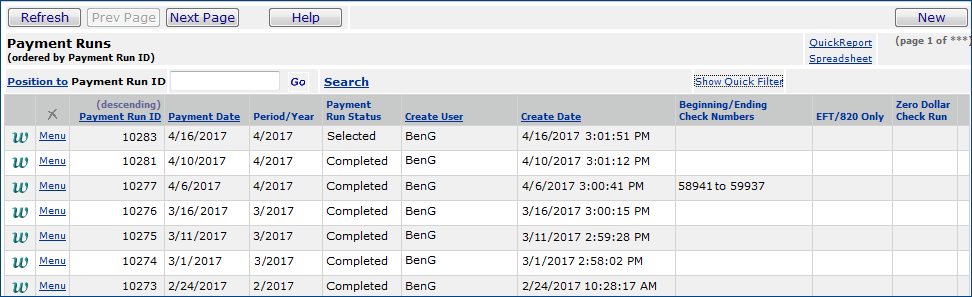
Figure 11 - Payment Runs List
To modify the check processing output method:
The current check processing output format appears on the Work with Payment Run panel in the box next to Send AP Check Output To. You can change the check processing output method as long as the payment run is in Open, Selected, or Committed Status.
- From the Work with Payment Run panel, under "I would like to..." (Figure 12), select Modify Check Output.
Go appears.

Figure 12 - The Work with Payment Run Panel with Modify Check Output Selected
- Click Go. The Modify Check Run Output panel appears (Figure 13).
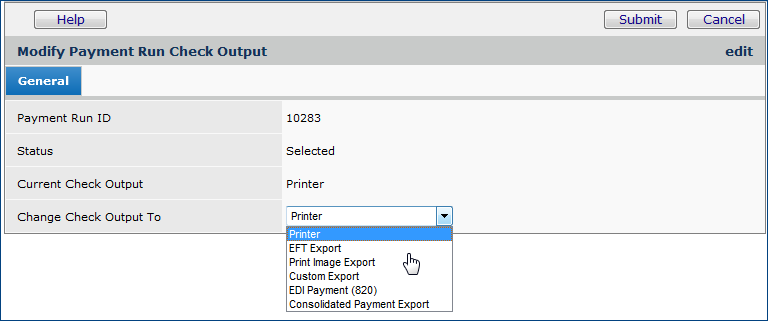
Figure 13 - Selecting a New Check Processing Output Method
- Click the arrow next to Change Check Output To and select the new processing method from the drop list.
- Click Submit. The check output format is changed. The change appears on the Work with Payment Run panel in the box next to Send AP Check Output To.
To view invoices in a payment run:
- From the Accounts Payable main Contents, select Payments > Payment Runs.
- Select "View the Payment Runs List."
- Select Payment Run ID under "Ordered by..."
- Enter the Payment Run ID under "Starting With..."
- Click Go. The Payment Runs list appears with the Payment Run ID at
the top.
- Click W to "work with" the payment run.
The Work With Payment Run panel appears.
- Select View Invoices (see Figure 10).
The list of invoices selected for the payment run appears (Figure 14).
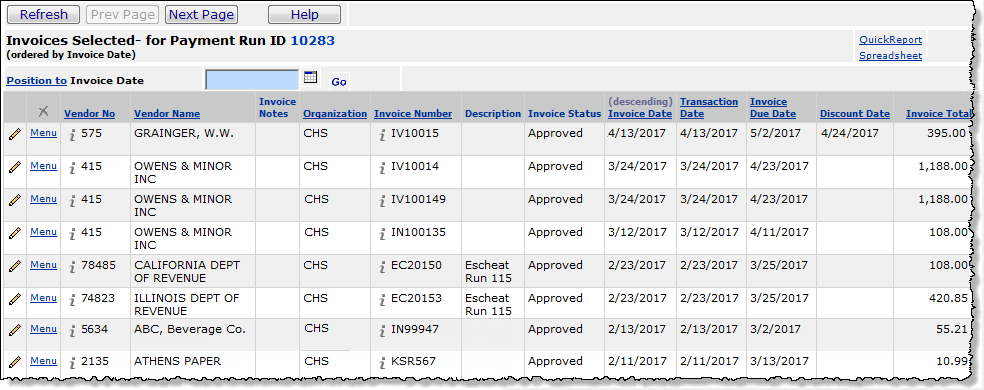
Figure 14 - View Payment Run Invoices
Invoices with notes have "Yes" in the Invoice Notes column.
- To view invoice notes, next to the invoice of interest (Figure 14), select Menu > Invoice Notes.
The invoice notes list appears if any have been created. Otherwise, No Data appears.
- To create a new invoice note, on the Invoice Notes list, click New.
- To edit an invoice note, click Menu > Edit next to the note.
Taking Discounts on Invoices
Your site may have standard discount terms established for each
vendor that you use. Discount terms specify the amount and/or percent of discount
that you can take if payment meets certain criteria, such as being paid within
a few days of the invoice date. Discount profiles are set up in your AP tables
and associated with individual vendors. The Discount Amount column in
the Invoices Selected list shows the available discount, if any. In Figure 14,
no discounts appear.
If the payment run has a Status of Open or Selected,
you can change the total payment for the invoice by taking any available discounts.
For any particular invoice, an additional discount over and above any standard
discount terms (if any) may be available. In this case, you will need to edit
the invoice included in a payment run to specify the amount of additional discount
that you can take.
To take or remove a discount:
- Follow steps 1 through 6 in To view
invoices in a payment run.
- Review the Discount Amount column in the Invoices Selected list for
the amount of discount available. If the amount appears in the Discount
Taken Amount column, it is already included, and you do not
need to do anything further unless you wish to decline the discount.
- To decline the discount, click Menu > Remove Discount.
- Otherwise, next to the invoice, click Menu > Take Discount.
You are asked to verify that you wish to take the discount (Figure 15).
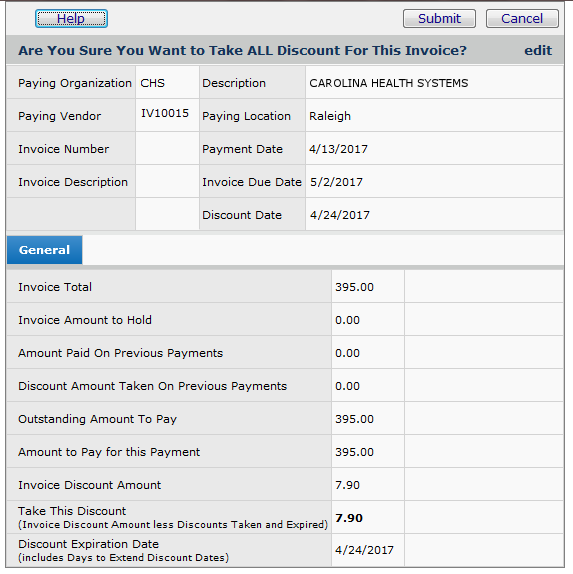
Figure 15 - Verify Discount on a Payment Run Invoice
- Click Submit to take the discount.
To take an additional discount
on an invoice:
- Follow steps 1 through 6 in To view
invoices in a payment run.
- From the Invoices Selected list (Figure 14), click the edit icon next to
any invoice or select Menu > Edit.
- Change the values in the following fields as needed: Amount to Pay for
this Payment, Invoice Paid in Full, and Discount to Take for
this Payment. (Essentially, at this point in the payment process, you
can only edit the invoice to specify a discount.) Figure 16 shows an invoice
from payment run 10283 being edited to include a discount of $7.00, taken from
the total of $1188.00.
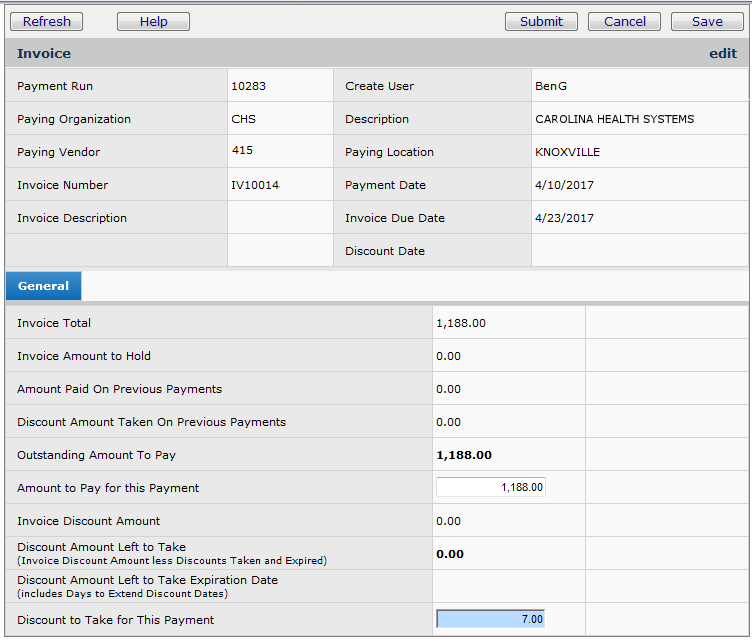
Figure 16 - Edit a Payment Run Invoice for Discount Information
- Click Save. The discount is shown in the Discount
Amount Left to Take field.
- Click Submit. The Invoices list appears.
- Click Refresh. The system updates the Disc Taken Amount column
for the invoice to include the discount.
To
view payments in a payment run:
- Follow steps 1 through 6 in the procedure To
view invoices in a payment run.
- Select View Payments from the Work With... panel.
The payment or list of payments for the payment run appears, similar to the invoices list (Figure 14).
Note that you can use
the Menu next to any payment on the Payments list to designate invoices
for exclusion/inclusion in the payment.
To
exclude an invoice from a payment:
- Follow steps 1 and 2 in the procedure To
view payments in a payment run.
- Next to any payment on the Payments list, click Menu > Select/Omit
Invoices for Payment.
The list of invoices for the payment appears. The first column of the list
shows a select box containing a check. All the invoices are selected, by default.
- Click to uncheck the select box next to the invoice(s) that you wish to
exclude. Rechecking an empty box includes the invoice.
- Click Finish Now or Finish Later. You are returned to
the Payments list.
- If you clicked Finish Now, click Refresh on the Payments list.
The Payment Amount column's value changes to reflect the excluded or
included invoice(s).
When you are finished setting up the payment run to include all discounts and
invoices, you can commit to the payment run. Once you commit to the payment
run, you can no longer edit any of its invoices or payments.
To commit to a payment run:
- Follow steps 1 through 6 in To view
invoices in a payment run.
- Select Commit Payment Run. Click Go. You are asked if you
are sure that you wish to commit to the payment run.
- Click Submit. The Work With... panel shows the
message "Commit Payment Run Pending" or "Commit Payment Run
Running".
- Click Refresh. When the commit process is complete, the message disappears
and Commit Payment Run is replaced with Print Checks.
At this point in the payment process, you can number and print or export the
checks for the payment.
Voiding/Reinstating
payments
You can void payments that are Completed
(for which checks have been printed), if you need to. Also, you can reinstate
a payment that you have voided. You can specify that you wish to reuse a check number when you void the payment, or later, if you wish.
To void payments:
- Follow steps 1 through 6 in To view
invoices in a payment run.
- On the Work With... panel , select Void a Range of
Payments..
- Click Go. The Void Range of Payments panel appears.
- Enter the range of checks that you wish to void in the appropriate fields.
If you wish to void only one check, enter the check number in both the From... and To... fields. Note that you can also delete all the invoices
associated with the checks (see Note below),
and instruct the system to reuse the check numbers.
- Click Submit.
If you have not deleted all the invoices associated with voided checks, the system
asks you which invoices to delete, if any.
Note:
If you delete invoices, you will not be able to
reinstate payments for those invoices, should you choose to do so.
Note: GL transactions created for void payments now recognize when payment is a Payment Method 3 ( credit card) and use the Credit Card Clearing account defined for the bank.
Did you forget to specify "reuse" the check number for a voided payment?
You can reuse the check number for a voided payment even if you did not check the reuse option when you were voiding the check.
Instruct ERP to reuse the check number as follows:
- From the AP main Contents, select Payments > Payments. The list of payments appears.
- Locate the voided payment of interest.
- Click W to work with the payment.
- On the Work With… menu, a new option Reuse Check Number appears (Figure 17).
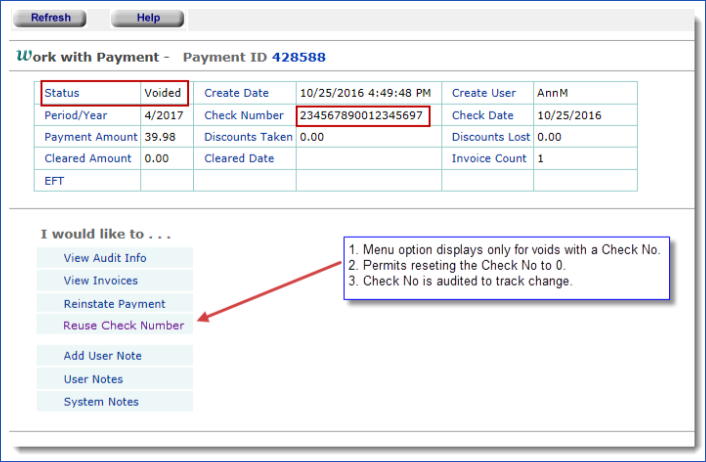
Figure 17 - Reusing a Voided Check Number in AP Payments
- Click Reuse Check Number. The check number is available for reuse.
-
To delete invoices
- Check the box in the first column of each invoice that you wish to delete.
- Click Submit. The invoices are deleted.
To retain invoices
- Leave the selection boxes blank.
- Click Save.
- Click Submit.
The payments are voided, and any invoices that you specified are deleted.
To reinstate voided payments:
- Follow steps 1 through 6 in To view
invoices in a payment run.
- On the Work With... panel, select View Payments.
The list of payments appears. Voided payments contain the word Voided
in the Payment Status column.
- Next to the voided payment that you wish to reinstate, select Menu >
Reinstate Payment.
You are asked to verify that you wish to reinstate the payment, and keep
the payment check number as it was.
- Click Yes.
The payment is reinstated, and the Payment Status returns to Completed.
Creating Payments for Multiple Organizations
You can generate payment runs for multiple organizations at the same time. Multiple organizations are assigned to a payment group; then a payment run is created for the payment group. (This payment run is a payment group run.) The process has two steps:
- Set up the payment group(s).
This step assigns organizations and their associated banks and bank accounts to one or more payment groups. You can also set some payment parameters for the payment group.
For
example, you may define a payment group for organizations that all use EFT/EDI 820.
Payment groups reside in an Accounts Payable table.
You can create new payment groups and edit existing groups, as needed. You can also delete groups.
- Create the payments.
The payment group run automatically creates payments for each organization in the designated payment group.
Creating a payment group run is similar to the process used for regular payment runs. If you know how to create
payment runs, this process will be familiar.
For each organization in a payment group, you will need to assign a bank/bank account. You may wish to review the discussion of Check Output Methods that you can specify for bank accounts.
Note: The check output method Local Print (Print) is not supported for payment groups.
Payment group runs do not accommodate payment profiles. However, you can specify many of the same values that you use in your payment profiles on the payment group run itself.
Define Payment Groups
In creating a payment group, you first identity the group and select parameters for payment runs for the group. For example, you may wish to have a payment group that makes only EDI payments. You next assign organizations to the group. You can create multiple payment groups and you can assign an organization to more than one group.
To create a payment group
- From the Accounts Payable main Contents, select Tables > Payment Groups.
The list of payment groups appears, if any have been created. Otherwise, No Data appears (Figure 18).
- Click New.
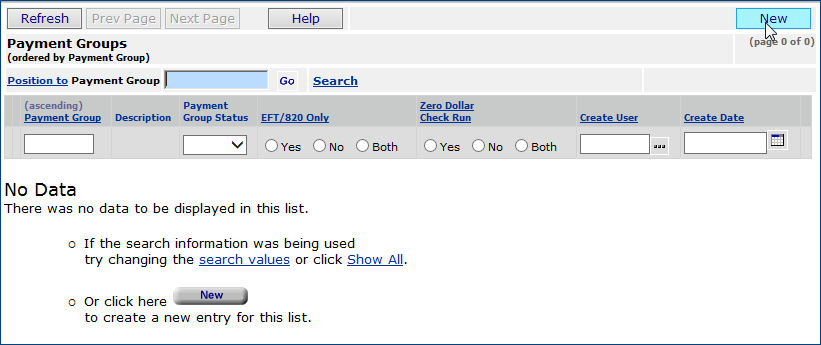
Figure 18 - Payment Groups List
The Payment Group Parameters edit panel appears (Figure 19).
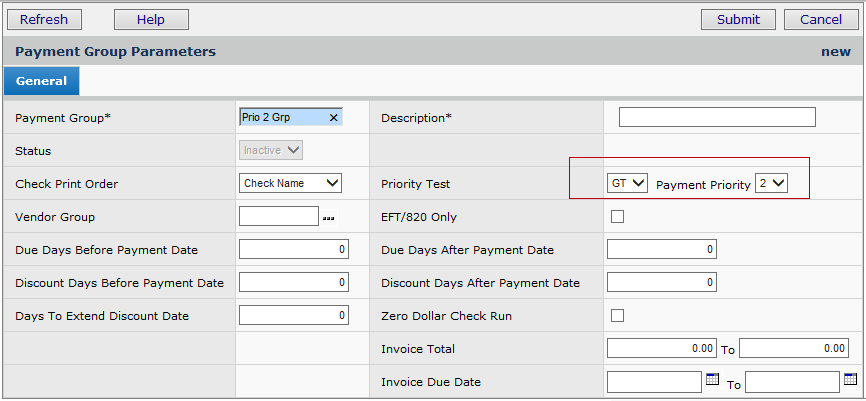
Figure 19 - Payment Group Parameters Panel
- On the Payment Group Parameters panel, complete the fields that identify the payment group -- Payment Group and Description.
- Select the optional fields Check Print Order, Vendor Group, and others, as applicable.
- If you select EFT/820 Only, the application will only let you include organizations in the group that are set up for EDI or EFT check method payments. The group will be exclusive for
organizations that make EFT/EDI 820 payments.
- If EFT/820 Only is not selected, you cannot include organizations set up for EDI/EFT check method payments.
-
Click Help for field information.
- Set the Status field to Active.
In Figure 18, note that the user has defined a payment group that will collect invoices for vendors with a payment priority (Priority Test) greater than 2. (Payment Priority is set on the vendor AP Information panel.) You could, conceivably, create another payment group, assign it the same organizations as this group, but set a different Priority Test, or specify other parameters.
- Click Submit.
The header information refreshes, and a list of organizations appears underneath (Figure 20). The list only contains organizations that are defined in the user's Data Profile.
- Select the organization(s) to include in the payment group by checking the Select box (Figure 20).
- When the EFT/EDI 820 Only field is checked on the payment parameters panel, if you select organizations that use non-EFT/EDI Check Outputs, an error appears when you click Save.
- If the EFT/EDI 820 Only field is not checked, you cannot select organizations with EFT/EDI 820 methods. An error message appears when you Save.
-
Also,
organizations/banks/bank accounts whose Send AP Check Output To field is Printer are not available for selection.
Figure 20 - Payment Group Organizations for Selection
- Click Save and Submit. The application returns to the Payment Group List panel.
- Click Refresh to display the group you created (Figure 21).
The payment group that you created is available for use in payment runs. You can also click New to create additional payment groups.
Figure 21 - Payment Groups List with New Group Added
Generate Payment Group Runs
Payment group runs are similar to regular, single organization payment runs. The following steps are highlights.
Note that you must have banks, bank accounts, and payment groups set up, and any vendor payment information specified on the vendor record's AP Information tab.
To generate a payment group run
- From the Accounts Payable main Contents, select Payments > Payment Group Runs.
The list of Payment Group Runs appears, if any have been created. Otherwise, No Data appears.
- Select New.
The Payment Group Run Parameters panel appears (Figure 22). Use this panel to select
the payment group whose invoices you wish to pay.
Figure 22 - Payment Group Run Parameters Panel
- Enter information in fields marked with an asterisk (*). Use the other fields
to specify criteria for invoices that the system should select for payment.
If you have created payment runs for single organizations, this panel should look familiar. Several fields for particular attention are below.
- Payment Group - Select a payment group from the prompt. The payment group is a group of organizations (with their associated banks and bank accounts) for which invoice payments are generated. Payment groups are defined in the AP tables. Payments are generated for all of the organizations in the selected Payment Group.
- EFT/820 Only - When this box is selected, the payment run is for electronic funds transmission (EFT) or for EDI 820 payment documents.
- Notice that payment profiles are not supported. However, you can include many parameters on this panel that you might normally put on a payment profile.
-
You can also specify values such as Priority Test, Due Days..., Discount Days.... and others on the Payment Group Edit panel for a payment group (see Figure 20). When values are specified for a payment group, the application populates the fields on the Payment Group Run Parameters panel with the values.
- Click Help for more information about field values.
- Click Submit.
The application looks for invoices for the payment run, builds the payments, and displays the Work With Payment Group Run panel
(Figure 23). Payments are generated for approved invoices that belong to the organizations in the selected Payment Group, and satisfy other criteria specified on the Payment Run Group Parameters panel.
-
If no invoices meet the criteria, none are available for the payment run, the Invoice Count and Payment Count is zero.
Figure 23 - Work with Payment Run Panel
The menu under "I would like to..." lets you view payments, view invoices, take discounts, and exclude invoices from the payment run. These procedures are the same as those for single-organization payment runs, explained previously. Note that you cannot modify the check output format (as you can for single-organization payment runs).
- Select a menu option. Go appears. Click Go.
You can also view the individual payment runs for each organization.
- Select View Payment Runs and click Go.
The payment run for each organization appears (Figure 24). Click the Menu to display payments and invoices.

Figure 24 - Individual Payment Runs for Each Organization in a Payment Group Run
When you are finished setting up the payment run to include all discounts and
invoices, you can commit to the payment run. Once you commit to the payment
run, you can no longer edit any of its invoices or payments.
When the Commit routine finishes running, you can process checks for the payment group run.
- On the Work with Payment Group Run panel, select Process Checks in the Menu (Figure 25). Click Go.
Figure 25 - Processing Checks Menu Item on the Work with Payment Group Run Panel
The application displays organizations and payment information for check processing (Figure 26).
- Click Process Checks to create checks for each organization, according to the Check Output method on the line for the organization and bank.
Details on check processing are in a subsequent topic.
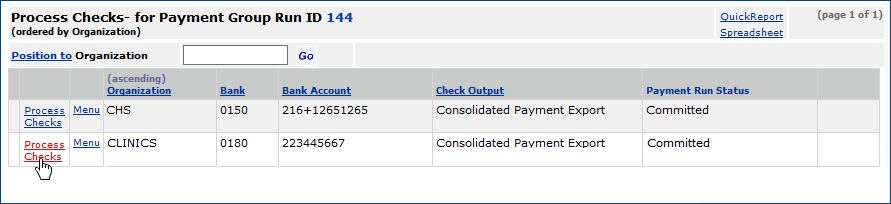
Figure 26 - Processing Checks in a Payment Group Run
Check Processing Steps
Click on a link in the list below for processing instructions for your preferred
check output method.
If you are using Consolidated Payment Exports, see the separate discussion Creating Payment Exports for a Bank's Integrated Payments System.
Processing Checks for Local Printing
This section describes how to print checks locally from the system. The Send
AP Check Output To value on the Payment Run Parameters panel (Figure 7)
is Printer.
To print checks locally for a payment
run:
- Follow steps 1 through 6 in To view
invoices in a payment run.
- Commit to the payment run.
When the payment run commit is finished, the Work With... panel changes and Send AP Check Output To: Printer appears.
- Select Process Checks.
- Click Go.
If you have not downloaded the Check Printing utility, you are
asked if you would like to download it.
The Print AP Checks - Step 1 panel appears (Figure 27).
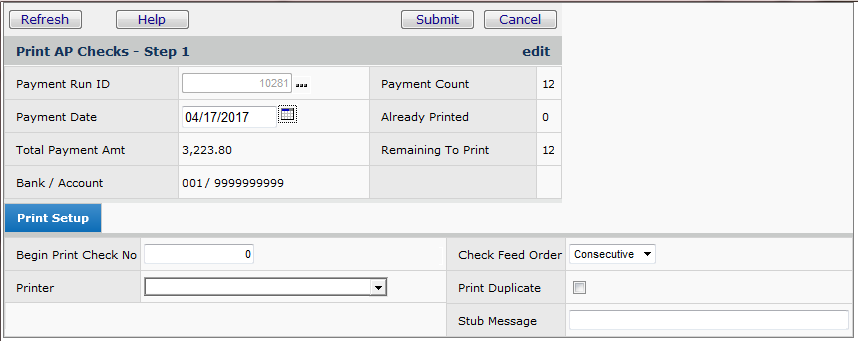
Figure 27 - Print AP Checks, Step 1
- Enter information on the Step 1 panel fields. A default printer
location may appear in the Printer field. You can also select a printer.
The printer that you select for the checks must be the printer that you load
with the check forms.
- Click Submit.
You may receive a security message asking you if you wish to install and run
the Printer Security Control module.
- Click Yes if you wish to install the module.
- If you have not aligned the printer for a check run, the system sends you
a message (Figure 28) suggesting that you run the printer alignment wizard.
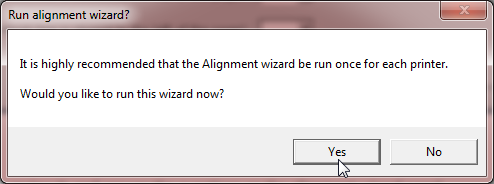
Figure 28 - Printer Alignment Wizard Query Panel
- To run the printer alignment wizard, click Yes.
A test
sheet prints on the printer that you specified, and the alignment panel appears (Figure
29).
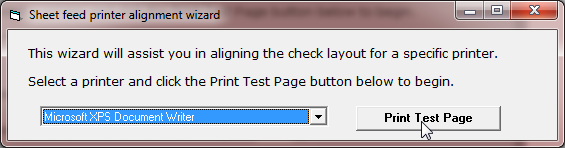
Figure 29 - Printer Alignment Wizard
- Collect the test sheet from the printer, review it, and answer the questions
on the alignment wizard panel.
When you are finished, click OK.
- The Print AP Checks - Step 2 panel appears (Figure 30).
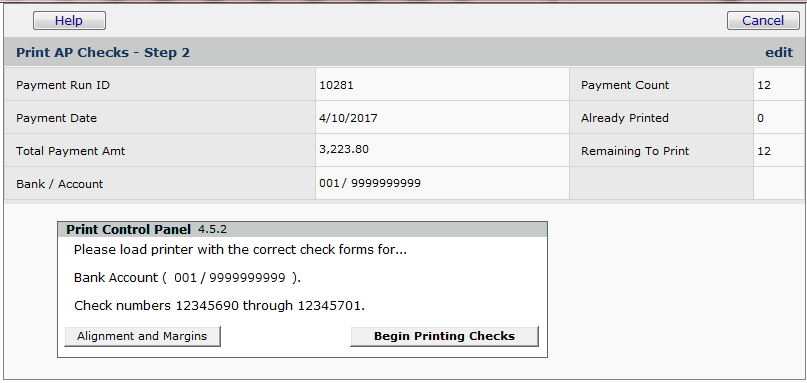
Figure 30 - Print AP Checks, Step 2
A message below the Step 2 panel shows the printer that you have selected,
the bank account, and the check numbers. Make sure that your check forms are
loaded in the printer.
- You can test the alignment of your check forms on the printer by clicking
Print Alignment Form.
- Click Begin Printing Checks.
The system sends you a message when printing is complete.
- Click OK.
When the checks are finished printing, the Print AP Checks - Step 3 panel
appears. A message below the Step 3 panel asks if the checks printed correctly.
- Select the appropriate response for whether the checks printed
correctly.
- If none of the checks printed correctly (Figure 31), the system resets
the check numbers.
- Click Continue.
You are returned to the Step 1 panel.
- Click Submit.
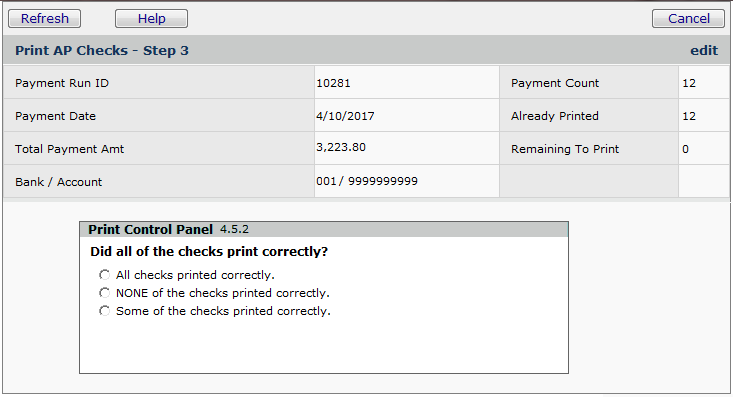
Figure 31 - Reset All Check Numbers
- If some of the checks printed correctly, the system asks for the
first number of the check that did not print correctly (Figure 32) and resets
the checks beginning with that number.
- Click Continue. You are returned to Step 1.
- Click Submit.
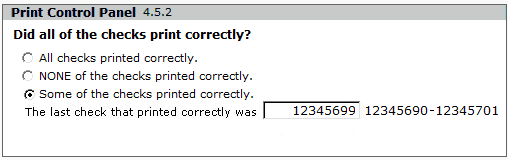
Figure 32 - Reset Some Check Numbers
- When all of the checks have printed correctly, select All checks printed
correctly.
- Click Continue.
The Print Control Panel for check stub overflow appears (Figure 33). Use this panel if
you need to print check stubs that overflow the stub space on the check
printer. Enter the name of the printer for the overflow stubs.
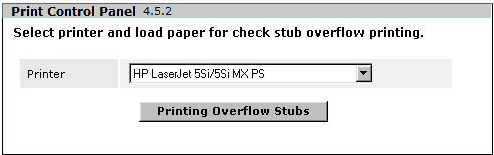
Figure 33 - Print AP Checks, Step 4.
- Click Continue.
You are asked if you want to complete the payment run (Figure 34).
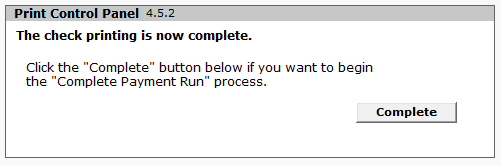
Figure 34 - Complete the Payment Run?
- Click Complete.
You are asked to verify completion of the payment run.
- Click Submit.
The payment run is completed. The Status of the payment run - as
shown on the Work With... panel - changes to Completed.
At this point, you can record unused checks.
Making Quick Payments
If you need to enter an invoice into
the system and create a check quickly, you can do so. The steps below outline
the process, and refer to parts of earlier discussions. The steps below are
useful for situations in which the invoice is not associated with any PO
or receipt, such as invoices for small, unforeseen expenses or services.
Note: To use these steps, you must have invoice approval
authority.
To
pay a single invoice using a locally printed check:
Step 1
- Enter the invoice in the system.
- Select Invoicing in AP > Invoices > New.
The Invoice edit panel appears. Notice that the Matching
tab is missing from the Invoice edit panel.
You will not match this invoice since it has no receipt associated with it.
(See To
create an invoice and match it with a PO if you need details on how to
create an invoice.)
- Enter information on the Invoice edit panel.
- On the Distribution tab, you must enter a GL Account for the
invoice expense.
- When you are finished entering information, click Save.
- Click Finish Now to approve the invoice.
Step 2
- Generate a payment record for the invoice.
- Select Invoicing in AP > Invoices.
- Locate your invoice.
- Next to the invoice, select Menu > Pay Invoice.
The Pay Invoice panel appears.
- Enter the bank and bank account for payment.
- Review the discount information and make changes if needed.
- Notice that the Pay Invoice panel contains the field Send AP Check Output
To: with a drop list. If you are printing a check on a local printer,
select Printer. You can also create an EFT export,
a check image file export, or a custom
export, as discussed below in this topic.
- Click Submit.
When you click Submit, the system begins the check printing
process.
Step 3 - Print the check.
- Enter the number of the check that you are printing (or the first check,
if several) in Begin Print Check Number.
- Click Submit.
The Print Control panel is displayed, reminding you to load the printer
with your check stock.
- Click Begin Printing Checks.
- Continue to follow the instructions on the Print Control panel until your
check prints correctly.
Processing Checks for EFT Export
A vendor can request checks to be forwarded to a particular bank account using
EFT. In this case, the EFT Location field is selected on the
vendor's AP Location record. As discussed previously, a payment profile or a
bank account record may also specify "EFT."
To process checks for EFT export:
- Build a payment run as described in Payment Run
Steps.
- Select a Payment Profile that specifies EFT, or
Select an EFT Bank and Bank Account, or
Select a specific vendor that uses EFT.
- For Send AP Check Output To, select EFT Export.
See Figure 35.
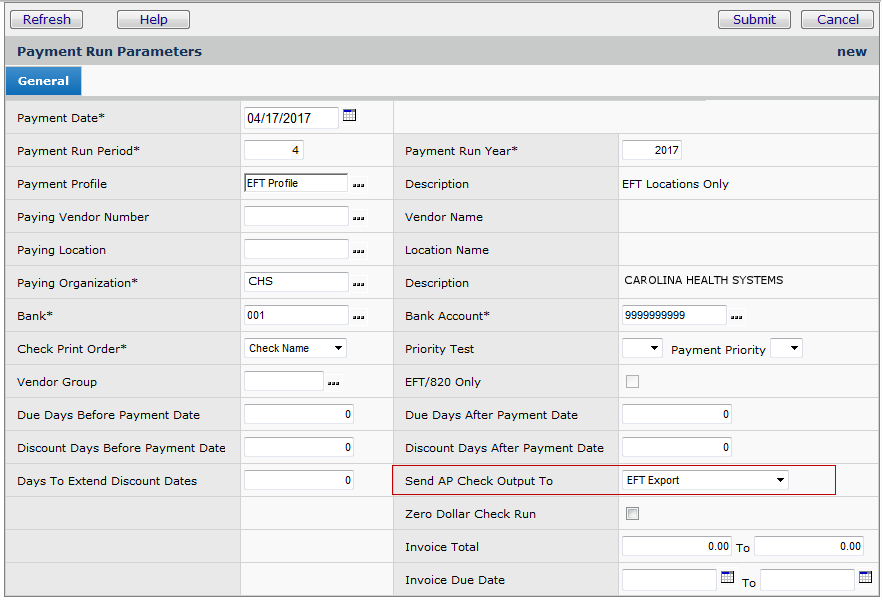
Figure 35 - Building a Payment Run for EFT Export
The system builds a payment run (Figure 36). The invoices selected for the payment
run are only for EFT vendors.
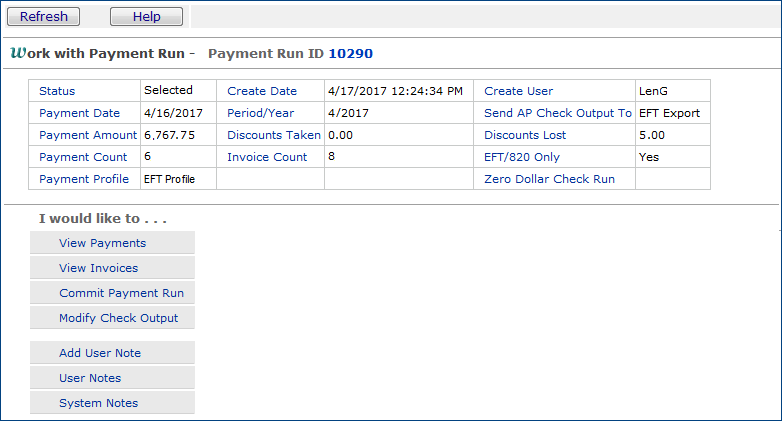
Figure 36 - An EFT Payment Run
- Commit to the payment run.
The Work With Payment Run panel refreshes when the commit process
has finished.
- Click Process Checks.
The AP Checks EFT Export panel appears (Figure 37).
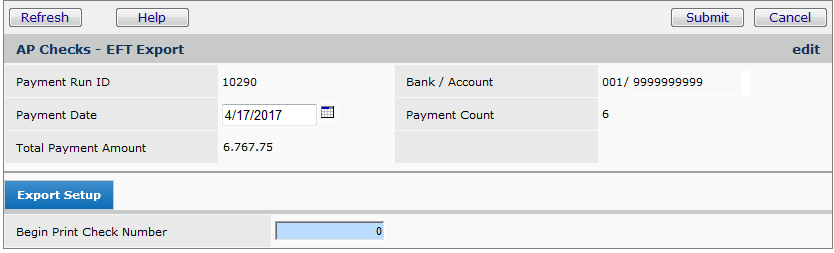
Figure 37 -The AP Checks EFT Export Panel
- Enter the starting check number for the payments.
- Click Submit.
The EFT check export file is created.
You can view the EFT export files from the EFT Export List.
- From the AP Main Contents, select Imports / Exports > EFT Export.
- For any export line on the list, click Menu > Download to transmit the file.
Processing EDI 820 Payment Document - Summary
EDI 820 processing requires several setup steps, and is described in detail in Using EDI 820 Payment Documents. Once EDI 820 is set up, you can transmit payments to a vendor's bank account as EDI 820 documents.
If you use EDI 820 payments, you can set up a payment profile specifically for EDI 820. Payment Profiles contains the information.
Processing Checks for Export to Another Application
Hospitals that use external applications or service vendors to print large
batches of checks may prefer to create a check image export file. The discussion
below explains the process of creating a check image file for export.
To process checks for export:
- Build a payment run as described in Payment Run
Steps.
- For Send AP Check Output To, select Print Image Export.
See Figure 38.
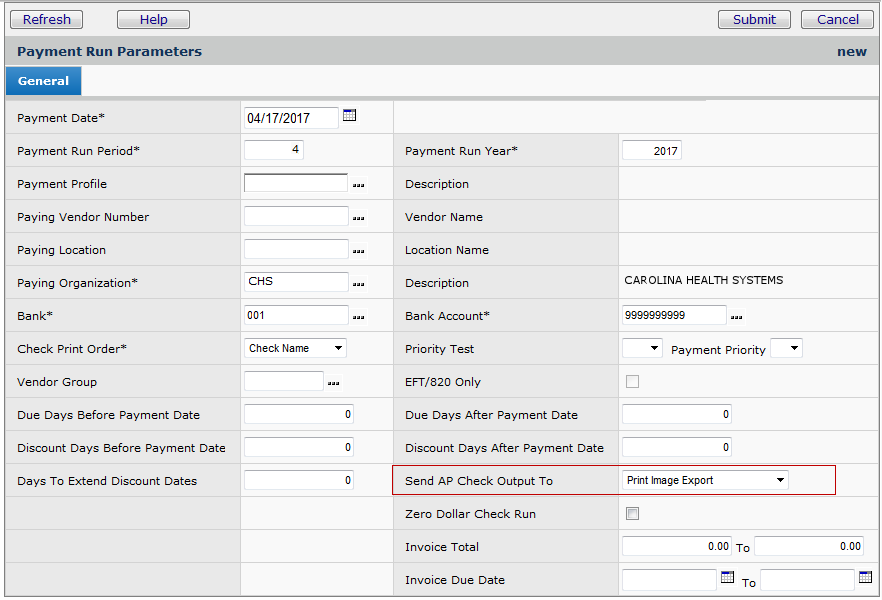
Figure 38 - Building a Payment Run for Print Image Export
- The system builds a payment run (Figure 39).
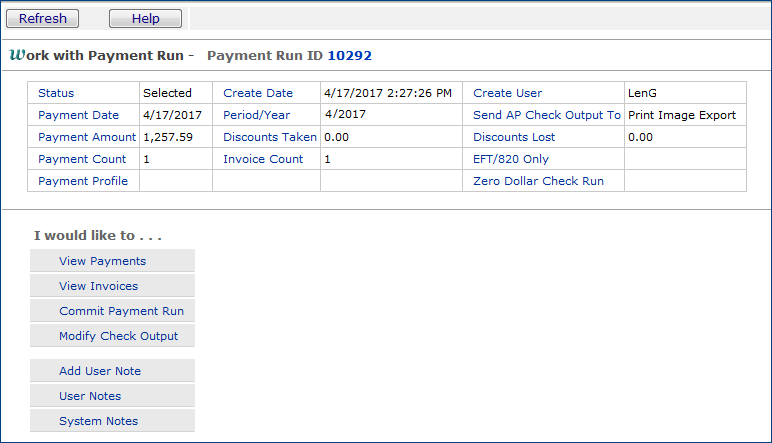
Figure 39 - A Payment Run for Print Image Export
- Commit to the payment run.
The Work With Payment Run panel is refreshed when the commit process
has finished.
- Click Process Checks.
The AP Checks Print Image Export Panel appears (Figure 40).
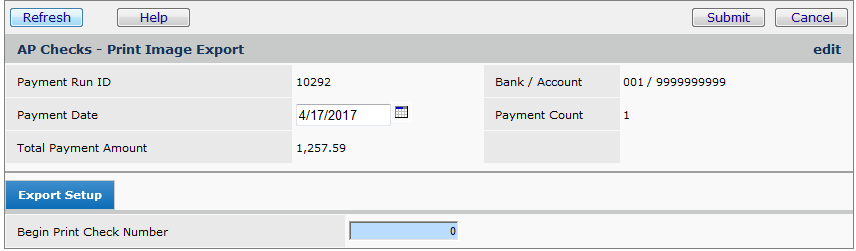
Figure 40 - The AP Checks Print Image Export Panel
- Enter the starting check number for the payments.
- Click Submit.
The check image export file is created and put it in the export queue.
You can view the check image export files from the Check Export list.
- From the AP Main Contents, select Imports / Exports > Check Export.
The list appears..
- Click Menu > Download Check File to transmit the file.
Processing Checks for Custom Export
If you need check files that contain specific information, perhaps
tailored to your check output application, you may wish to generate custom export
files for processed checks. Custom exports are .csv files that you create using
Report Objects. (For checks, you would use the "Check Printing"
Report Object.) Normally, you would define a custom export file for checks,
and then re-use the custom export definition for checks in each payment run.
The Payment Run ID field in the Check Printing Report Object specifies
which payment run the system should use in each custom export.
When you process checks for custom export, you must create a payment
run that has the Send AP Check Output To field set to Custom Export.
You must also process checks for the payment run, even though
you are creating an export file, because the processing step assigns check numbers.
To process checks for custom export:
- Build a payment run as described in Payment Run
Steps.
- For Send AP Check Output To, select Custom Export
(Figure 41).
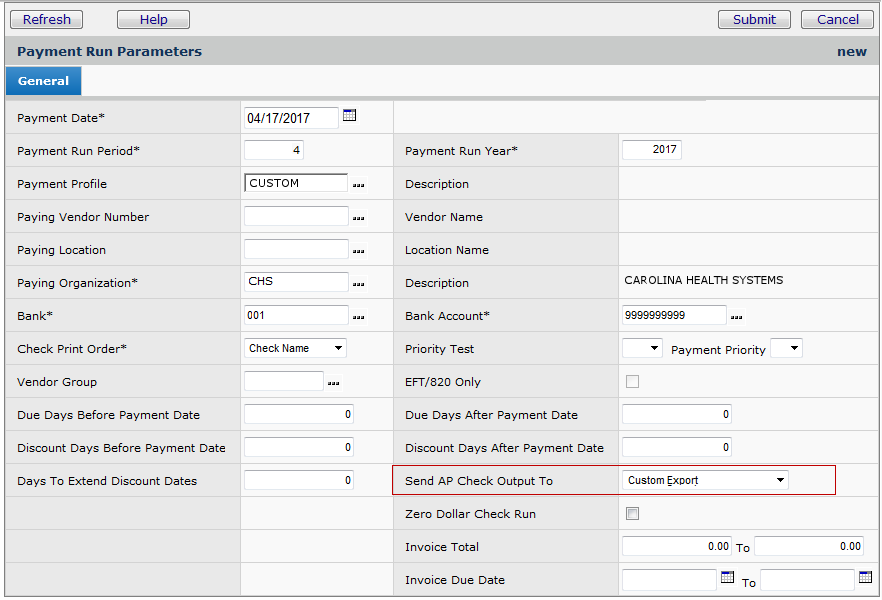
Figure 41 - Building a Payment Run for Custom Export
The system looks for Approved invoices that have not been assigned to
a payment run, and builds a new payment run (Figure 42).
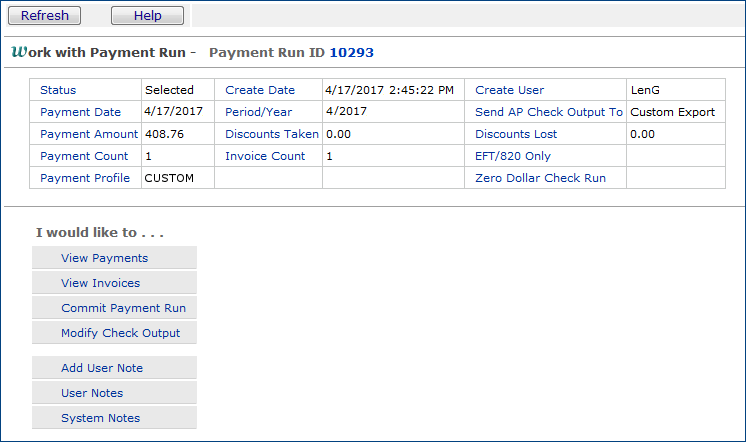
Figure 42 - A Payment Run for a Custom Export
- Commit to the payment run.
The Work With Payment Run panel is refreshed when the commit process
has finished.
- Click Process Checks.
The AP Checks Custom Export panel appears (Figure 43).
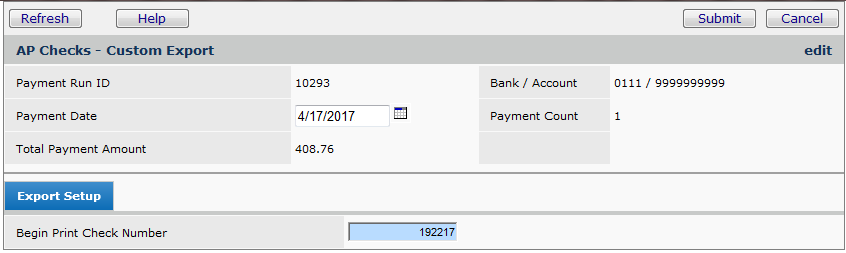
Figure 43 - AP Checks Custom Export Panel
- Enter the starting check number for the payments.
- Click Submit.
The system assigns the check numbers and returns to the Work With Payment Run panel.
Building a Custom Export for Checks
A custom export file definition tool is provided for specifying what
you wish to include in your check export files. Defining a custom export is
much like defining a report: you identify the fields for the export file, specify
their order, identify any that are selection fields, and so on. Once you have
created the definition, you can create custom export files for payment runs.
The steps below are a brief outline of the custom export definition process.
See also: Creating Custom Reports.
To create a custom export definition and check export file:
- From the Accounts Payable main Contents, select Imports/Exports > Custom Exports.
The list of custom exports appears.
- Click New.
The Create New Custom Export panel appears (Figure 44).
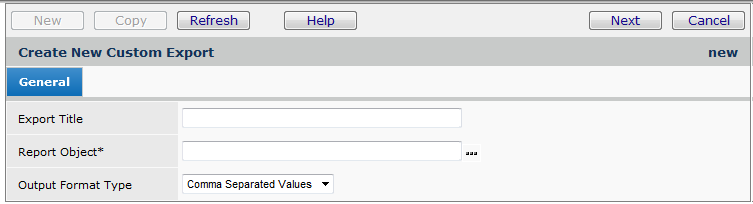
Figure 44 - Create New Custom Export Panel
- Enter a title for the custom export.
- Click the prompt for the Report Object field.
The Report Objects list appears.
- Select the "Check Printing" report object.
The system enters "Check Printing" in the Report Object field (Figure
45)
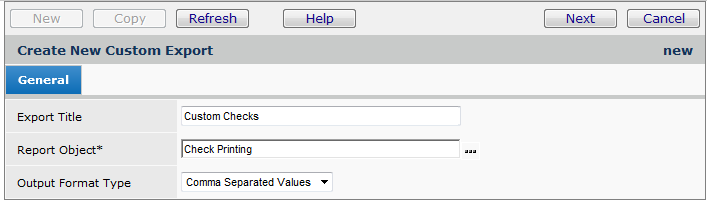
Figure 45 - Create New Custom Export for Check Printing
- Click Next.
The Custom Export Fields selection panel appears (Figure 46)
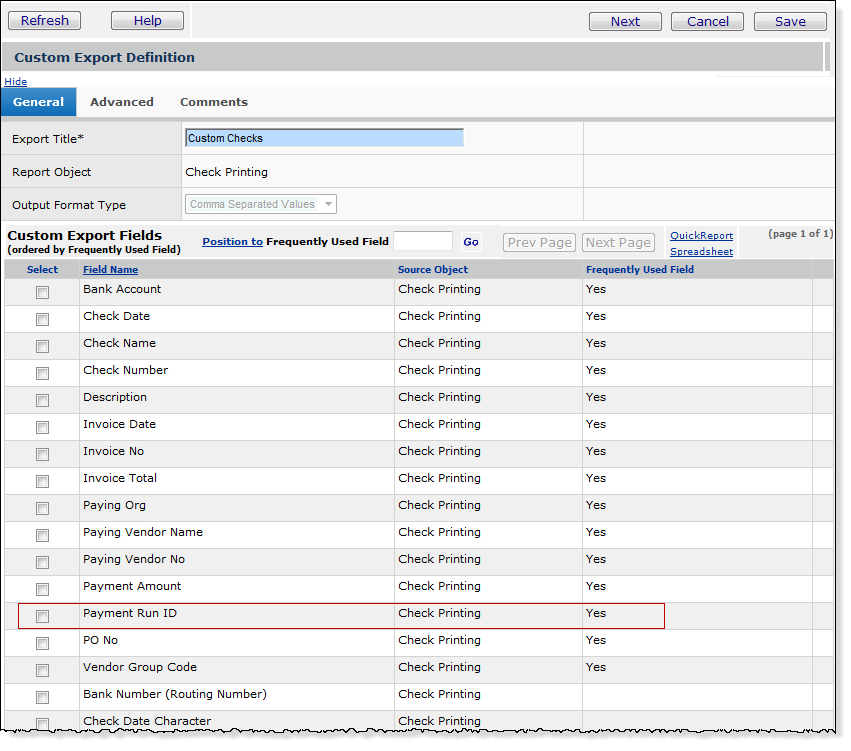
Figure 46 - Fields for Custom Export Definition
- Select the fields that you wish to include in the custom export
file.
Important: Among the fields that you select, be sure to select the Payment
Run ID field.
- Click Next.
The Selection Fields panel appears (Figure 47).
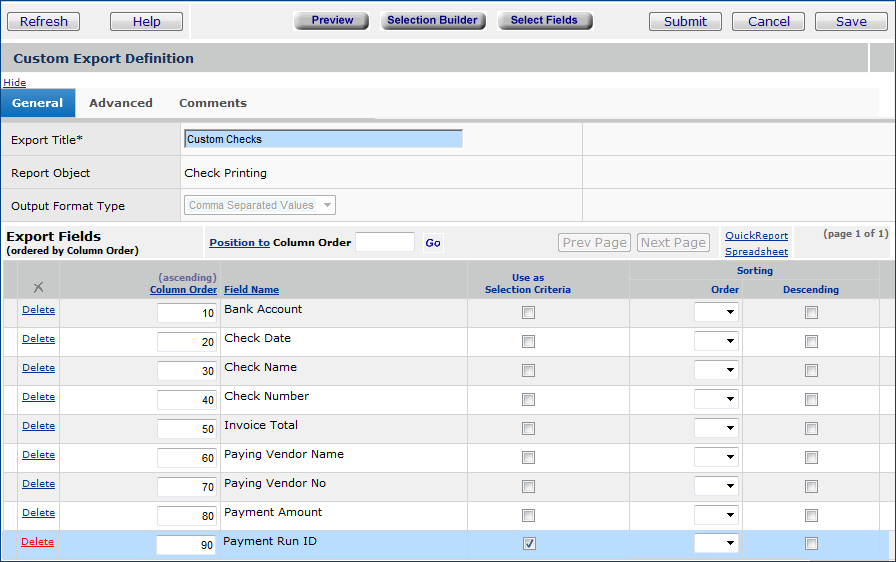
Figure 47 - Custom Export Definition Selection Panel
This panel lets you order fields horizontally in the export file (Column Order),
indicate which fields are selection criteria when the export is run, and specify
the sort order. Click Help for details on using this panel.
Important: Notice that in Figure 46, Payment Run ID is a selection field. You should select Payment
Run ID under Use as Selection Criteria. When you run the custom
export definition, the system prompts you for a Payment Run ID. This way, you
can generate export files for each custom checks payment run.
- Click Save.
- Click Submit.
You are returned to the Custom Exports list.
Generating the Custom Checks Export File
- To build the custom checks export file, locate the custom export title
on the Custom Exports list (Figure 48).
- Click Menu > Build Export. (Figure 48).
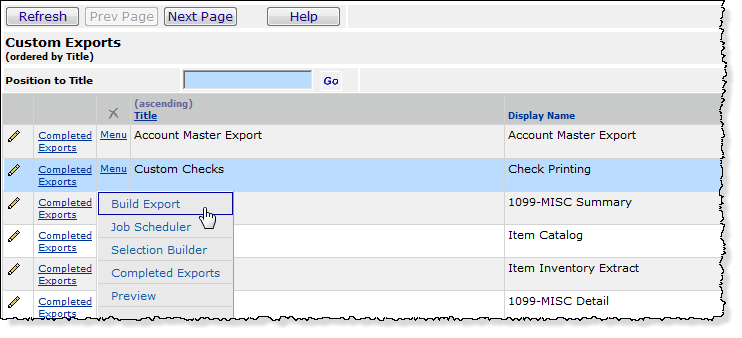
Figure 48 - Custom Exports Definitions List: Building the Check File
A prompt for the Payment Run ID appears (Figure 49)
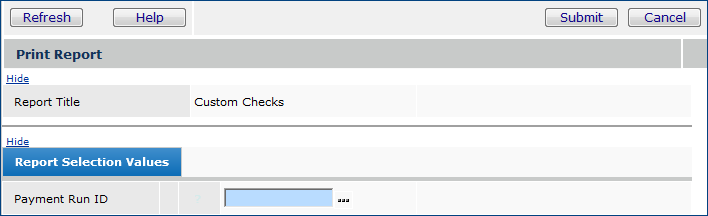
Figure 49 - Print Report Panel for Creating Custom Checks Export File
- Enter the Payment Run ID for which you wish to create
an export file.
-
The payment run must be processed and check numbers assigned.
otherwise, the export file will be empty.
- Click Submit.
The system sends you a message when the file is created, and returns you to
the Custom Exports List.
- Click Complete Reports to download your file.
Note: If you have Pulse (the client "gateway") set up, you can also use the job scheduler to
download the file automatically at a time you specify.
Auto-Generating Payment Check Numbers
Check numbers for an organization's payments can now be auto-generated. Auto-numbering avoids having to manually input the next check number for every payment run. An auto-numbering scheme can be set up for an organization's different banks, bank accounts, and payment methods. Check numbers can be auto-generated for all payment types; except, the Check Output Method Printer is not supported for payment groups.
With auto check numbering, each organization, bank, bank account, and optionally, payment method has an associated “next available” check number. The application automatically assigns this Next Check Number to payments in the organization's payment runs. In a payment run, as each check number is used, the next available check number is calculated by incrementing with a specified Increment By value. (The most common increment is one.)
The organization record must be flagged for auto-numbering of checks. You must also set up the Start Check Number and the increment for your default payment method for the bank(s) that you use. Additionally, you can set up auto-numbering for other payment methods: check, credit card/ACH, and local print. The Bank Accounts panels (Accounts Payable > Bank Accounts > Menu > Next Check Numbers) provide the setup fields.
For a payment on a single invoice, the system default is to use an auto-generated check number, except when the Check Output Type is Print.
Users can override auto-generated numbers by entering a check number (on the Process Checks panel) that is greater than the default auto-check number. The entered check number will be incremented, and updated for the next check run.
Restrictions:
On the Work with Payment Run panel, when auto-generated check numbers are used, the menu option Record Unused Checks is not available. Autonumbered check numbers cannot be reused.
Setup for Auto-Numbering Checks
The organization record must be flagged for auto-numbering of checks, and the organization must have -- minimally -- a default starting check number and check number increment assigned. The auto-numbering scheme -- initial check number, increment, payment method, and final check number -- must be set up for the payment bank account.
Organization record
- From the Accounts Payable main Contents, select Tables > Organizations.
- Locate the organization of interest.
- Click the edit icon.
The Organization Edit panel appears.
- Click the tab AP Info (Figure 50).
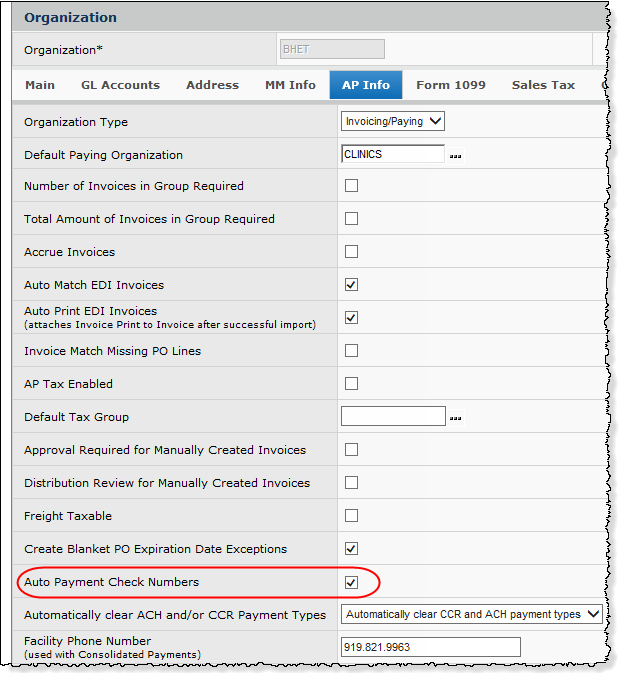
Figure 50 - Setting Auto Check Numbers on the Organization Record
- Select the field Auto Payment Check Numbers.
- Click Save and Submit.
Note: If the organization's Auto Payment Check Numbers field is selected, but no default check numbers have been assigned for the paying bank, an error occurs when payments are processed.
Bank Accounts
For each bank account/payment method combination that you use to pay checks, you set up beginning and ending check numbers. Minimally, you must set up default values. You can also set up values for different payment methods.
For example, imagine that you have set up a bank account to auto number checks for the Credit/ACH payment method. A payment run using that payment method is processing checks. The system will begin auto numbering with the Next Check Number available for the Credit/ACH payment method for the bank account. If no auto numbering were set up for the Credit/ACH payment method, the system would use the Next Check Number associated with the Default.
The Bank Account panels contain the auto numbering fields for checks.
To set up check auto numbering for a bank account
- From the Accounts Payable main Contents, select Bank Accounts > Bank Accounts.
The list of bank accounts appears. Figure 51 is an example.
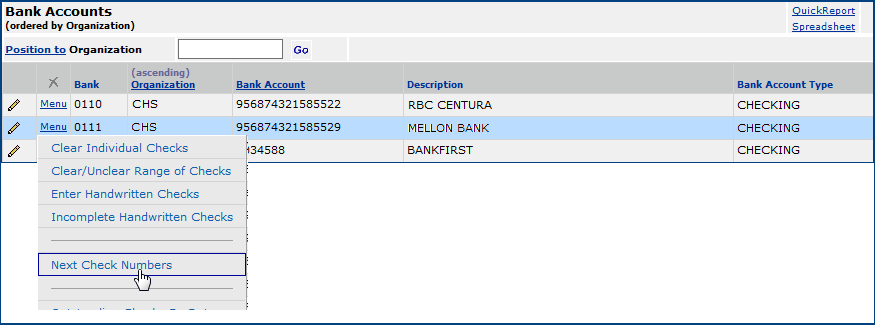
Figure 51 - List of Bank Accounts for an Organization
- Click Menu > Next Check Numbers next to the bank account that you wish to use for the payments. The list of Next Check Numbers panel for the bank account appears (Figure 52).
The Item Key value is a concatenation of identifiers for organization, bank, bank account, and payment method. Values for the payment method -- the last integer after the | delimiter -- can be:
0 - Default
1 - Local Print
2 - Check
3 - Credit Card/ACH.
In Figure 51, the final integer in the Item Key is a zero, so the Default value for the Next Check Number has been set up.
Imagine that the user wishes to set up a value for Credit/ACH payments.

Figure 52 - List of Payment Types Set Up for Auto Check Numbering for a Bank Account
- Click New. The Next Check Number edit panel appears (Figure 53).
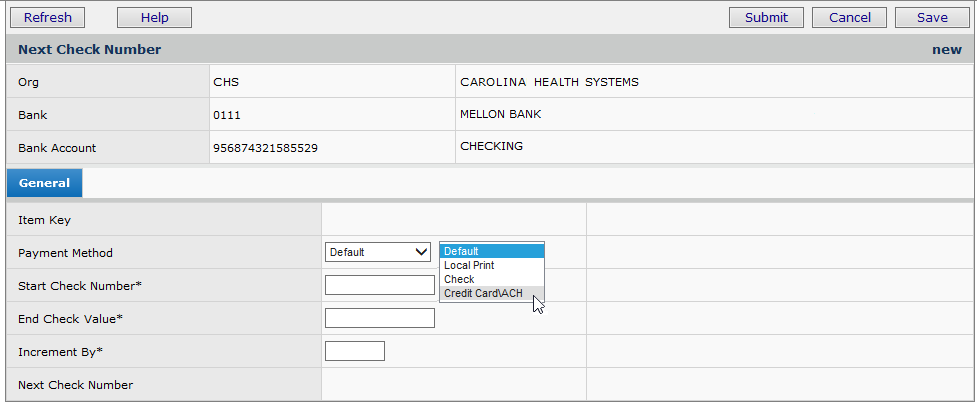
Figure 53 - Next Check Number Edit Panel
- Select a Payment Method. In this case, the user selects Credit Card/ACH.
- Enter a Start Check Number.
The Start Check Number is the numeric value to be used to start auto numbering checks.
The Start Check Number must be higher than the bank account's current highest check number.
- If you don't know what the highest number is, enter a small value and click Save. An error message tells you the highest number; e.g., Figure 54.
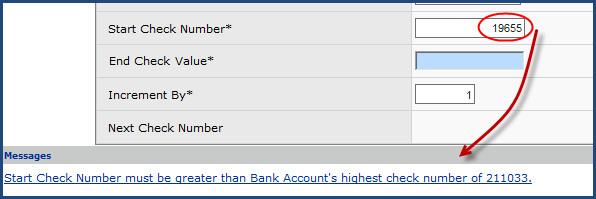
Figure 54 - Start Check Number Needs to Be Higher
- Re-enter a number higher than the number in the message.
- Enter an End Check Value -- the last check number to be calculated via auto-numbering.
- Enter an Increment By integer. Typically, checks increment by one, but you can enter a different integer.
- Click Save. The system fills in a value for the Next Check Number.
- Click Submit.
When a payment run is ready to process checks, the system populates the Beginning Check Number for the payments.
Note for Administrators: System Keys
The values from the Bank Account panels for banks, bank accounts, organizations, payment methods, and check beginning/ending numbers, plus the increment, are stored as System Keys. (System Keys are accessible from the "Work in Administration" panels. The appropriate authorization is needed.) Once a payment run's processing is complete, the System Keys are updated with the correct Next Check Number.
If you change the Default check number in the Bank Account panels, the appropriate Key Value for checks is updated with the new check number.
Using Auto-Numbering when Processing Checks
Check processing with auto-numbering is the same as when you manually number checks, except that you do not need to specify check numbers for the check run. The beginning check number is filled in for you. Figure 55 is an example. The system automatically applies a check number from the parameters that you have set up in the bank accounts panels.
Figure 55 - Processing Auto-Numbered Checks in a Payment Run
How Auto-Numbering Works
When you process checks in a payment run, the system determines if the next check number already exists on a payment for the same organization, bank, bank account, and optionally, payment method. If a duplicate is detected, the check number is incremented according to the Increment By integer. The test is performed again until a unique check number can be assigned. That check number is incremented to create additional checks for the payment run.
When a payment run completes the processing of checks, the stored values for the organization, bank, bank account, and payment method are associated with the next check number available. This value becomes the Beginning Check Number for the next payment run (Figure 55).
Eventually, as you are processing checks in payment runs, you will reach the last check number associated with the End Check Value (Figure 54).
When this situation occurs, you will need to
edit the Next Check Number panel and enter a new End Check Value.
Recording Unused Checks
Whether you process checks for export or print them locally, you may have unused
checks in a check run, and need to record their numbers.
Note: If you are auto-numbering checks, unused checks do not apply: You cannot record any.
To record unused checks:
- Follow steps 1 through 6 in To view
invoices in a payment run.
- On the Work With... panel, select Record Unused Checks (Figure
56).
Figure 56 - Work With Payment Run Panel: Record Unused Checks
and Void a Range of Payments
- Click Go. The form for recording unused checks appears
(Figure 57).
Figure 57 - Form for Recording Unused Checks
- Make corrections as needed to the check date.
- In the fields From Check Number and To Check Number, enter
the beginning and ending checks in the range of unused checks.
- Click Submit.
The system returns to the Work With... panel and runs the job to record
the unused checks. You get a message that "Recording Unused Checks is
Pending."
- When the job is finished running, clicking Refresh deletes
the message.
You can void payments that are Completed,
if you need to. Also, you can reinstate a payment that you have voided. For
instructions on how to void and reinstate payments, see Voiding/Reinstating
Payments.
Entering
Handwritten Checks
From time to time, you may need to
write checks by hand, and enter them into the system. You can use the Handwritten
Checks feature to associate a manual check with an invoice.
To
enter handwritten checks:
- From the Accounts Payable main Contents, select Bank Accounts.
A list of bank accounts appears.
- Next to the bank account that you wish to use for the handwritten check,
select Menu > Enter Handwritten Checks.
The Create Payment panel appears (Figure 58).
Figure 58 - Create Payment Panel
- Enter information for the check.
- Select the Paying Vendor Number from the prompt.
- Enter the Check Number.
- Review and correct the Paying Location for the vendor and the Check
Date, if needed.
- Click Submit.
The Select or Omit Invoices for Payment panel appears (Figure 59).
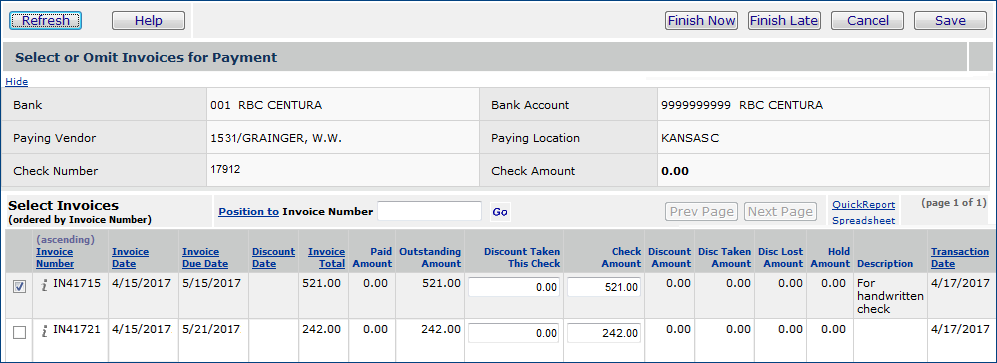
Figure 59 - Handwritten Check Select/Omit Invoices for Payment Panel
- Select the invoice or invoices that you wish to pay with the check
by clicking in the box in the first column of the Select Invoices panel. Note
that boxes in the column Fully Paid are selected by default. If you
wish to make partial payment, select the Fully Paid box for the invoice.
(Selecting the box "unchecks" it.)
- Click Save.
- Click Finish Now to complete the payment. Or, click Finish Later
to make the information available for finishing at another time. (See Incomplete
Handwritten Checks.)
To view the payment on the Payments list, from the AP main Contents,
select Payments > Payments. The check number appears in the Check
Number column and the Payment Status is Completed.
Incomplete Handwritten Checks
You may encounter situations in which you cannot finish a handwritten check
immediately, but must come back to it later. The system keeps a record of your
incomplete handwritten checks, and makes them available for you to finish or
delete.
Note that both the AP Bank Accounts menu and the AP Table for
Banks allow you to enter handwritten checks. The discussion below refers
to Bank Accounts.
To complete or delete a handwritten check:
- From the Accounts Payable main Contents, select Bank Accounts.
A list of bank accounts appears.
- Next to the bank account that you used for the handwritten check, select
Menu > Incomplete Handwritten Checks.
A list of incomplete handwritten checks for the bank account appears.
- Locate the check that you wish to complete or delete.
To delete the check
- Select Menu > Delete Incomplete Check.
You are asked to verify that you wish to delete the check.
- Click Submit. The check is deleted and disappears from the list.
To complete the check
- Click the edit icon, or select Menu > Edit.
The Select Invoices for Payment panel appears.
- Select the invoice that you wish to pay by clicking the box next to the Invoice Number.
The total amount of the invoice is entered in the Check Amount field by default.
-
If you wish to make partial payment, enter the amount that you wish to pay in the Check Amount field.
- Enter any applicable discount amount in the field Discount Taken This Check.
- Click Save.
- Click Finish Now to complete the check. (When you click Refresh on the list of incomplete handwritten checks, the check disappears.)
Clearing Checks in Reconciling Bank Statements
Clearing checks is a part of bank reconciliation, and is available in the system
AP. You can access a list of checks for each of your bank accounts from these
areas on the AP Contents.
- Bank Accounts contents
- AP Tables > Banks
The discussion below uses the Bank Accounts panels to clear checks manually.
Note: You can also use the Cleared Checks Import function to clear checks automatically on import to the system. See Importing Cleared Checks .
To clear individual
checks:
- From the AP main Contents, select Bank Accounts.
The Bank Accounts list appears.
- Locate the bank account that you wish to reconcile.
- Next to the bank account, select Menu > Clear Individual Checks.
A list of checks for the bank account appears.
- Enter the Cleared Date for the check. Figure 60 shows part of a list
of checks to be reconciled, and one check being cleared.

Figure 60 - Clearing Individual Checks
- Select the box in the Cleared column next to the check.
- Adjust the amount of the check to be cleared by editing the Cleared Amount
column.
- Click Save. The date appears in the Cleared Date column.
- Click Finish Now. You are returned to the Bank Accounts list.
To clear or "unclear" a range of checks:
- From the AP main Contents, select Bank Accounts..
The Bank Accounts list appears.
- Locate the bank account that you wish to reconcile.
- Next to the bank account, select Menu > Clear/Unclear Range of Checks.
The selection panel appears (Figure 61). Use this panel to specify the range
of checks that you wish to clear or "unclear."
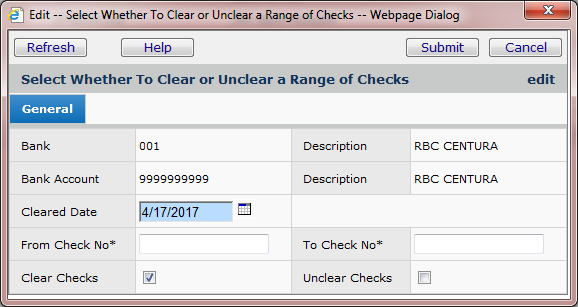
Figure 61 - Selection Panel for Clearing or "Unclearing"
a Range of Checks
- In the From Check No field, enter the first check number
in the range of checks that you wish to clear.
- Enter the last check number in the field To Check No.
- Select Clear Checks to indicate that the checks have cleared. Select
Unclear Checks to designate previously "cleared" checks as
"outstanding" again.
- Click Submit.
You are returned to the Bank Accounts list and sends messages while the
clear or "unclear" job is running.
Display Outstanding Checks
This utility is an alternative to the "Checks Outstanding" report so that users can generate an accurate list of outstanding checks, as of a particular date.
On the Bank Accounts list, you can access the list of outstanding checks from the menu.
To display a list of outstanding checks:
- From the Accounts Payable main Contents, select Bank Accounts.
Locate the bank account of interest.
- Click Menu > Outstanding Checks By Date (Figure 62).
Figure 62 - The Bank Accounts List Menu
The system displays a panel for entering a Checks Outstanding As Of Date. Initially, the field is empty, and the list of outstanding checks is empty (Figure 63).
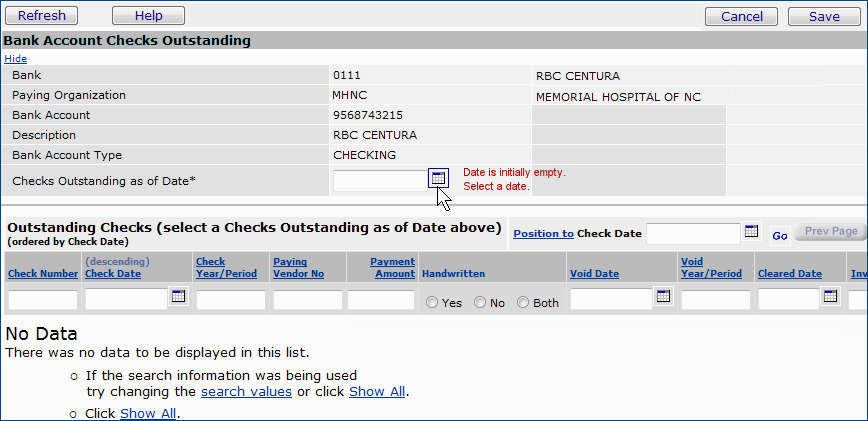
Figure 63 - The Bank Account Checks Outstanding Panel
- To display a list of outstanding checks -- not voided or cleared -- as of a particular date, select a date for Checks Outstanding As Of Date (Figure 64).
- Click Enter.
The list of outstanding checks appears based on the selected date (Figure 64).
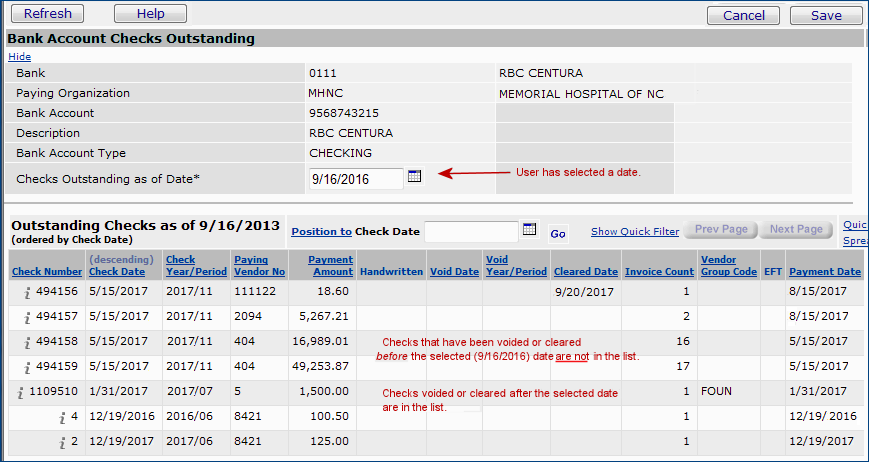
Figure 64 - List of Outstanding Checks for a Selected Date
 Checks that have been voided or cleared after the selected date appear in the list, along with the outstanding checks. The voided date and year/period is displayed, along with the cleared date when relevant.
Checks that have been voided or cleared before the selected date are not in the list.
View
AP Transactions for Payments
- From the Accounts Payable main Contents, select Payments > Payments.
The Payments list appears.
- Use the Search function to locate the payment that you are interested
in.
- Next to the payment, select Menu > View AP Transactions.
The system displays the AP transactions associated with the payment.
Making payments to a group of OneTime vendors using a Payment Profile
This technique - outlined broadly below - can be used to pay a group of OneTime vendors, such as patient refund invoices (whose vendor is OneTime) that have been imported from another application.
- Create a Vendor Group named onetime.
- Associate a Payment Profile with Vendor Group onetime.
- Assign vendor OneTime to vendor group onetime.
- Create a payment run for vendor group onetime.
In selecting invoices for the payment run, you can select all the outstanding OneTime invoices, for example. Then, review the list of selected invoices and delete from the payment run any invoices that you do not wish to pay in the run.
Reports
Several reports are available to assist you in working with checks:
Check Register Summary - Displays check summary information including: check number, check date, payee, vendor number (for the payee), check amount, and the check was later voided, and whether the check was written manually.
Check Register Details - Displays check details including: bank and bank account, check number, date, amount, payee, payee vendor number, whether the check was later voided, whether the check was handwritten and invoice data (if relevant): the invoice number, invoice date, the outstanding amount, held amount, discount amount, and payment amount.
Checks Cleared Report - Lists checks that have cleared.
Checks Outstanding Report - Displays a list of outstanding checks for a period/year, including checks that were voided in a later period for the year.
To use this report, for Check Acct Year Period, enter a year and period in the format YYYYPP. (The field defaults to LE -- less than or equal to -- for the year you specify.)
When you run the report, voided checks are included.
Note: The report does not include payments of $0.00, nor payments where the check year and period are the same as the voided year and period.
Checks Voided Report - Displays voided checks.
To run the reports:
- From the AP or Materials Management main Contents, select Reports > Standard Report Definitions.
Handle Unclaimed Payments (Escheats)
Escheat refers to the power of a U.S. state to acquire title to property for which there is no owner. Typically a hospital has accounts payable checks that have not been cashed for a number of months. The hospital attempts several times to locate the payee; if unable to do so, the hospital is required to send the money to the appropriate state for the payee.
The escheat process lets you select uncleared checks based on a check date within a range of dates, a bank account, an organization, and a state. You can review the selections, and unselect any that are not relevant. You can then create escheats payments from the selected uncleared checks.
Security: The role object "Escheats" provides security for the feature.
Creating escheats is similar to creating payment runs. The Accounts Payable Payments menu (Figure 65) provides access to escheats processing:
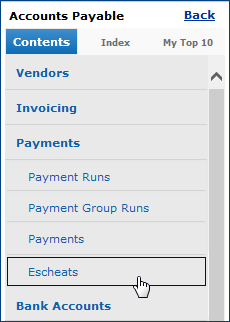
Figure 65 - Accessing Escheats (Unclaimed Property Returns) Processing
To process unclaimed payments (Escheats):
- From the Accounts Payable main Contents, select Payments > Escheats. The list of escheat runs appears (Figure 66), if any exist. Otherwise, the Escheat Runs panel is empty, and "No Data" appears.
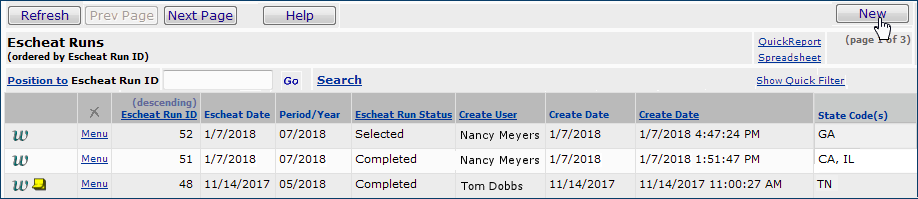
Figure 66 - List of Escheat Runs
- Click New.
The Escheat Run Parameters panel appears (Figure 67). Enter values in the panel fields to select
the uncleared checks for which you wish to create escheat payments.
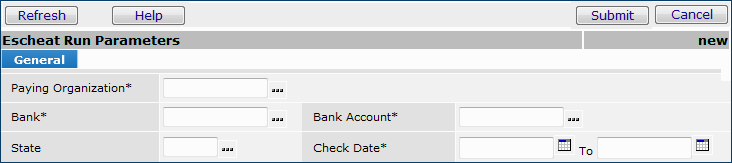
Figure 67 - Escheat Run Parameters Panel
- Enter information in fields marked with an asterisk (*). Use the fields
to specify your criteria for uncleared checks that the system should select. For example, in the Check Date fields, you may need to enter dates for uncleared checks of over 180 days, or for whatever timeframe is standard for your organization/state. Figure 68 is an example. (Click Help for detailed descriptions
of fields.)
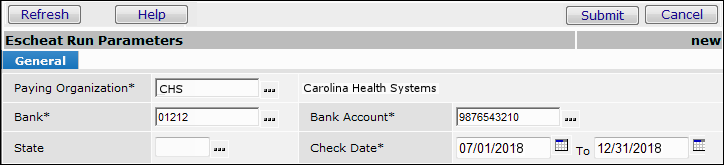
Figure 68 - Escheat Run Parameters Panel: Uncleared Checks Selected for a Six-Month Period
- Click Build.
The system looks for uncleared checks in the timeframe that you specified and builds the escheat run. The Work With Escheat Run panel
appears (Figure 69) and displays the message "Build
Escheat Run Pending."
-
Click Refresh. When the build is complete, the message
disappears, and the Escheat Count field displays the number of escheat payments. The Invoice Count field initially contains zero.
The escheat run in Figure 69 was built by selecting checks for a six-month range (Figure 68). Six uncleared checks (in the Escheat Count field) were identified in the timeframe selected.
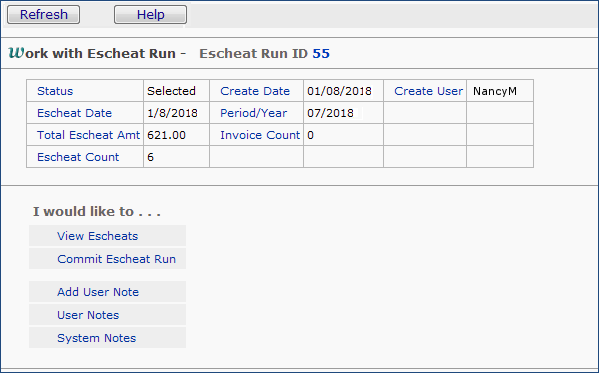
Figure 69 - The Work With Escheat Run Panel - Six Escheat Payments Selected
- Click View Escheats and Go to display a list of escheats in the run. You can click the Menu to view invoices associated with the uncleared check, or to delete the escheat from the run (Figure 70).
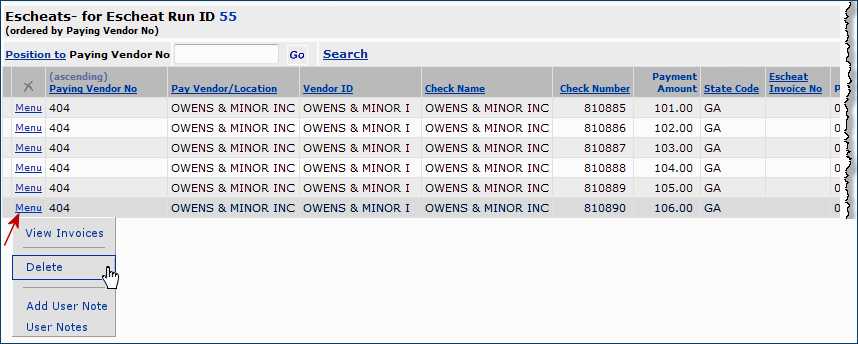
Figure 70 - Displaying a List of Escheats in an Escheat Run
- On the Work With Escheat Run panel (Figure 69), click Commit Escheat Run and Go.
A confirmation panel appears.
-
Click Submit.
The Work With Escheat Run panel is refreshed when the commit process
has finished (Figure 71). The Status displays the value Committed.
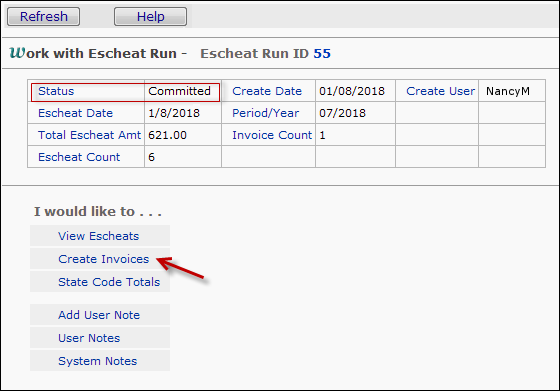
Figure 71 - Work with Escheat Run: Committed Status
6. Click Create Invoices and Go (Figure 71) to generate invoices for the US states to which the escheat payment checks for the escheat run are to be sent.
A confirmation panel appears.
-
Click Submit.
Click Refresh to refresh the Work With Escheat Run panel (Figure 71). The Status displays the value Completed (Figure 72). Invoices are created as Approved.
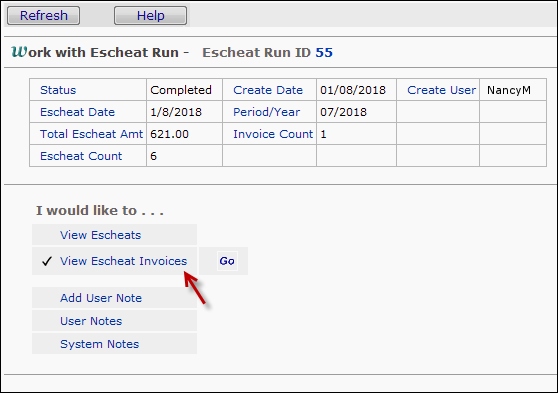
Figure 72 - Creating Invoices for Escheats
- To display invoices associated for the escheat run, click View Escheat Invoices.
Approved invoices for the states for the unclaimed checks appear (Figure 73).

Figure 73 - Viewing Escheat Invoices
Notice that the Invoice Number for an escheat invoice contains the prefix "EC," that the Invoice Status is Approved, and that the Invoice Due Date is automatically set to one month from the Invoice Date.
- To display totals for all the state payments included in the run, click Go next to State Code Totals (Figure 71). A list of the totals appears (Figure 74). You can display the state totals for an escheat in any Status: Selected, Committed, etc.
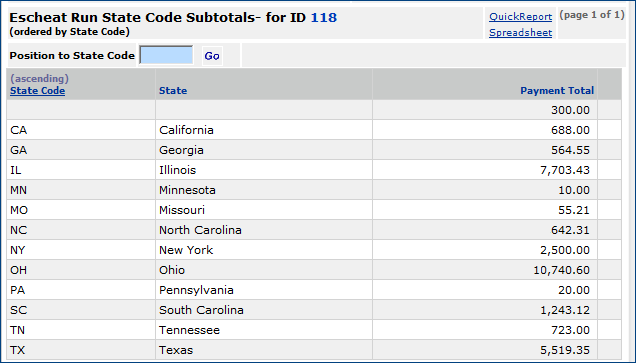
Figure 74 - Escheat Run State Totals
At this point, you can proceed to generate payments for the escheats using payment processing and check processing.
For escheats, the payment method is either Local Print or Checks.
Editing Approved Escheat Invoices
Escheat invoices that have been approved can be edited. This feature makes it easier for sites that need to generate escheat payments in different formats; e.g., paper check, electronic transaction, etc. Also, it will allow sites to put approved escheats invoices “on hold” until payment is required.
To edit an approved escheat invoice,
- From the Accounts Payable main Contents, select Payments > Escheats. The list of escheat runs appears.
- Locate the escheat run of interest and click w to work with the escheats in the run. The Work with Escheat Run panel appears.
- Click View Escheat Invoices and Go to display a list of invoices in the run.
- Locate the invoice of interest and note its Invoice Number.
- Open the Invoice List in Accounts Payable (Accounts Payable main Contents > Invoicing > Invoices).
- Locate the approved escheat invoice using the Invoice Number you found in Step 4.
- Click Menu > Edit to edit the invoice.
Import and View Payments from an External Application
Payments made in an external system can be imported into ERP for viewing, avoiding the need to access the external system separately for payment information.
Accounts payable staff using ERP need to see invoices and payments that reside in an external system (such as Oracle and others). Normally, this task would require staff to access the external application to display payments. This feature lets you import payments into ERP for viewing, and avoids having to open the external payment application for the information.
A .csv file template is available for the payment imports. You can send the template to the external application's IT staff. Once the .csv file containing external payments is in a location on your network, you can upload the file, and import it into ERP. Payments made in the external system and invoice statuses are then available for inquiry in ERP. The import is the standard ERP import.
Note: Sites that export invoices to an external system for payment have the System Value Export Invoices to External System set to "on."
(Figure 75).
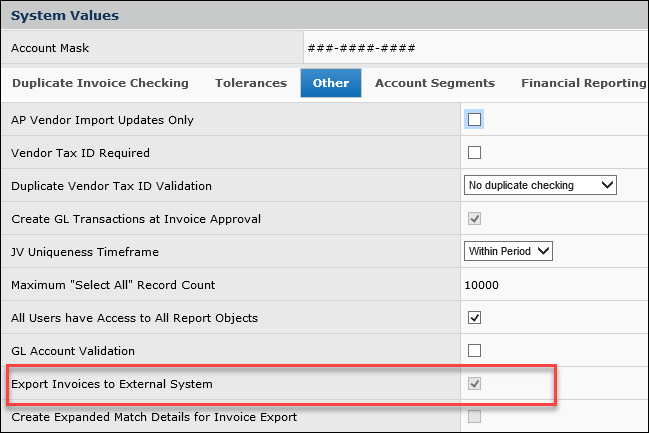
Figure 75 - Setting a System Value to Export Invoices to an External Payment System
Administration > System Values > edit > Other
File format and fields
Figure 76 contains the format and fields for the .csv payment upload file. You must save the file as a .csv. The last line of the file must contain EOF, by itself.
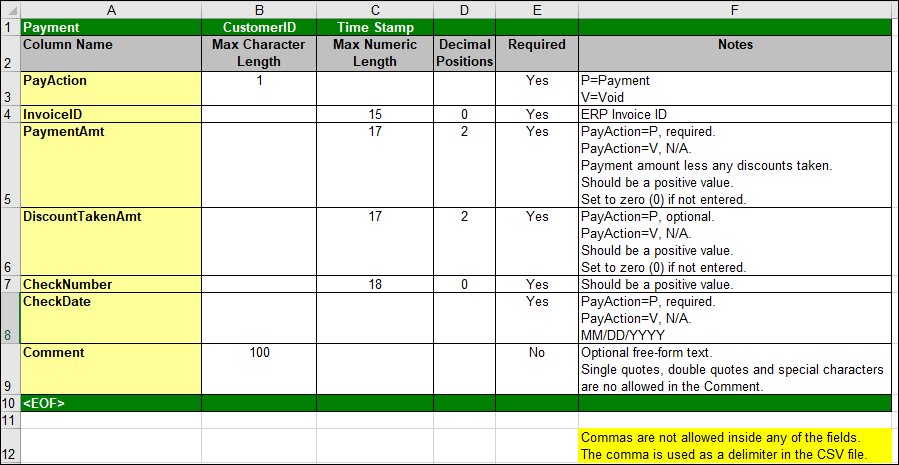
Figure 76 - Fields for the Payment Import .csv Upload File
Figure 77 is an example of a payment import file containing data. (Note: the data are displayed in Excel, but the file must be a .csv file.)
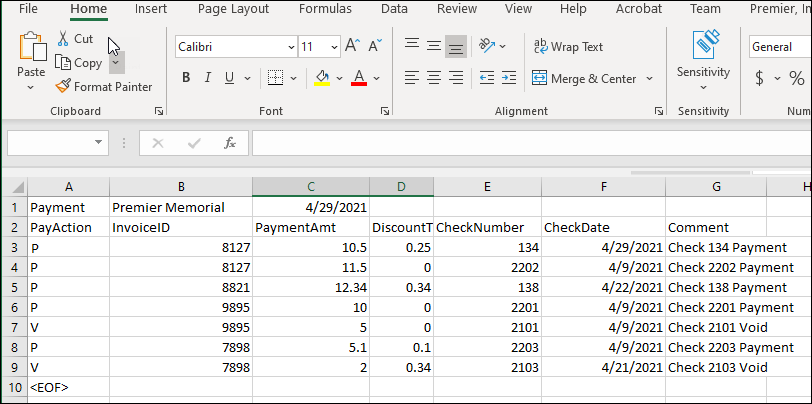
Figure 77 - A Sample Payment Import File Displayed in Excel
Upload process
Payments from an external application are imported using the standard import process.
- From the Materials Management main Contents, open Imports/Exports and Financials > Payment Import.
You can also open the Payment Import list from Accounts Payable > Imports/Exports.
A list of import appears, if any exist. Otherwise, No Data appears.
- Click New. The Import Panel appears (Figure 78).
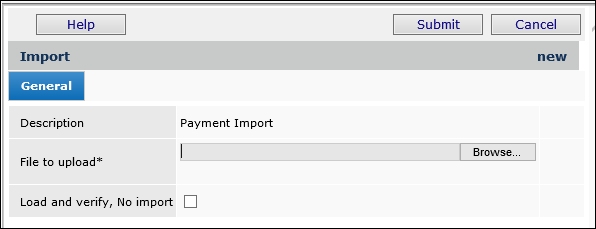
Figure 78 - The Import Panel for Uploading a Spreadsheet of Payments
Materials Management main Contents (or GL) > Imports/Exports and Financials > Payment Import > New
- Enter the file that you wish to import in the File to Upload field.
- Click Browse to locate the file in your local network folder, then click the file to select it.
- At this step, you have a choice. You can work through the import process in two stages or in one stage.
If you have uploaded files to the application before, use the one-stage approach, as follows:
- Click Submit. The system attempts to upload your file and validate it. The Imports... list appears.
- Click Refresh to see your file listed on the Payments Imports list.
For new users of this feature, we recommend the two-stage import approach. The two-stage approach first loads the file and validates it.
Once the file has successfully loaded, you can process it manually to import it into the application.
Figure 79 is an example of the Payment Import list with several imported files. From the Menu, you can reprocess a file, open a file and view the import details, download a file to a network location, or delete a file.

Figure 79 - Payment Imports List
Materials Management main Contents (or GL) > Imports/Exports and Financials > Payment Import
Invoice and Payment Inquiry
For invoices whose payments are imported from an external system, the Invoice Inquiry panel contains a new tab: Payment Imports. This tab displays data from the import (Figure 80).

Figure 80 - Inquiring on an Imported Payment for an Invoice
Materials Management main Contents > Invoicing > Invoices > i
From the menu, you can review payments for the invoice lines (Figure 81). Notice in Figure 81 under Pay Action that one payment with check 124 was subsequently voided.
- For PayAction P, invoice will have the Status of "Complete" or "Part Paid."
- For PayAction V, invoice will have the Status of "Paid In Full" or "Part Paid."
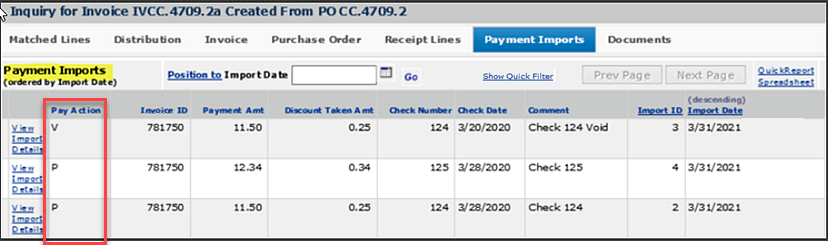
Figure 81 - Details of Inquiry on an Invoice with Imported Payment Information
Materials Management main Contents > Invoicing > Invoices > i >
You can display further details (Figure 82) by clicking View Import Details.

Figure 82 - Drill Down on Inquiry Details for an Imported Payment
Materials Management main Contents > Invoicing > Invoices > i > Payments tab > View Import Details
Copyright © 2023 by Premier Inc. All rights reserved.

