Export Materials and Accounts Payable Transactions Version
Contents
Overview
General Ledger sites can create export files for Materials Management and Accounts Payable
transactions, and then import the files into General Ledger, or download the
files to an external network. For transaction files imported to General Ledger,
the system can create journal vouchers automatically during the import process.
Journal vouchers can also be created manually from the transaction files.
For exports to an external system, the system generates a .csv
(comma-separated) file for downloading.
If you
are working in Materials Management, you can export files containing both materials
and accounts payable transactions. If you are working only in Accounts Payable,
you can similarly export accounts payable transactions.
Financial Reporting Fields
Your site may be set up to use Financial Reporting Fields in various parts of the application. Similarly, you may also be using Project Codes and Fund Codes.
Financial Reporting Fields, along with Project Code and Fund Code let you generate reports on non-account code fields. For example, your site might define Physician as a financial reporting field. Users could then select the physician associated with a journal voucher, for example.
If financial reporting fields are used by your site, the tab Fin Reporting appears on the panels. (Otherwise, this tab does not appear.) You can enter field values on the tabbed panel.
Details are in Using Financial Reporting Fields in ERP.
Security
This feature is controlled by the "GLFINExport" role object. To view the list of GL export files, the minimum setting is View. To create or download export files, the setting must be Create.
Empty Export Files
A setting on the System Values panel addresses the situation in which a large volume of exports is processed through Pulse and many of the export files are empty. The field is Auto-Complete Empty Exports, and it applies to GL exports, AP transactions exports, item exports, and warehouse exports.
For details, see Auto-Complete Empty Exports.
To
view a General Ledger export file
- From the Materials Management main
Contents select Imports / Exports & Financials > GL Export.
The GL Export list appears (Figure 1).
- If you are working with Accounts Payable, from the Accounts Payable main Contents, select
Imports / Exports > GL Export.
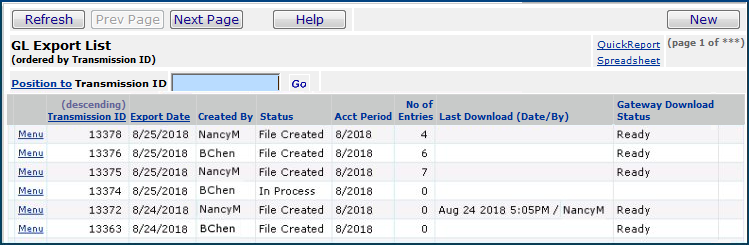
Figure 1 - GL Export List
The system numbers export files consecutively
and assigns a Transmission ID to each. The GL Export list shows the Transmission ID, the Export Date, the user ID of the person who
created the export file (Created By), the "create" Status
of the export file, the accounting period (Acct Period), and the
number of entries in the export file.
For
files downloaded to external systems, the Last Download column shows
the date and time when the file was last downloaded, and the user responsible
for the download. When Pulse is configured to handle downloads, the export
status appears in the Download Status column.
- To view the transactions in any of the export
files, click Menu > View Transactions. The Export Detail list appears.
The list shows all the transactions in
the export file, the account code, the account name, the date of each
transaction, its type, the amount, and other information.
- Click Back to return to the GL Export list.
To create an export file and import transactions
to General Ledger
-
From
the Materials Management main Contents select Imports / Exports & Financials
> GL Export.
The GL Export list appears. (Figure 1)
- If you are working with Accounts Payable, from the Accounts Payable main Contents, select
Imports / Exports > GL Export.
- Click New. The GL Export Selection Parameters panel appears (Figure 2 and Figure 3).
This panel is a tool for you to identify the transactions that the system should
include in the export file.
The General panel lists transactions available for export. The fields allow
you to select transactions.
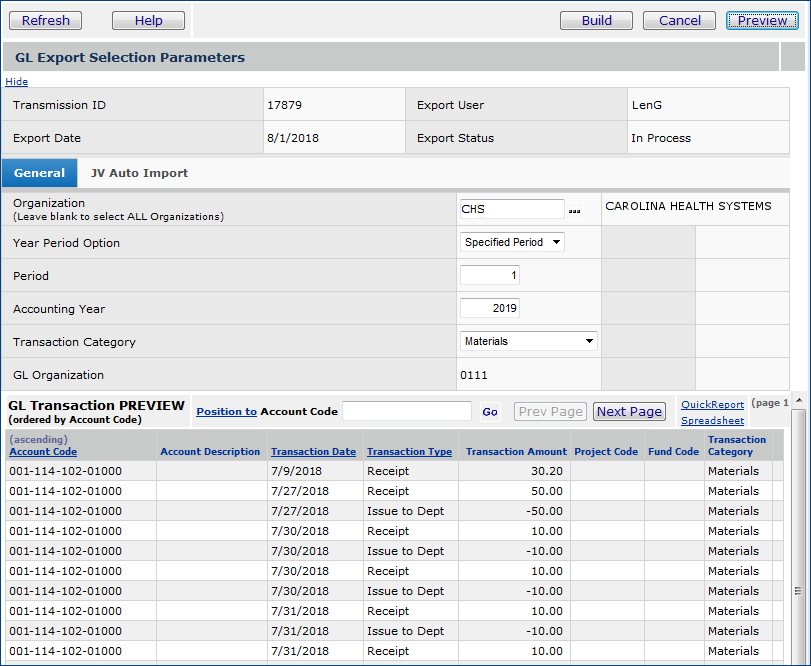
Figure 2 - Transactions Selection Panel for GL: General Tab
- Verify that the Organization is
correct. If not, use the prompt (...) to enter a new Organization.
The system selects transactions using the GL Organization code associated with
the Organization in this field.
- To create GL exports for all organizations:
- In the Organization field, delete the default organization value so that the field is blank. A blank Organization field creates GL exports for all organizations.
When you create GL exports for all organizations, the system creates exports only for organizations that actually have GL transactions to export. If an organization has no GL transactions that can be exported, no export is built for that organization.
GL exports are processed one at a time. When the system completes processing of one GL export, the next is processed. If any of the GL exports fails, you can resubmit it manually for processing, but the system continues to process the remaining exports until all are complete.
- Select the appropriate value from the Year Period Option field.
- Current Period exports transactions from the current period, according
to your financial calendar.
- If you are exporting transactions from the period immediately previous to
the current period, select Prior Period.
- If you are exporting transactions from a particular period, select Specified
Period. Then, enter the period in the Period field and the year
in the Accounting Year field.
- Select the Transaction Category.
Invoices (financial) and Payments - Invoice and payment transactions for financial accounts.
Materials - Materials-related transactions, such as Issues to Departments, and Inventory Adjustments.
Invoices (financial) - Invoice transactions such as Approving Credit Invoices that were created for financial account distribution lines; i.e., profit/loss or balance sheet.
Payments - Payment transactions.
Invoices(statistical) - Invoice transactions that were created for statistical account distribution lines.
The system selects transactions
for export from the category that you enter. For example, if you select Payments,
the system includes transactions such as Pay Invoice and Void Payment.
- Click Preview to update the selected
transactions list.
- Review the selected transactions list in the
bottom part of the panel.
JV Auto Import tab
(Figure 3)
This tab only appears if you have General Ledger enabled. Use the
JV Auto Import panel if you wish to create journal vouchers as part of the export/import
process.
Note: For AP and MM Journal Vouchers that the system creates
automatically during import, the fields Inter Org Transactions
Allowed and Auto Create Inter Org Entries on
the JV header are selected.
The JV Auto Import panel also appears when you are using the Job Scheduler
to schedule a GL export job. See Set Up Schedules for
Batch Jobs for details on how to use the scheduler.
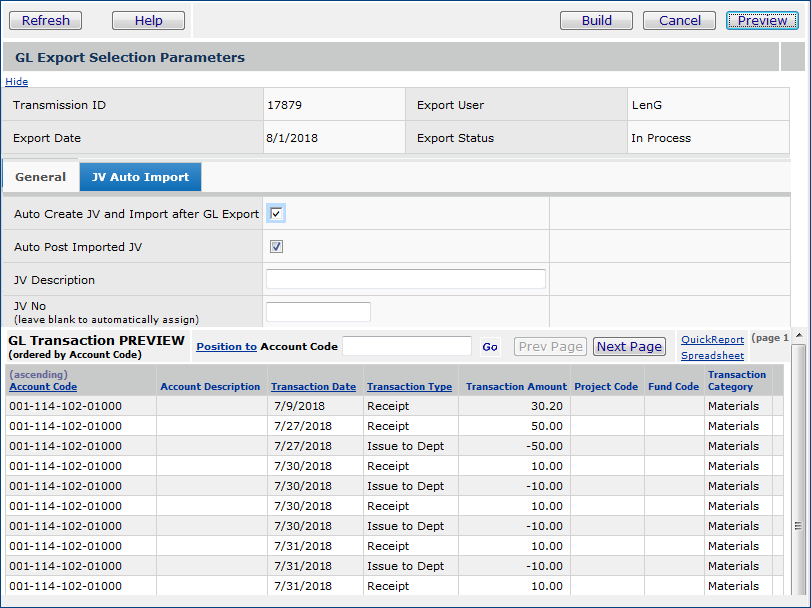
Figure 3 - Import Transactions to General Ledger as
Journal Vouchers
- Select or unselect the field Auto Create JV and Import after
GL Export as appropriate:
- If the field is not checked, select it to create journal vouchers
when you export transactions.
- If the field is checked when you open the panel, the setting is
your organization's default. (The default is entered on the Organization record.
See Fields on the GL Information Panel
in the discussion of Organization records.) To override your organization's
default and export transactions without creating journal vouchers, select
the field to "uncheck" it.
- Select or unselect the field Auto Post Imported JV
as appropriate.
- When selected, this field automatically posts the Journal Voucher. To be
able to use this field, you must have the appropriate authority set in your
user profile, and the feature must be enabled for your organization (on the
Organization's GL Information
panel.)
- Enter a description for the journal voucher(s) in the JV Description
field, if you wish.
- Enter a JV No, or leave the field blank.
If you leave the field blank, the system automatically assigns journal voucher
numbers. Materials transactions receive journal voucher numbers beginning
with "MM." Accounts payable transactions receive journal voucher
numbers beginning with "AP."
- Click Build. The system builds the export file
and returns you to the GL Export list (Figure 1).
- Your transactions export file appears in the GL Imports from Materials
and AP list (Figure 4)
- To view the list, from the General Ledger main Contents, select Imports
/ Exports > Imports from Materials and AP.
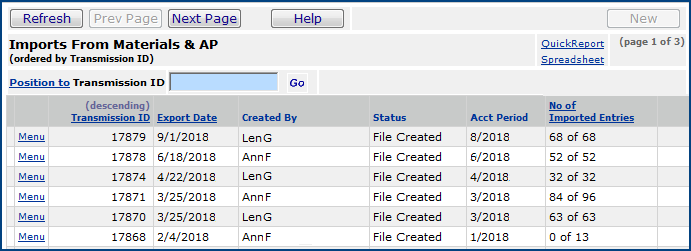
Figure 4 - General Ledger Imports from Materials and AP
- If you selected Auto Create JV and Import after GL Export
when you built the export file, the system automatically creates journal vouchers
for the transactions.
- Statistical transactions from invoice distribution lines are created as Journal Voucher Type Statistical. The journal voucher is processed and posted as a statistical JV.
-
Values from the distribution line for 1099 Code, Project Code, and Fund Code are not supported for statistical journal vouchers, and are ignored.
- To view the journal vouchers, select Menu > Journal Vouchers next
to the Transmission ID of the file (Figure
4). Figure 5 shows journal vouchers created for the
export file 13379 (at the top of Figure 4).
The journal vouchers have a JV Status of Entered,
if there are no errors. If errors exist, the status is Incomplete.
Note: Unless you specify a Journal Voucher Number,
the system assigns Materials transactions to the journal MM.
Accounts payable transactions are recorded in the journal AP.
These journals are created by the system. Journal voucher numbers are protected.
To override a system-assigned journal voucher number, you must have the appropriate
authority set in your user profile.
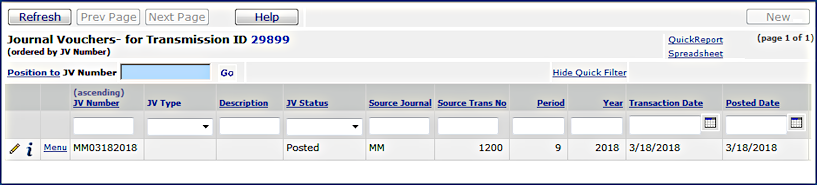
Figure 5 - Journal Vouchers Created for a File Exported to
General Ledger from Materials Management
- If you did not select Auto Create JV and Import after GL Export
when you built the export file, you need to create the journal vouchers for
the export file yourself.
- To create journal vouchers, select Menu > Create Journal Vouchers
next to the Transmission ID of the file (Figure 4).
To create an export file for sending transactions
to an external system
-
From
the Materials Management main Contents select Imports / Exports & Financials
> GL Export.
- Click New. The GL Export Selection Parameters panel appears, similar to Figure 2. Use the
panel to identify the transactions that the system should include in the export
file.
- Verify that the Organization is correct.
If not, use the prompt (...) to enter a new Organization. The system
selects transactions using the GL Organization code associated with the
Organization in this field.
- Select the appropriate value from the Year Period Option field.
- Current Period exports transactions from the current period, according
to your financial calendar.
- If you are exporting transactions from the period immediately previous to
the current period, select Prior Period.
- If you are exporting transactions from a particular period, select Specified
Period. Then, enter the period in the Period field and the year
in the Accounting Year field.
- Select the Transaction Category. Options are: Materials, Invoices,
Payments, Invoices and Payments. Transactions
are selected for export from the category that you enter. For example, if you select Payments,
the system includes transactions such as Pay Invoice and Void Payment.
- Click Preview to update the selected
transactions list.
- Review the selected transactions list in the
bottom part of the panel.
- Click Build. The system builds the export
file in .csv format and returns to the GL Export list.
- Click Refresh to view GL export file
that was built.
Note:
If you edit .csv
files, a text editor is preferable to a spreadsheet program. Spreadsheet programs
(e.g., Excel) add commas for blank columns. The system cannot process trailing
commas. Also, the spreadsheet column formats must match the formats expected
by the system. Simply saving your file from the spreadsheet does not guarantee
that the column formats will be correct. For this reason, editing and saving
a .csv file as text is better.
The system numbers the GL export files consecutively
and assigns a Transmission ID to each. The Export No and
Transmission ID may not always be the same.
To
download an export file to a local network
These steps download
an export file to a folder on your local network.
-
From
the Materials Management main Contents select Imports / Exports & Financials
> GL Export.
- If you are working with Accounts Payable, from the Accounts Payable main Contents, select
Imports / Exports > GL Export.
- You can also use these instructions to download EFT files. Select Imports / Exports > EFT Export.
- Locate the export to download.
- Click Menu > Download
file next to the export file.
The File Download window appears.
- On the File Download window,
select Save.
The Save As window appears.
- Use the down arrow on the Save in: box
to select the directory or folder where you want to store the exported file.
- The File name: field contains a file
name created by the system.
- For GL exports, the file name has the form: GLExportX.csv
where "X" is the Transmission ID.
- For EFT exports, the file name begins with "EFT" and has the extension ".DAT."
- Accept the file types in Save as Type.
-
For GL exports, accept Microsoft Excel Comma Separated Value
Files (.csv)
for the Save as type:. You can open this type of file with Microsoft
Excel, or with WordPad.
- For EFT exports, accept .DAT for the Save as type.
- Click Save.
- The File Download window shows the progress
of your export file as it downloads to the local network.
- When the download is complete, close the Download
window. The system returns you to the GL Export list or to the EFT Export list.
The Last Download (Date/By) field
on the list is updated with the date, time, and user ID for the
download.
To
create an Accounts Payable export file for download to a local network:
- From
the AP main Contents select Imports / Exports > AP Transactions Export.
The AP Transactions Export list appears.
This list (similar to Figure 1) contains export files
that have been created for AP transactions such as Approve Invoice, Pay Invoice,
Void Payment, and others.
- The system numbers export files consecutively and assigns a Transmission
ID to each. The Last Download column shows the date and time
when the file was last downloaded, and the ID of the user who performed the
download. When Pulse is configured to handle the export, the export status
appears in the Download Status column.
- To
view the individual AP transactions in any of the export files, click Menu
> View Transactions next to the export file.
The Exported AP Transaction list appears (Figure 6). The
list shows all the AP transactions in the export file by organization and
invoice number. You can sort the list on the Invoice Number and vendor
AP Location columns.
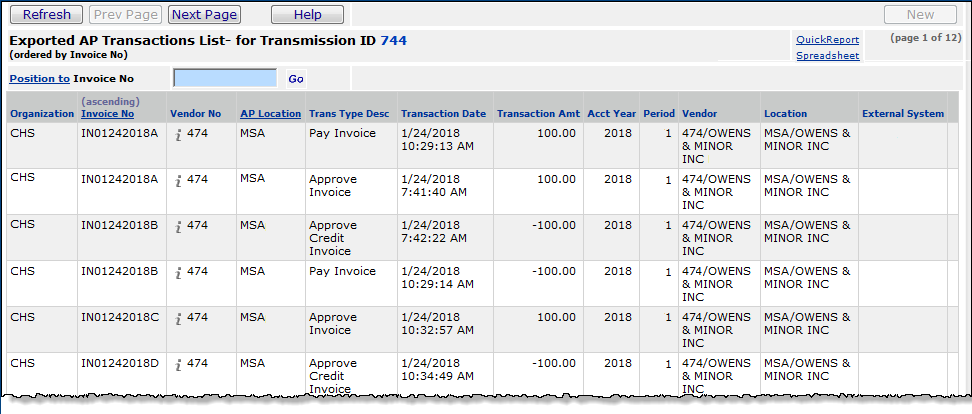
Figure 6 - List of Transactions in an AP Export File
- From the AP Transactions Export list, click New. The AP Transactions Export
Selection Parameters panel appears (Figure 7). This
panel lets you identify the transactions that the system should include in the
new export file.
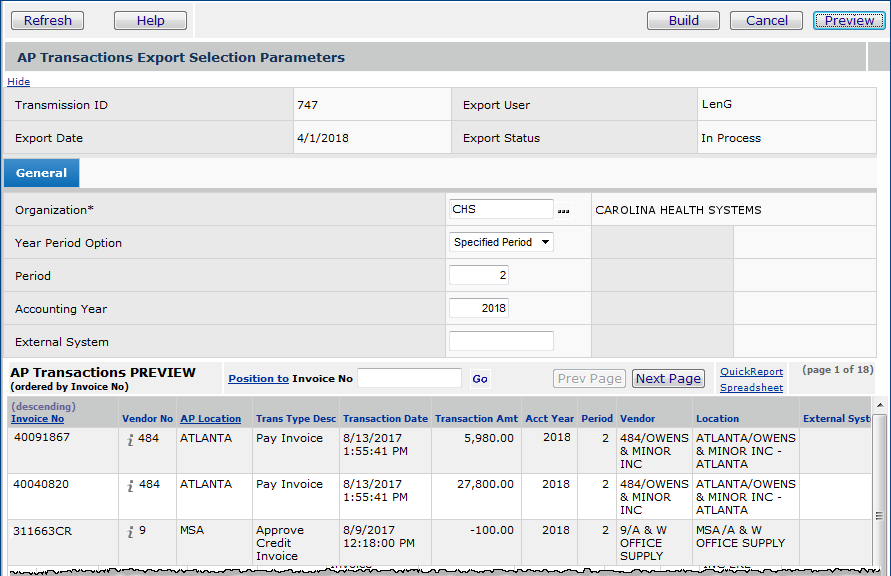
Figure 7 - AP Export Selection Panel
- Verify that
the Organization is correct. If not, use the prompt (...) to
enter a new Organization.
- Select the appropriate value from the Year Period Option field.
- Current Period exports transactions from the current period, according
to your financial calendar.
- If you are exporting transactions from the period immediately previous to
the current period, select Prior Period.
- If you are exporting transactions from a particular period, select Specified
Period. Then, enter the period in the Period field and the year
in the Accounting Year field.
- If you are exporting transactions to an external system (such as PBAR),
enter the name of the system in the External System field.
- Click Preview to update the selected
transactions list.
- Review the selected transactions list in the
bottom part of the panel.
- Click Build. The system builds the export
file and returns to the AP Transactions Export list.
- Click Refresh to view the export file.
To
download an Accounts Payable export file to a local network:
These steps download
the AP Transactions Export file to a folder on your local network.
- From the AP main Contents select Imports
/ Exports > AP Transactions Export.
The AP Transactions Export list appears.
- Locate the export file to download.
- Click Menu > Download File next to
the export file.
The File Download window appears.
- On the File Download window,
select Save.
The Save As window
appears.
- Use the down arrow on the Save in: box
to select the location for the exported file.
The File name: field contains a
file name created by the system. The file name has the form: APTransExportX.csv
where "X" is the Transmission ID.
- Accept Microsoft Excel Comma Separated Value
Files (.csv)
for the Save as type:.
- Click Save.
- The File Download window shows the progress
of your export file as it downloads to the local network.
- When the download is complete, close the Download
window. You are returned to the AP Transactions Export list.
- The Last Download (Date/By) field on
the AP Transactions Export list is updated with the date, time, and user ID
for the download.
Copyright © 2023 by Premier Inc. All rights reserved.