|
New Features and Enhancements - Release 7.3
A summary of enhancements made in updates since Release 7.2 is also included in this document.
Tax Calculation Enhancements: Materials and AP Tax:
EDI 810 Enhancements:
Other New Features
Attachments
ERP Materials Management and Financials - This Release: 7.3
 Tax Calculation Enhancements: Materials and AP Tax Tax Calculation Enhancements: Materials and AP Tax
Some hospitals need to order items for locations that are in different cities, and different cities may have different tax rates.
Because tax is determined based on where product ships to, not where it is ordered from, an invoice may be out of balance when it is created. For example, a hospital in Sacramento orders supplies to be shipped directly to a department that is located in San Diego.
The application calculates the tax at the organization level (Sacramento), but the vendor has calculated the tax for San Diego
because that is where it it is sending the order.
Below is a summary of these new features. In addition, Attachment 1 contains tax setting examples,
before and after 7.3 implementation.
Important: These tax features are enabled by setting flags for both AP and Materials. Additionally, new fields are available to specify tax rates for different organizational units -- departments and asset locations. Enabling this feature may have ramifications for your operations that you need to consider. You should talk to your Premier ERP Consultant before enabling this feature for Materials or AP taxes.
The calculation of materials tax by department is available.
You can set a materials tax rate for a department, and require tax to be calculated at the department rate in situations where the jurisdiction for the department is different from the organization, and tax is different.
Note: Department-level materials tax is calculated only when the Separate PO by Department field is enabled.
To enter materials tax data for a department:
- From the Materials Management main Contents, select Requisitioning > Departments. A list of departments appears.
- Locate the department of interest on the list. Click the edit icon
(
 ), or select Menu
> Edit. ), or select Menu
> Edit.
The Department edit panel appears.
- On the General tab, select the box labeled Calculate Tax For Materials
Transactions. (Figure 1, red arrow).
Note: The initial setting of this field (for new departments, and at implementation) matches the setting of the same field on the Organization record.

- Select the Sales Tax tab to display the Sales Tax panel (similar to the Organization Sales Tax panel).
- Enter information in the fields on the Sales Tax panel as
needed. You may enter State, City, or County tax
rates and accounts.
The default value of these fields is "blank."
- When you have finished entering information, click Submit. You are returned
to the Departments list.
See the discussion below on how ERP orders processing of materials tax according to organization, department, and asset location.
You can also have ERP calculate materials tax by asset location.
In situations where a medical center handles ordering for asset locations in different jurisdictions, you can define tax at
the asset location level consistent with tax rates locally. The process is similar to setting up materials tax for a department.
Note: You cannot edit an asset location record unless your data profile contains the asset location. You must also have permission to maintain the asset location. See "Restricting Users from Editing Asset Location Records."
To enter materials tax data for an asset location:
- From the Materials Management main Contents, select Tables
> Asset Locations. A list of asset locations appears.
- Locate the asset location on the list. Click the edit icon,
or select Menu > Edit.
The Asset Location edit panel appears.
- On the Main tab, select the box labeled Calculate Tax For Materials
Transactions. (Figure 2, red arrow).

Note: The initial setting of this field (for new asset locations, and at implementation) matches the setting of the same field on the Organization record.
- Select the Sales Tax tab to display the Sales Tax panel.
- Enter information in the fields on the Sales Tax panel as
needed. You may enter State, City, or County tax
rates and accounts.
- When you have finished entering information, click Submit.
- Click Submit. You are returned
to the Asset Locations list.
See the discussion below on how ERP orders processing of materials tax according to organization, department, and asset location.
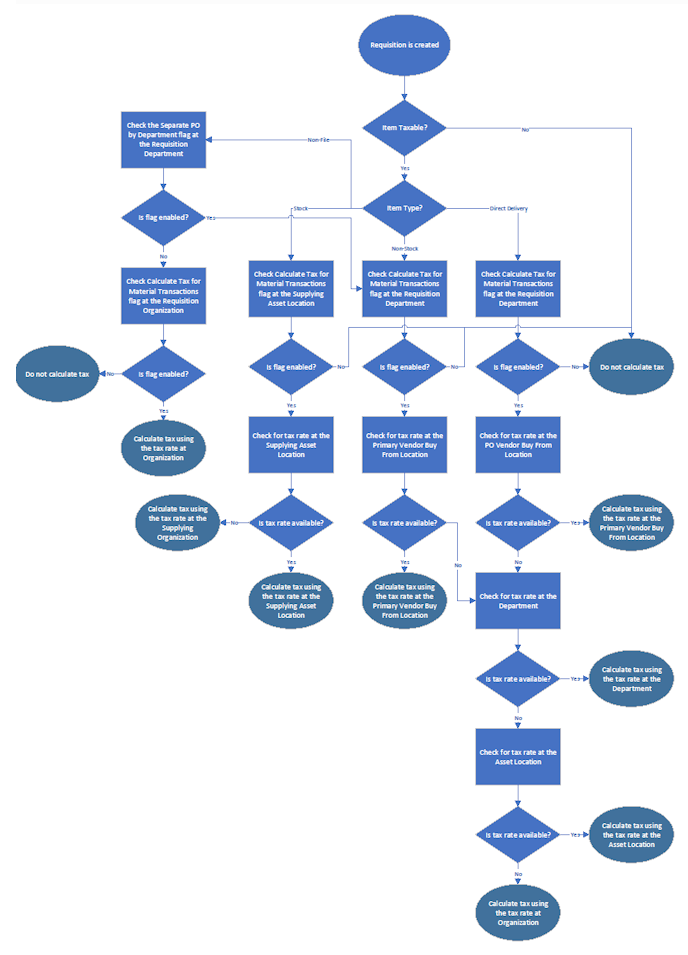
How ERP identifies the correct tax rate to use to calculate materials tax.
When a vendor, department, asset location, or organization requires materials tax to be calculated (i.e., the field Calculate Tax for Materials Transactions is selected for one or more of those domains), ERP checks whether a tax rate has been specified for the vendor, department, organization, or asset location as well. ERP checks the MM tax settings in hierarchical order until a tax group is found.
If none is found, ERP displays a message.
The order the application uses to search for a materials tax rate is summarized below.
In addition, Attachment 2 is a chart of the process flow that the system uses to determine the correct materials tax for requisitions. Attachment 3 charts the process flow for determining PO materials tax.
Note: If you uncheck the materials tax flag at the for an organization, the tax rates for the organization, asset location, and vendor buy-from location are not affected, and stay in place.
Purchase Orders
No direct delivery
- Separate PO by Department = Yes and Direct Delivery = No:
- Stock items: Vendor Buy-From Location > Asset Location > Org
- Non-stock and non-file items: Vendor Buy-From Location > Department > Asset Location > Org
- When Separate PO by Department = No, the order is Vendor Buy-From Location > Asset Location > Organization.
With direct delivery
How ERP decides if a non-file line on a PO is taxable.
Tax is calculated at the department level only when the Separate PO by Department is specified for the department's PO.
Separate PO by Department = Yes, and...
- Calculate Tax for Materials Transactions for the department is Yes (checked): the Taxable field defaults to enabled
for non-file purchase order lines. (Figure 3 displays the Taxable field on a non-file PO line edit panel.)
- Calculate Tax for Materials Transactions for the department is No (not checked): the Taxable flag defaults to disabled
for non-file PO lines.

Requisitions
- Stock items: Requisition's supplying asset location > supplying organization
- Non-stock, non-file, or direct delivery items: Primary Vendor Buy From Location > Department > Asset Location > Org
Note: When Separate PO by Department = No, ERP goes to MM tax flag for the organization.
How ERP decides if a non-file line on a requisition is taxable.
- Tax is calculated at the department level only when Separate PO by Department is specified for the requisitioning department.
Separate PO by Department = Yes, and...
- Calculate Tax for Materials Transactions for the department is Yes (checked): the Taxable field defaults to enabled for non-file requisition lines. (Figure 4 displays the Taxable field on a non-file line requisition edit panel.)
- Calculate Tax for Materials Transactions for the department is No (not checked): the Taxable flag defaults to disabled for non-file requisition lines.
Note: When Separate PO by Department = No, ERP goes to MM tax flag for the organization.

The calculation of AP tax (for invoices) is available at the department level.
The new AP Info panel (Figure 5) on the department record "switches
on" a tax requirement and tax calculations for invoices
associated with the department.
Note: Tax is calculated at the department level only when the Separate PO by Department field is enabled.

Since you can also specify AP tax to be calculated at the vendor, asset location, and organization level, ERP follows a hierarchy in determining which tax group to apply to an invoice. The way ERP decides what tax group to use is discussed below.
- Initially, for this release, the AP Tax Enabled field defaults to the same setting as the field for the department's organization.
- When new departments are created, the AP Tax Enabled field defaults to the same setting as the organization. The default tax group remains blank.
You can update the AP Tax Enabled field if needed. (See Attachment 1.)
This feature is available for PO invoices including EDI 810 invoices.
You can also have ERP calculate AP tax (for invoices) by asset location.
The asset location's AP Info panel (Figure 6) "switches
on" a tax requirement and tax calculations for invoices associated
with the asset location.
To enter AP tax data for an asset location:
- From the Materials Management main Contents, select Tables
> Asset Locations. A list of asset locations appears.
- Locate the asset location on the list. Click the edit icon,
or select Menu > Edit.
The Asset Location edit panel appears.
- Select the AP Info tab (new in this release).
- To require the calculation of tax on invoices for the asset location, select AP Tax Enabled.
- Select a Default Tax Group.

Since you can also specify AP tax to be calculated at the vendor, department, and organization level, ERP follows a hierarchy in determining which tax group to apply to an invoice. The way ERP decides what tax group to use is discussed below.
- Initially, for this release, the AP Tax Enabled field defaults to the same setting as the field for the asset location's organization.
- When new asset locations are created, the AP Tax Enabled field defaults to the same setting as the organization.
You can update the AP Tax Enabled field if needed. (See Attachment 1.)
This feature is available for PO invoices including EDI 810 invoices.
How ERP identifies the correct tax rate to use to calculate AP tax.
ERP follows a hierarchy to identify the AP tax rate to use on PO invoices. A process flow diagram is Attachment 4.
Tax for Department:
The hierarchy is: Vendor AP Location > Department > Asset Location > Organization.
For invoices with a departmental Ship To location that are "separate PO by department" and "direct delivery,"
the Default Tax Group on the department's AP Info tab is used to calculate taxes unless the vendor AP location specifies a tax group.
If no tax data exists at the department level, ERP checks the asset location associated with the department for tax data.
Finally, if no tax data exists for the asset location, ERP looks at the organization to determine if it has tax information.
When no tax information is available anywhere in the hierarchy, a message appears directing the user to enter tax information
(a Default Tax Group).
Tax for Asset Location:
The hierarchy is: Vendor AP Location > Asset Location > Organization.
For invoices with the asset location as the Ship To location, if the vendor AP location contains tax data, ERP uses the vendor data to calculate taxes. Otherwise, ERP uses the tax specified for the asset location. Finally, if no tax data exists for the asset location,
ERP looks at the organization to determine if it has tax information.
When no tax information is available anywhere in the hierarchy, a message appears directing the user to enter tax information
(a Default Tax Group).
Note: Non-PO Invoices use the hierarchy AP Location > Organization.
EDI 810 Enhancements:
The ERP application now supports EDI 810 invoices for blanket, standing, and bill-only purchase orders.
The previous release (7.2) provided an advance opportunity to set up blanket purchase orders for EDI 810 invoice matching
and approval routing.
- Matching and approval routing of EDI 810 invoices for blanket purchase orders is now available.
- In addition, matching and approval routing of standing and bill-only EDI 810 invoices is also available in this release.
(EDI 810 invoices have always been generated for regular POs.)
Summary
You can import EDI 810 invoices for blanket, bill-only, standing and -- of course -- regular requisitions and their associated purchase orders, including regular POs created from requisition order guides. You can then process the 810 invoices, and route them for approval.
If you are not using automatic approval routing by vendor, you can assign direct approvers/approver groups to an invoice, associated PO, or associated requisition of the types listed above.
For blanket EDI 810 invoices, you can also require approval routing on an organizational basis, and, at the same time, "turn off" any automatic routing that you set up for the vendor.
These features will be especially helpful to sites that are using IDS (IDS Xchange Services). These hospitals were having IDS send them blanket invoices, which the hospitals then had to manually process.
If you are not using automatic approval routing by vendor, you can specify approvers for EDI 810 invoices as follows:
- On the purchase order. The assigned approver/approver group propagates to the EDI 810 invoice and back-copies to the associated requisition.
- On the requisition. The assigned approver/approver group propagates to the associated purchase order and EDI 810 invoice.
- On the EDI 810 invoice (if not assigned on either the PO or the blanket requisition). The ERP application then back-copies the approver/approver group to the PO and the requisition.
Assigning an 810 Invoice Approver/Approver Group on a Requisition
Follow the standard process to create a blanket (bill-only, regular, or standing) requisition.
(This example uses a blanket requisition.)
- From the Materials Management main Contents, select Requisitioning - My Department or All Departments.
The Quick Click menu appears.
- Click New.
- For the Requisition Type, select Blanket (Figure 7).

- Enter an Expiration Date, a Dollar Limit, and any other fields as needed.
- Click Save.
- Proceed to enter lines on the requisition, as usual.
- Click Save when you are finished.
The application displays the requisition header information, and lines. A new tab -- Invoice Approval -- is available (Figure 8).

- Click the Invoice Approval tab to assign either a direct approver or an approver group (Figure 9).

- Continue with the requisition: save it, and click either Finish Now or Finish Later.
When an EDI 810 invoice is processed for the PO associated with the invoice, ERP verifies the invoice approver(s)
and routes the invoice to the named approver or approver group.
Note: You can also enter approvers on the PO itself, instead of on the requisition. If approvers were entered only on the PO,
they will be copied to any associated requisition.
Assigning an 810 Invoice Approver/Approver Group to a Purchase Order
Follow the standard process to create a purchase order. The example below uses a blanket PO.
- From the Materials Management main Contents, select Purchasing > Purchase Orders (by PO Number) or
Purchase Orders (by Create Date). The Quick Click menu appears.
- Click New to create a new purchase order, or click the edit icon
 to edit an existing, unauthorized PO. to edit an existing, unauthorized PO.
For instructions on creating a new PO, see the online documentation topic "Create a Purchase Order Manually."
- Click the Invoice Approval tab (Figure 10). The fields for Direct Approver and Approver Group appear.

- Select a direct approver or approver group.
- Click Save and Submit.
Assign an Invoice Approver/Approver Group to an Order Guide Requisition
EDI invoice approvers entered on an order guide requisition propagate to any associated purchase order, and to the EDI 810 invoice.
The location of the invoice approver fields for order guides is on the Preview Requisition tab.
- Click Requisitioning > Order Guide Requisitions.
- Locate the order guide of interest, and click Create Requisition from Order Guide.
- Enter the header information.
- Click Submit. The Requisition panel appears, and displays Enter Order Quantities.
- Enter order quantities for items as needed.
- Click the Preview Requisition tab (Figure 11), then select the Invoice Approval tab.

- Enter either an EDI invoice direct approver or an approver group (Figure 12).

- Complete any other fields on other tabs as needed. See the discussion of order guide requisitions.
- Submit the requisition.
Manually Assign an Invoice Approver/Approver Group to an EDI 810 Invoice
In addition to blanket EDI invoices, bill only, regular, and standing EDI invoices also contain an invoice Approval tab
where you can assign approvers, if none have been specified in the PO or requisition. An example is in (Figure 13).

Using the Approval Required feature for blanket invoices
For blanket invoices (only), a field on the Organization record lets you "turn off" automatic approval routing
(if you have that feature set up on the vendor). At the same time, the field "turns on" a requirement to use approvers
that you assign on the requisition, purchase order, or invoice itself.
The field is: Invoice Approver for Blanket Req/PO required (Figure 14).
- From the Materials Management main Contents, select Tables > Organizations.
A list of organizations appears.
- Locate the organization of interest and click Menu > Edit or the edit icon .
- Open the AP Info tab.

Unselected: The default setting is unselected. When the field is unselected, ERP uses any approver/approver group set up
on the vendor record for automatic approval routing.
Selected: When you select the field, any approver assignments set up on the vendor panel are ignored, and you must create approver assignments on the invoice (PO, or requisition).
- Select the field if needed.
- Click Submit to apply the change and return to the Organization list.
How invoice approver assignments propagate from requisitions to EDI invoices
Approver assignments propagate from the requisition to the PO to the respective EDI invoice.
How ERP generates POs from requisitions
When a requisition is released, ERP first looks for an existing, unauthorized PO with the same vendor and buy-from location.
If an open, unedited PO exists,
- ERP adds item lines from the requisition to an the existing PO.
- Identical items are combined on PO lines. If a PO line for a requisition item is not on the existing PO, then a new line is added.
- For blanket POs, the Dollar Limit on the PO is increased by the Dollar Limit amount on the blanket requisition being added.
Also, the Expiration Dates are compared. If the new blanket requisition has an Expiration Date later than the existing
PO's Expiration Date, the existing PO's Expiration Date is changed to the requisition's Expiration Date.
If no usable PO exists for the vendor buy-from location, a new PO is generated for the requisition.
The correct invoice approvers also need to be included on generated POs
ERP also needs to match the correct requisition/PO with the incoming EDI vendor invoice, and the correct invoice approvers.
Since you can assign invoice approvers on requisitions, when multiple requisitions (for the same vendor) contain different invoice approvers, ERP accounts for the invoice approver assignments in generating POs.
- For example, if an open PO already exists for the same vendor with the same invoice approvers, ERP will add the requisition lines to it.
- If no open PO exists for the vendor with the same approvers, then a new PO is created.
EDI 810 matching and exception processing enhancements
When the ERP receives an 810 file, it attempts to build the 810 invoice and reconcile that invoice with the purchase order (line by line). Previously, if ERP determined either that an invoice line already exists for a PO line, or that a line on the invoice does not exist on the PO, it created an 810 exception. The exception appeared on the Invoice 810 Exceptions list. Unfortunately, such an exception for 810s could not be cleared. Several enhancements are now available to relieve this situation, and improve the EDI 810 matching process.
The following types of EDI 810/PO mismatches can now be handled as normal invoice exceptions, and no longer appear on the Invoice 810 Exceptions list.
Open the Exception Invoices list (Invoicing > Exception Invoices) to display and work with these types of exceptions in EDI 810s.
- EDI 810 invoices with lines missing from the associated PO.
- EDI 810s with lines that do not match the associated PO.
This enhancement not only allows you so add a missing line from the 810 exception panels, if the exception has the status
"PO Line Does not Exist" during 810 processing, ERP automatically creates the missing line.
Also see the online documentation topic "Work with Partially Created EDI Invoices."
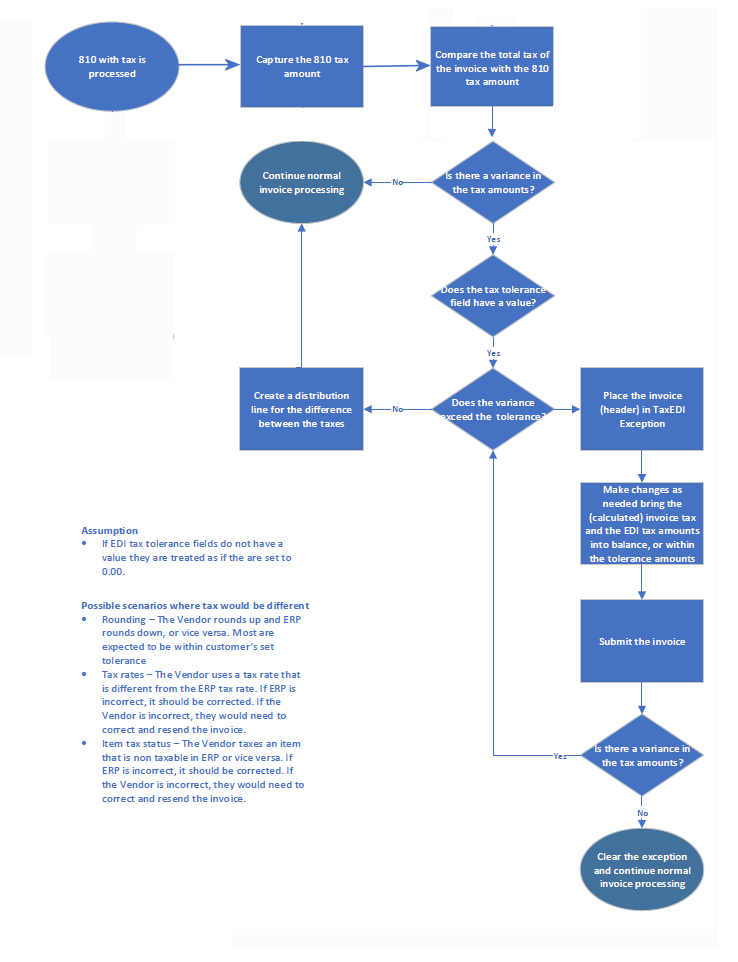
You can use set tolerances for calculated tax exceptions in EDI 810 invoices to avoid editing the invoices.
When an 810 invoice is taxable, the tax for the invoice is not taken from the 810 invoice. Rather, ERP calculates tax as the invoice is created. Sometimes, a slight difference occurs in the calculated tax amount causing the invoice to be out of balance. You can set a tolerance level so that 810 tax differences within that tolerance can flow through without having to be edited.
When an EDI 810 invoice has a tax amount variance within a tolerance that you set, the application does not consider it an exception.
This feature lets you avoid manually adjusting EDI 810 invoices whose calculated tax amount has an acceptable variance.
For in-tolerance variances, ERP creates a distribution line containing the variance, so that you can complete the invoice.
Out-of-tolerance taxes need to be cleared, as outlined below.
You define EDI tax tolerances in the application's System Values. Using EDI tax tolerances is optional, and can be set on or off via another field in System Values. The ability to set system values requires administrator privileges (appropriate user profile role and security object settings). If you need tax tolerances defined for EDI 810s, contact your site's system administrator.
Attachment 5 is a process flow for EDI tax variances.
To define an EDI tax tolerance,
- From
the main Contents, select Work in Administration > Administration
> System Values.
The System Values list appears.
- Select Menu > Edit.
- Click the Tolerances tab. The Tolerances panel appears (Figure 15).

- In the EDI Invoice (810) Tax Dollar Over field, enter a dollar amount equal to the percent difference between an ERP-calculated tax total, and a greater EDI 810 invoice tax total. This amount is the tax overage that will not trigger a tax exception.
- In the EDI Invoice (810) Tax Dollar Under field, enter a dollar amount equal to the percent difference between an ERP-calculated tax total and a smaller EDI 810 invoice tax total. This amount under the ERP-calculated tax will not trigger a tax exception.
- Click Submit when you are finished. ERP will process incoming 810 invoices according to the tax tolerances you set.
Both of the new tolerance fields are audited.
The tax amounts appear when you inquire on an EDI 810 invoice.
To view the tax amounts on the EDI 810 invoice,
- From Materials Management or AP, select Invoicing > Invoices.
- Search for the invoice.
- Click i to display the invoice.
- Click the Invoice tab.
- Click the Tax tab.
Figure 16 is an example invoice.

ERP compares the Tax Amount (Figure 16, red arrow) and the EDI 810 Tax Amount (Figure 16, green arrow).
The Tax Amount is calculated based on the Taxable amount and the tax rate, while the EDI 810 Tax Amount comes from
the imported 810. The two amounts are within tolerance if the difference between them is less than the tolerance
value (EDI Invoice (810) Tax Tolerance over/under) in System Values. Figure 17 is the tax tolerance settings for the site
whose invoice is in Figure 16.

The "over" tolerance setting is $3.00. The "under" tolerance setting is $2.00. The variance is greater than $3.00,
so the invoice in Figure 16 has an out-of-tolerance tax exception. The invoice also appears on the Invoices in Exception list with the Exception Type TaxEDI.
To enable tax tolerances for your site
The field Use EDI Invoice Tax Tolerances on the System Values panel, Other tab (Figure 18) enables or disables the EDI invoice tax variance tolerance feature for your site.
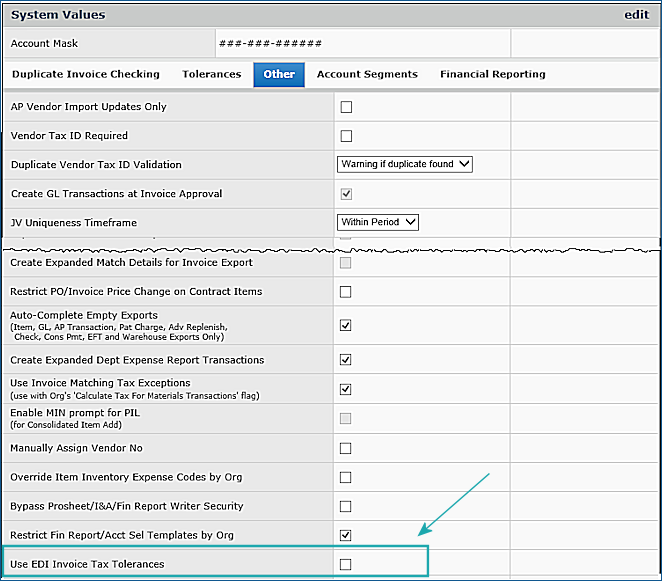
At implementation, this field is unselected and tax tolerance is not enabled. The System Values fields EDI Invoice (810) Tax Dollar Over and EDI Invoice (810) Tax Dollar Under (Figure 15) are not visible.
When the field Use EDI Invoice Tax Tolerances is selected, tax tolerance for EDI invoices is enabled, and functions as described in this document.
The Use EDI Invoice Tax Tolerances field is audited.
Invoices with in-tolerance tax variances
During 810 invoice processing, ERP compares the total tax on the created invoice with the total tax amount from the 810 invoice.
The application uses the AP tax hierarchy, as described previously. If a variance in the tax amounts exists, the application checks the system values fields EDI Tax Dollar Over and EDI Tax Dollar Under to determine if the variance is within tolerance.
If the tax variance is within the tolerance, the application creates a new invoice distribution line (of Type Tax) in the amount needed to balance the invoice. The amount will be posted to the the Tax Expense account. The description of the tax distribution line is "EDI Tax in tolerance adjustment".
After the distribution line is created, the invoice can proceed to completion and approval.
If the tax variance is outside of the tolerance, the invoice has the exception type TaxEDI. Instructions for clearing an out-of-tolerance variance are below.
For example, Figure 19 displays tax tolerance settings (in System Values) for a site. The "over" amount and the "under" amount are each $0.10.

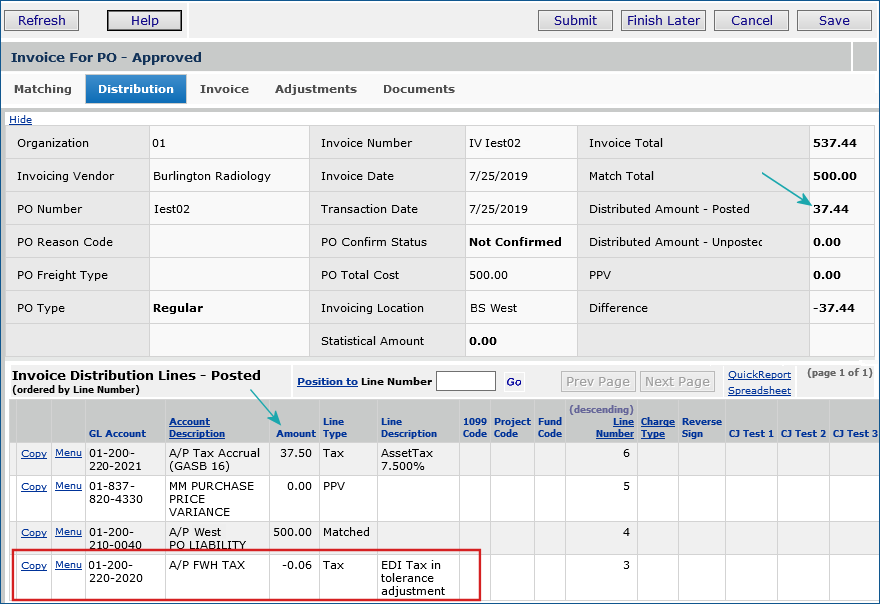
An EDI 810 invoice is processed with tax amounts that are not the same. Figure 20 is an inquiry on the invoice. The variance -- $0.06 -- is within the defined tolerance.

Editing the invoice and opening the Distribution tab displays the distribution line that ERP created for the in-tolerance tax variance
(Figure 21).
Displaying EDI invoices that have an out-of-tolerance tax variance
Invoices with an out-of-tolerance tax variance have the new exception type TaxEDI. Invoices with this exception are incomplete and are displayed on the Invoices in Exception list (Materials Management or AP Main Contents > Invoicing > Exception Invoices).
An example is in Figure 22. You will need to work with these invoices to complete them.

Materials Management or AP Main Contents > Invoicing > Exception Invoices
Note: The TaxEDI field is also available for you to use on reports created with the "Invoice Match Header" report object.
Clearing an out-of-tolerance TaxEDI exception
To clear a TaxEDI exception, you can edit the invoice to bring the (calculated) invoice tax and the EDI tax amounts into balance, or bring them within the tolerance amounts. You also have other options that involve resetting the location in the hierarchy for the default tax,
and
changing the Default Tax Group value on the vendor, department, organization, or asset location.
- Option 1 - Adjust the amount
- Edit the invoice and adjust the taxable amount until the variance falls within tolerance.
- Submit the invoice. (Remember that when the variance is within tolerance, ERP creates a distribution line for the variance.)
- Option 2 - Change where the tax is enabled, if it is not correct
- Enable or disable the AP Tax Enabled YN fields until the tax defaults to the appropriate unit in the hierarchy.
For example, perhaps the tax amount is based on the vendor tax group, and should be based on the organization tax group.
- Option 3 - Change where the tax is enabled and select a different Default Tax Group.
- Enable or disable the AP Tax Enabled YN field so that the appropriate unit in the hierarchy generates the default tax.
- Edit the Default Tax Group to enter the correct value.
When the tax exception is cleared, ERP proceeds with normal processing of the invoice.
- Option 4 - Manually add a distribution line to adjust the invoice amount so that it balances.
If none of the other options can clear the TaxEDI exception, you can add a distribution line to cover the out-of-tolerance tax amount and bring the invoice into balance.
- Edit the invoice and add a distribution line.
-
Click Submit. The EDI Tax Amount and the calculated amount will still be unequal, but if the added distribution line
brings the invoice total into balance, the TaxEDI exception is cleared, and the invoice continues processing normally.
The GL Account Import is now available under General Ledger Imports on the General Ledger menu.
You can use the General Ledger main Contents to access GL Account Imports. Also, you no longer need to construct a .csv upload file
from scratch: you can use the spreadsheet download of existing general ledger accounts as a template for importing new
general ledger accounts.
A detailed discussion of importing general ledger accounts is in the online documentation topic "Import General Ledger Accounts."
Below is a summary.
- From the General Ledger main Contents, select Account Management > General Ledger Accounts.
The list of accounts in your Chart of Accounts appears.
- Filter the list for accounts that are similar to the type of account that you wish to import.
For example, you could select Balance Sheet from the Account Class quick filter and Asset from the Account Type quick filter.
See Figure 23.

- Then, click Go.
The list is filtered as you directed.
- Click Spreadsheet (Figure 23, upper right, red box).
- If the list contains more than 200 lines, the application asks you how many records you wish to download. Select a value.
An Excel spreadsheet opens with the accounts displayed on the list (Figure 24).

- Save the spreadsheet to a local network folder as a .csv file. The file name must be unique.
This file will be the template you use to add, change, and delete accounts.
- Notice the ActionCode in column G. This code tells ERP what to do with the account on that line. Values are:
C - change the information on this account.
A - add this account.
D - delete this account.
- Open the .csv file that you made in the previous step
and edit it to change data in columns as needed.
- Be sure to set the ActionCode column for the appropriate action to take with the account.
-
The columns AccountCode, Description, GLAccountType, AccountStatus, and ActionCode are required.
- Important: Add the following end-of-file marker after the last line
of comma-separated data, on a line by itself: <EOF>
- Use the standard upload from Work in General Ledger > Imports / Exports > Upload GL Accounts to import the .csv file into ERP.
Sourcing and Contract Management - This Release: 7.3
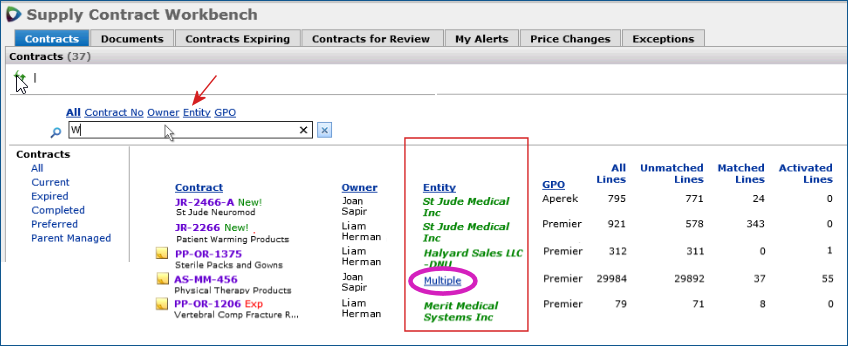
The Entity for each contract now appears on the Work with Contracts list.
The new column displays the manufacturer/supplier for a contract (Figure 25).
- The search appears at the top of the list. Click the search icon to open a search box (Figure 25, red arrow).
Select a column and enter characters in the search box to search that column.
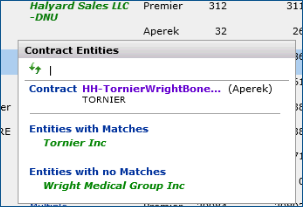
-When a contract has multiple suppliers, the multiple link appears (Figure 25 purple circle).
SCM Main Contents > Contracts > Contract Workbench
- Click the multiple link to display the different manufacturer entities. The entities appear in a pop-up.
Figure 26 is an example.
ERP/SCM Problem Resolutions
ERP Problem: An incorrect error message was appearing on journal entry imports with invalid account codes.
If the Account Code does not exist, an error is attached to the journal import record. The message (Menu > View Details) appeared as "Your Department Data Profile does not allow access to this Department's Payroll Details."
This message was wrong, since the problem was an invalid account code.
Resolution: The problem has been resolved so that when an account code for a journal entry import is wrong, the message has been changed to identify the invalid account code "Account Code [account number] is not defined."
ERP Problem: For a PO invoice created for an item in one unit of measure (before receiving the item), when the item was received
in another unit of measure, if the invoice was deleted, the PO header Invoiced Qty was incorrect.
Resolution: This problem has been resolved so that quantities are correctly calculated.
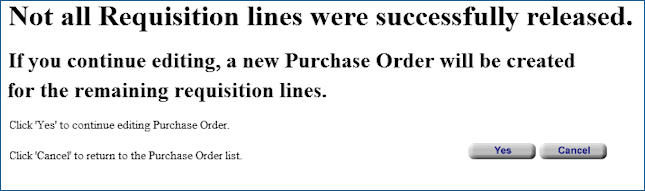
ERP Problem: Users want to be able to associate all lines in a bill-only requisition with a single PO. Errors can occur, during processing,
that prevent one or more lines from being released to the PO created. If the related approved requisition is released prior to editing the PO, the unreleased lines will flow to the same bill-only PO. However, if the unreleased lines are not noticed,
and the bill-only PO is edited, when the requisition is released, the lines will flow to a new bill only PO.
Manually adding the requisition lines that have errors to the PO generates a new requisition.
Resolution: This problem has been resolved so that lines on a bill-only requisition can be associated with single PO number.
If one of the existing requisition lines is not released (because of errors), a confirmation window appears to notify the user (Figure 27).
- Click Cancel on the confirmation message.
- Re-release the requisition. Doing so will release only the unreleased lines.
Note: Lines from multiple bill-only requisitions are never written to the same PO.
Reports
- The TaxEDI field is available for you to use on reports created with the "Invoice Match Header" report object. This field indicates EDI invoices with an out-of-tolerance tax variance. EDI tax tolerance values can be set on the System Values edit panel.
(Work in Administration > Administration > System Values > edit)
Administration
User maintenance is more efficient with the new data profile import feature.
The new import feature for data profile record mass maintenance is now available. With the use of a template, this mass loader allows a security administrator to upload multiple new data profiles at one time instead of creating them manually in ERP.
You can also maintain and audit existing data profiles without having to update each one individually within the application.
Usage Tips: Creating one or more "generic" data profiles is a convenient way to utilize this feature. From within the Administration module, an administrator can copy these "generic" profiles and make changes to the department, asset location, and organizations as needed.
Security: This feature is controlled by the "Administration" role object.
Create New Data Profiles via Template Import
An Excel template is required for the data and fields that you will upload and import into ERP.
To download the Data Profile Import template:
- From the Work in Administration main Contents, select Administration > Data Profile Import Template.
- Save the Excel template to your computer or local network.
The file should look similar to the example in Figure 28.

The template contains several tabs. The initial tabbed worksheet (Figure 28) is for your data. Detailed instructions,
including the colored columns are on the Info tab. Examples are on the Examples tab.
To create and upload new data profiles using the Data Profile Import template:
- On the template, enter values for Data Profile fields in the appropriate columns.
Important:
- The fields highlighted in yellow are required and marked as such.
- Enter information directly over the <required> text within cells. If you import the spreadsheet with the <required> word
still in a cell, the application will take it as an invalid value and send an error message.
- Click the Info tab on the worksheet for detailed instructions on completing and saving the template.
- The last entry on the template must be <EOF>.
- When you finish entering values in the fields, save the spreadsheet as a .csv file on your computer or local network.
Important: When you save the file as .csv, make sure that it is saved as an MS-DOS .csv type. Otherwise, the upload will not recognize the record type, and you will get an error message.
Note: For .csv files opened in Excel, be aware that when you save the file, Excel only saves the active tabbed worksheet.
- Upload and import the spreadsheet to ERP using the instructions
in Importing Data Profile .csv Files Using the Standard ERP Upload.
Importing Data Profile .csv Files Using the Standard ERP Upload
After you create or edit data profile records, you can import them back to ERP.
Important: The file you import must be in .csv (comma delimited) format.
To import data profile records:
- Select the Data Profile Import panel from ERP Work in Administration main Contents > Administration > Data Profile Import.
- This panel lists previous imports if any, and lets you create new imports.
- Click New. The Upload Panel appears. This panel uses the standard upload process.
- Click Browse to locate and enter the .csv file to upload.
- You can work through the import process in either one stage or two stages.
For the one-stage process,
- Click Submit. The system attempts to upload your file and validate it.
- Click Refresh to see your file listed on the Data Profile Import panel.
For the two-stage process,
-
Click Load and verify, no import.
Once the file has successfully loaded, you can process it manually from the Data Profile Import panel, and import it into the application. The Data Profile Import panel displays the import and its status. In Figure 29, an imported file (in blue) is incomplete. Problems occurred with this import file.
(The actual problem was that the ActionCode was set to C, when it should have been set to A.)
Work in Administration > Data Profile Imports
- Click Menu > View Import Details to view the problem areas of the import. From the Import Details panel,
you can display any messages (Figure 30).

- Click the edit icon or Menu > Edit to open the import and fix any problem. Figure 31 is an example.
You can then reprocess the import.

- To reprocess an edited (corrected) import, from the Data Profile Import list (Figure 29), select Menu > Reprocess.
Enhancements from Updates 7.2.1 to 7.2.4
The following changes to ERP and SCM were covered in previously released Update Notes for each update release.
The changes and problem resolutions below are in summary form. Refer to the particular Update Release Notes for details.
ERP Enhancements
Update 7.2.2
- Approved Substitute Field on Item Imports: An enhancement to the automatic item substitution feature is available:
You can upload and download items marked as “approved substitutes” as part of the normal item maintenance process.
The item substitution feature provides automatic substitution of items on EDI purchase orders. When a hospital sends an EDI 850 purchase order for an item to a vendor, the vendor can substitute an approved, similar item. The EDI 855 PO confirmation document contains the item substitution information. Substitute items are designated as such in the site’s item catalog.
Item Maintenance Uploads: The Excel Item Maintenance template contains the column – ApprovedSubYN – on the Item Vendors tab.
This column lets you identify item vendor records for approved substitute items. (Figure 32).

Important: If you plan to use the item maintenance feature to import/export records for substitute items, download the new item maintenance template.
- From the Materials Management main Contents, select Imports / Exports & Financials > Excel Item Maintenance Download.
You can:
- Add items (ActionCode A) as vendor-approved substitute items (ApprovedSubYN=1).
- Delete items (ActionCode D).
- Change existing items (ActionCode C) to set them as approved substitutes (ApprovedSubYN=1), or reset them as non-substitute items (ApprovedSubYN=0).
- On the Item Vendors tab, enter 1 in the column ApprovedSubYN in the row of an item that you wish to designate as
an approved substitute for another item.
- To indicate that an item is not a substitute, enter zero 0. (Zero is the default.)
All the rules involving substitute items apply:
- The original item and the substitute item must have the same local ID (“item number”) in your site’s item catalog/item file.
- The UOM of the original item and the substituted item must be the same and have the same conversion factor.
- The substituted item must have the same vendor, buy from location, organization, and asset location as the original item.
- The substitute item vendor number (VIN) must be unique, as with any item vendor number.
Item Record Downloads:
The download process requires setting up a Selection Profile. A Selection Profile filters item records,
identifying those to download. Figure 33 is an example of setting up a Selection Profile.
You can include the ApprovedSubYN item record field on Selection Profiles that you create.
The column and its values will then appear on item data downloads to Excel (Figure 33, green arrow).

SCM and Integrated Platform Catalog Enhancements
Update 7.2.1
- Integrated Catalog: You can now display custom tier descriptions for contracts in the Integrated Catalog on several panels.
Custom tier descriptions appear as follows:
-- For a contract: on the Tiers tab, and when you select a tier on the Products tab drop down menu. Figure 34 is an example of the Tiers tab.
-- For a product: on the Contract Prices tab.
The Catalog displays an integer in the Cust Desc column to indicate the number of custom tier descriptions available for viewing.
If one custom tier description exists, it is displayed. If multiple custom tier descriptions exist, the integer in the Cust Desc column
will be 2 (or more).
If no custom tier descriptions exist, No appears (Figure 34).
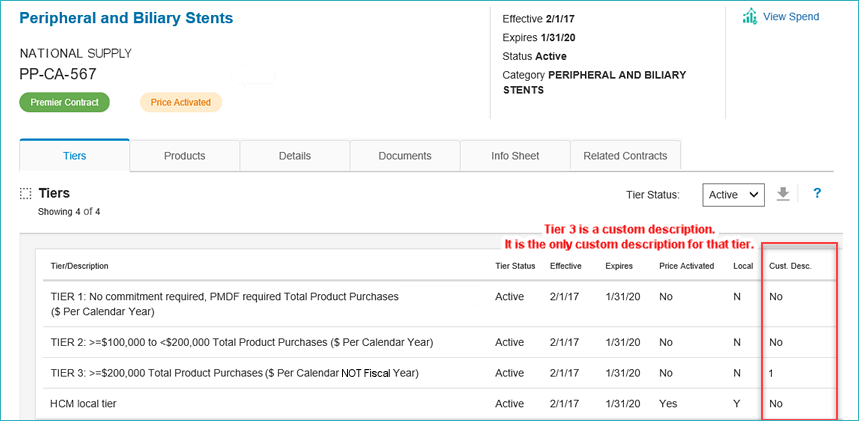
- Click the integer to view the custom tier description(s).
A pop-up shows you the Premier tier description, the custom tier description,
and the healthcare system's Name and the Entity Code of the top parent applicable to the description.
- Click ? on the Integrated Catalog panel for more information about custom tier descriptions.
Note: Custom tier descriptions can be created in SCA.
- Integrated Catalog: The search box contains a reminder that you must enter at least two characters to begin a search.
Blank searches return no data. Enter a search string to find a contract or product.
Update 7.2.3
- Integrated Catalog: For products on local contracts, you can switch between viewing Premier's product information
and the local contract’s product information (from SCM) that your site provided to the Catalog.
The View Product Source By: button lets you select the origin of the product data for display (Figure 35).
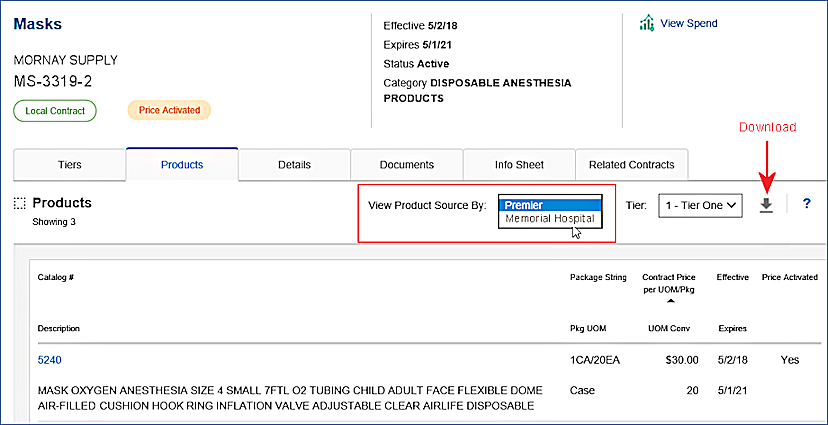
- Click the View Product Source By: button to toggle the display between Premier information (in the PIM) and local information
from your contract.
When you download a summary of the products to Excel (Figure 35, click the download icon), the Source is listed in one of the Excel columns.
Problems Resolved in Updates
- SCM: An internal error was sometimes triggered when a user selected the Correspondence tab of a service contract or when multiple attachments were present on the tab. The error on the Correspondence tab has been corrected and is no longer an issue for service contracts. Update 7.2.1
- ERP: A place to enter financial reporting fields was not available for manual invoice distribution lines. Update 7.2.2
To resolve this issue, a tab on the Distribution line panel has been added for financial reporting fields.
Click the tab to enter any fields as needed or required.
- ERP: When running recurring invoices as a scheduled job, ERP was not picking up all the invoices that should be created.
ERP was also not updating the last processing period correctly. This problem occurred with recurring invoices processed monthly.
Update 7.2.2
This problem was traced to incorrect period/year/date values being passed to the scheduled job.
The correct values are now being used. Monthly recurring invoices are now created showing the current date, period, and year.
- ERP: Deleting invoices with exceptions generated incorrect transaction amounts and incorrect PO liability amounts. Update 7.2.2
- Deleting an invoice with price and receipt exceptions.
When a PO invoice was created, and then deleted, the invoice amount on the PO became a negative number, instead of zero.
The next invoice entered against that PO thus had receipt line amounts that were not accurate.
When the invoice was finished, and cost adjustments were created, the adjustments were done for the wrong amount,
and the PO liability amount and all GL transactions created were incorrect.
- A similar situation occurred in PO invoices with quantity and price exceptions.
The invoice quantity exception was cleared with Invoice Correct. Quantity exceptions receipts were created.
The invoice was then deleted, along with the quantity exception receipts.
The resulting calculations of transaction amounts were based on incorrect negative values (instead of zero).
These problems have been resolved so that in situations like these, the calculations of PO transactions are correct,
and the PO liability values are correct.
Update 7.2.4
- ERP: EDI 810 invoice processing allows credit invoices to match to non-credit POs.
Credit invoices have a negative invoice total. The application changed the negative total to a positive number which allowed the credit invoice to be incorrectly matched to the original PO. This problem has been resolved so that ERP correctly identifies credit invoices which can then be correctly matched to the appropriate credit PO.
- ERP: When you added non-file items to a departmental inventory, ERP displayed an error message.
This problem has been resolved so that non-file items can be added to departmental inventories as designed.
Note: The departmental inventory feature allows you to perform inventory counts
for supplies stored at various locations within a department. When a departmental inventory is completed, it produces an inventory value that can be compared to a previous inventory. This feature allows a hospital
to get a more accurate picture of its total supply inventory value by assessing department inventories, as well as asset location inventories.
Attachment 1: Tax Setup Examples, Before and After 7.3 Implementation
Below are examples of how AP tax might be set when the new tax processing options are implemented at a site, and after.
A materials tax example would be similar.
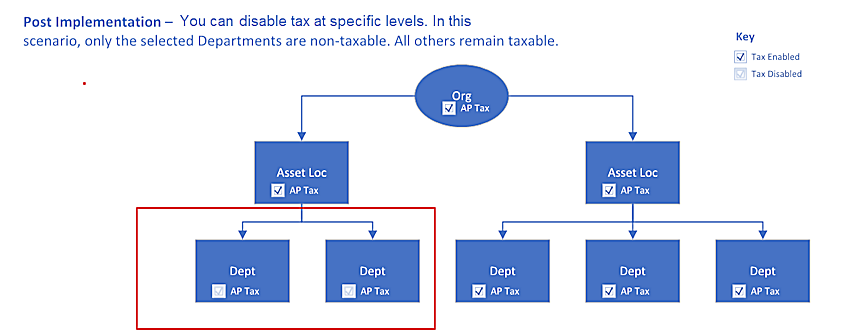
The Organizational AP Tax setting is off.
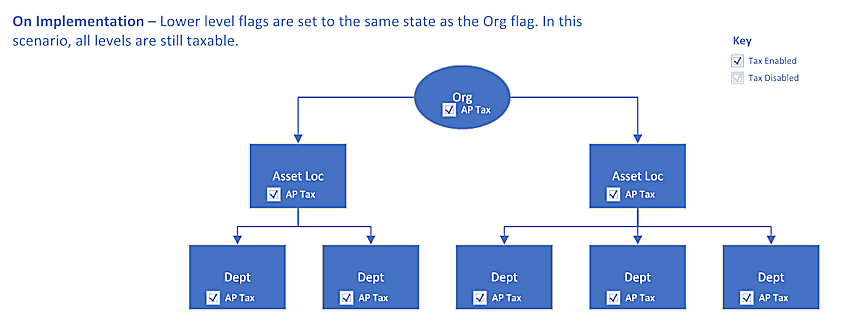
At implementation, all the departments and asset locations copy the organization's tax settings: Off.
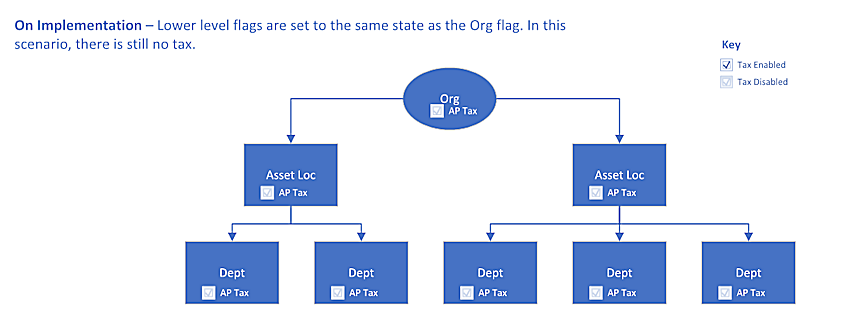
After implementation, two departments set their tax settings: On.
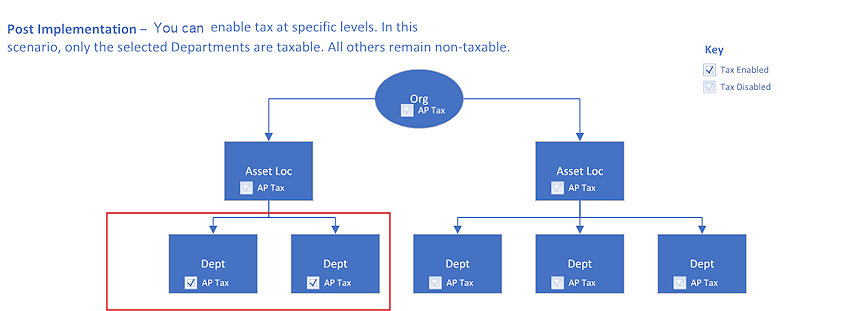
The Organizational AP Tax setting is on.
At implementation, all the departments and asset locations copy the organization's tax settings: On.
After implementation, two departments set their tax settings: Off.
Attachment 2: Process Flow for Determining the Applicable Materials Tax - Requisitions
Attachment 3: Process Flow for Determining the Applicable Materials Tax - Purchase Orders

Attachment 4: Process Flow for Determining the Applicable AP Tax

Attachment 5: Process Flow for EDI Tax Variance
Copyright © 2023 by Premier Inc. All rights reserved.
|