What's New in Service Pack 6.9
|
|||||||||||||||||||||||||||||||||||||||||||||||||||||||||||||||||||||||||||||||||||||||||||||||||||||||||||||||||||||||||||||||||||||||||||||||||||||||||||||||||||||||||||||||||||||||||||||||||||||||||||||||||||||||||||||||||||||||
|
New Features and EnhancementsEnhancements made in updates since Service Pack 6.8 are also included in this document. ERP Materials Management and Financials
Sourcing and Contract Management (SCM)
ERP and SCM Enhancements from Updates 6.8.1 to 6.8.11The following changes to ERP and SCM were covered in previously released Update Notes for each update. ERP
SCM
Reports
AdministrationProblem ResolutionsERP Materials Management and Financials
|


 |
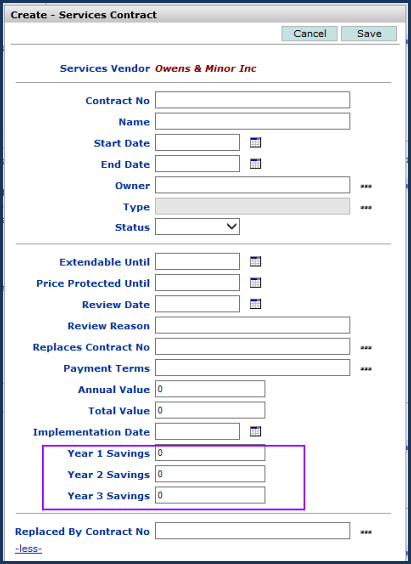 |
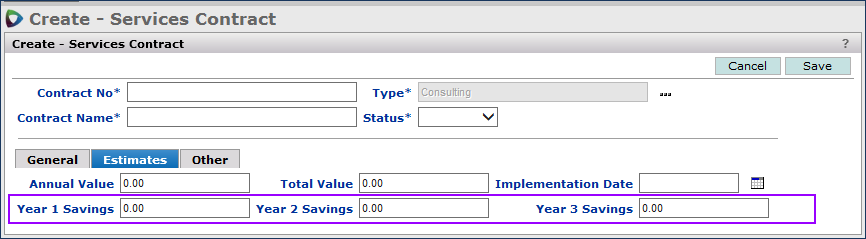
Fields for Year 1, 2, 3 Savings Estimates on a Services Contract Header
from the Incentives Setup Panel
SCM main Contents > Incentives > Incentives Setup
These fields (Year 1 Savings, Year 2 Savings, and Year 3 Savings) are also available on the following Report Objects:
- “Services Contract"
- “Services Contract User Fields”
- “Services Contract User Fields – Consolidated”
New % columns are on the Excel output for Welcome page "On Contract Spend and Items"
The Excel output for the Welcome page gauge “On Contract Spend and Items” contains two new columns for percentages: Items on Contract % and On Contract Spend %.
These columns (Figure 23) will assist contract and materials managers in comparing the volume of contract spend and item purchases.
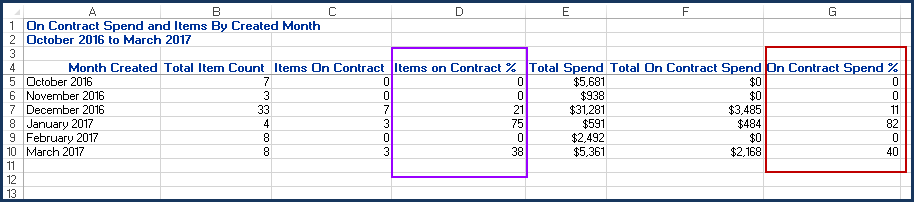
Excel Output for the “On Contract Spend and Items” Gauge
Analysis Projects lets you work with "child" entity data for manufacturer and vendor parents.
On the Project Contents panel for the Mfr category, you can open a display of spend dollars and a count of project items for both a parent manufacturer family and individual "child" manufacturers. You can also exclude an entire manufacturer family, or exclude only individual "child" members in the family.
In the Mfr view, the initial Project Contents panel contains the Parent entity spend (Figure 24), sorted descending by amount.

The Project Contents Panel with Manufacturer Data
SCM main Contents > Supplies > Analysis Projects > edit
In the Mfr view, click the Parent column header to sort by Parent family and to open the Mfr "child" data (Figure 25).

The Project Contents Panel with Parent and Child Manufacturer Data
SCM main Contents > Supplies > Analysis Projects > edit
On the Project Contents panel:
- To display items in the spend, click the item count (in parentheses). The View shifts to the Mfr/MIN display, and is filtered for the manufacturer.
- To exclude all spend for a manufacturer family, click the box next to the parent manufacturer.
- To exclude spend just for the child manufacturer, click the box that aligns with a child manufacturer.
- To display excluded spend, click the link Show Excluded in the top right corner. You can re-include spend that you previously excluded.
Note: You can only exclude spend before you award a contract in the project. When a contract is awarded, project spend freezes.
Similarly, on the Project Contents panel for the Vendor category, you can open a display of spend dollars and a count of project items for both parent vendor family and individual "child" vendors.
In the Vendor view, the initial Project Contents panel contains the Vendor spend (Vendor Spend Total) sorted descending by amount, shown in Figure 26.
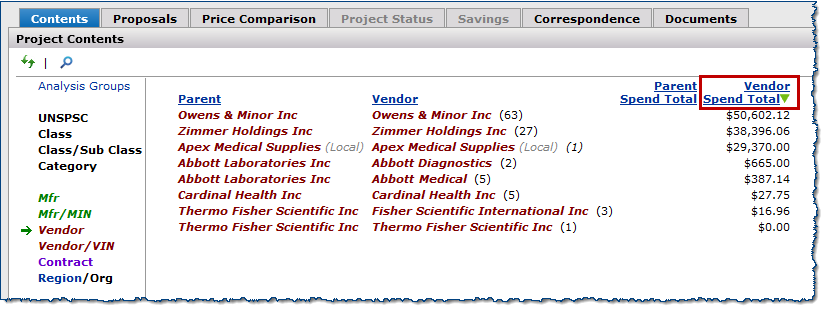
The Project Contents Panel with Vendor Data
SCM Main Contents > Supplies > Projects > select a project
To work with the Vendor view on the Project Contents panel:
- Click the Parent column header to sort by Parent family. This action opens the Vendor "child" data and populates the Parent Spend Total column. Each Parent Spend Total amount is equal to the sum of its "child" data.
- To display items in the spend, click the item count in parentheses. The View shifts to the Vendor/VIN display and is sorted by vendor.
Enhancements from Updates 6.8.1 to 6.8.11
ERP Past Updates
 To make email invoice approvals more convenient, the email message has been enhanced to include data needed by the approver.
The approval email message (Figure 27) now contains the following fields, in addition to the Invoice No, Invoice Date, and Invoice Due Date:
- invoice Description
- invoicing Organization
- Vendor
- Invoice Total
- the PO number of any associated purchase order
- Invoice distribution lines (if relevant)

The Email Message for an Invoice Approver: Approve or Reject
A new option for requisition imports lets you create separate POs by requisition in ERP Materials Management.
You can have Materials Management generate separate purchase orders for imported requisitions. On the Requisition Import Template, enter 1 (for “yes”) in the field SepPOByReqYN (Separate PO by Requisition) for each line. Then, all the lines are written to a single new purchase order. This feature will be especially useful for sites that import requisitions from external systems such as Strata.
The new field — SepPOByReqYN — on the requisition import template is the last field after the financial reporting fields, but before <EOF> (Figure 28).

Fields on the Requisition Import .csv Template
Field values are:
1- Create a separate PO for each requisition.
0- Do not create separate POs (default).
You can allow a paying organization designated on an invoice import file to override the default paying organization for invoices.
Currently, when an invoice for an organization is imported, responsibility for the invoice charges can belong to another organization. The Default Paying Organization field on an organization record can specify a different organization for charges (Figure 29).
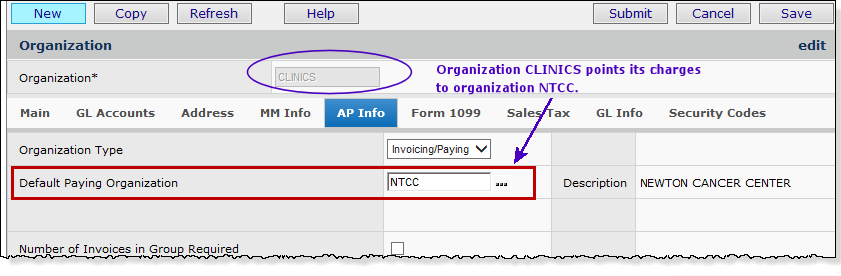
An Organization Record with the Default Paying Organization Defined
Materials Management main Contents > Tables > Organizations > edit organization
For some types of invoice charges, AP staff may not wish to use a different paying organization (specified in the Default Paying Organization field), and instead have the organization listed on the invoice pay the charges. For example, in Figure 29, organization Clinics points its charges to organization NTCC, by default. But, Clinics staff want charges on some imported invoices to go to Clinics itself, while the rest of the charges continue to go to NTCC.
- To accommodate this need, a new column — PayingOrgOverrideYN — is available on the invoice import (Figure 30). This field is completely optional. If you are not using this feature, you can omit the column or enter a zero in the column. (Do not leave the column “blank.”)
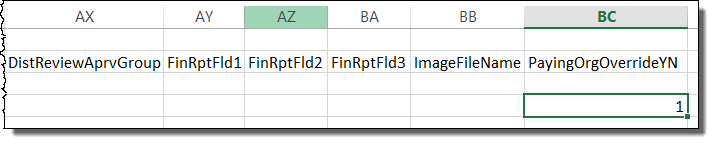
Location of the PayingOrgOverrideYN Field on the .csv Import File
The online documentation chapter “Import Manual Invoices into Accounts Payable” contains details on invoice imports.
Several columns within Requisitioning > My Approval Queue and All Approval Queues are now sortable and contain a Quick Filter search capability.
Analysts reviewing approval queues can now sort and filter the requisitioning All Approval Queue and the My Approval Queue by several columns. This change will allow users to more easily and efficiently manage the overall outstanding list of approvals.
Click one of the following column headers to change the sort order from ascending to descending:
- Organization
- Department
- Total Cost
- Requested Date
- Requested By
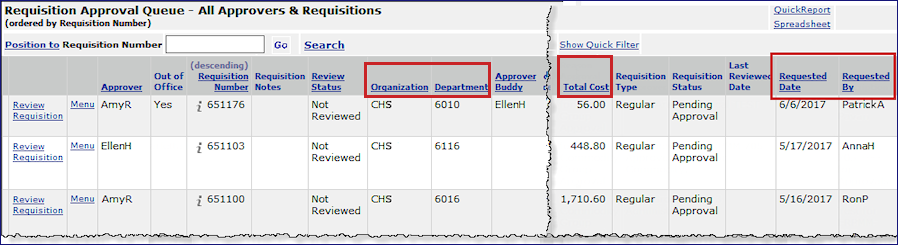
A quick filter at the top of each of these columns (red box, Figure 31) allows you to search for specific values within the data for that field. Enter search characters in the quick filter box that you wish to find in the column and press Enter, or click the button next to the box (red arrow, Figure 31) and use the prompts to select specific search elements.
The columns listed above are also now included in the Search panel for both approval queue pages. Click the Search link (green arrow, Figure 31 and enter criteria in one or more fields to search for specific data within each page.
Figure 32 displays the additional columns that sort.

New Sorting and Search Options on Requisitioning > All Approval Queues Page
Materials Management main Contents > Requisitioning > All Approval Queues
The Requisition All Approvers Queue with the Sort Columns
Materials Management main Contents > Requisitioning > All Approvers Queue
Users who create credit purchase orders now have the option of being notified on approval or rejection of the PO.
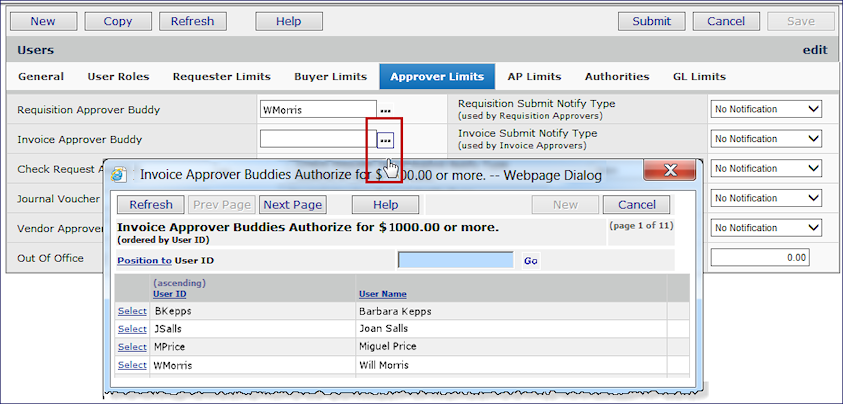
When a user opens a credit PO, he/she needs to know when the PO is approved so that Distribution or Receiving can be alerted to pick up the items for return. For this goal, a new field is available on the User Profile Buyer Limits panel (Figure 33) that sets up an email alert for the user when a credit PO is approved or rejected.

Setting Notifications for a User for Credit PO Approval and Sample Notifications
Work in Administration main Contents > Users > ![]()
Users responsible for credit POs can now filter and search the lists that contain credit POs for review and for shipment.
This enhancement makes it easier to find credit POs in the process of review.
A new sort field — Original PO Buyer — has been added to the lists: Credit POs for Review (Figure 34) and Credit POs for Shipment. The previous Buyer column has been renamed to Credit PO Buyer.
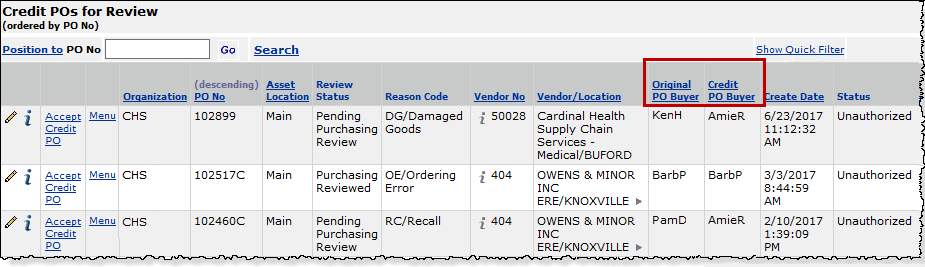
The Credit POs for Review List with the Sort Columns for the Buyers
Materials Management main Contents > Purchasing > Credit POs for Review
The Original PO Buyer is the person who authorized the original PO from which a credit PO was derived. This person authorizes or rejects the credit PO.
The Credit PO Buyer is the person who created the credit PO derived from the original PO.
Access to journal voucher details and journal entries in payroll accounts is controlled by new security features.
To protect sensitive employee pay data, Human Resources Managers want to be able to allow a user visibility to organizations’ and departments’ JV details, except for payroll information. This enhancement lets managers prevent a user from viewing imported journal voucher payroll data for specified organizations/departments, while retaining visibility to other types of journal vouchers.
This enhancement covers both payroll accounts and statistical payroll accounts, and applies to ERP departments only (not SCM departments). It applies to imported journal vouchers whose Journal Voucher Type is Payroll. (Manually created journal vouchers cannot be defined with the Journal Voucher Type of Payroll.)
Enabling a User’s Restriction for Payroll Data
Security is set in these areas:
- In a Data Profile, selecting/unselecting a new flag that governs access to payroll JVs for any department/organization in the Data Profile. For any selected departments, any user assigned the Data Profile cannot see payroll journal voucher details, but can display details for other types of journal vouchers.
- In a user’s role through the role objects PayJV (General Ledger Payroll Journal Vouchers) and PayJVDtl (General Ledger Payroll Journal Vouchers Detail).
- Selecting the field Allow Access to Payroll Journal Voucher Detail on the User Profile GL Limits tabbed panel (Figure 35).

The User Profile Field That Allows Access to Payroll Data
Work in Administration > Administration > Users > edit > GL Limits
Important: The permission for payroll data by department (in a Data Profile), the appropriate values on the role objects, and the flag on the GL Limits panel must be set for a user to access payroll data.
Usage: To set the flag to allow payroll data access for a department:
- From the Work in Administration main Contents, select Data Profiles. The list appears.
- Locate the Data Profile of interest.
- Click Menu > Restrict Access to JV Payroll (Figure 36).

Data Profiles Menu Item for Restricting Payroll Access
Work in Administration > Administration > Data Profiles
The Restrict Access to JV Payroll panel opens with a list of departments and organizations included in the Data Profile (Figure 37). In Figure 37, the departments where payroll data access is allowed are in the green box. The red box indicates departments where payroll data access is not allowed.

Granting Payroll Information Access to Data Profile Departments
Work in Administration > Administration > Data Profiles > Restrict Access to JV Payroll
In the Restrict Access to JV Payroll panel General tab, in the center, the Selection Criteria box is initially blank. You can set the selection criteria to Select All, or when any departments are selected, UnSelect All.
- In the Select column, check any organization/department for which you wish to deny access to payroll details.
Unchecked departments will have payroll details available to users assigned the Data Profile. The default is “unchecked.” - Alternately, to deny payroll data access to all departments in the list, set the Selection Criteria box to Select All.
Note: If you add an organization/department to a Data Profile, the new department’s flag for access to payroll data will be unselected; i.e., “allowed.” If you need to restrict access to payroll data for the newly added department, return to the Restrict Access to JV Payroll panel and check the Select box.
Application Areas Controlled for Payroll JV Access
Access to payroll data for users who have department access is controlled in the application in several areas, outlined below. A few examples are included.
![]() Viewing payroll JV import details.
Viewing payroll JV import details.
If the user is restricted, then a message appears explaining why the user cannot see payroll data on the import. (Figure 38 is an example.)
In Figure 38, the user does not have permission (department settings, role object settings, and user profile authority) to view payroll data. The user can see debit and credit totals, but not individual lines which are associated with employee amounts. A message informs the user. If the user were authorized to view this department’s payroll data, individual journal entry lines would appear with the payroll dollars for each.

Drilling Down to Journal Entry Details from an Imported Payroll Journal Voucher
GL > Imports/Exports > Import External Chase Journal Vouchers > Menu > View Import Details
![]() Inquiring on journal vouchers and drilling down to details.
Inquiring on journal vouchers and drilling down to details.
From the list of journal vouchers, unauthorized users cannot drill down to payroll journal entry lines. When a user clicks Payroll Details (Figure 39) to display the lines, if the user is authorized, the lines appear (Figure 40). If the user is unauthorized, the “Insufficient Authority” message appears, with no payroll lines (Figure 38).

Drilling Into Payroll Details from a JV Inquiry: User Is Authorized
GL main Contents > Journal Vouchers > Journal Vouchers

Payroll Entries for a Payroll Journal Voucher
(All identities are fictional)
GL main Contents > Journal Vouchers > Journal Vouchers > Payroll Details
![]() Displaying Account Balances and Drill Down to Journal Entries
Displaying Account Balances and Drill Down to Journal Entries
For any account, you can display account balances and journal entries for a selected year (Figure 41).

Viewing Balances / Journal Entries for a Payroll Account
GL main Contents > GL Accounts > Account Management
Drilling down to journal entries for a payroll account displays the same menu as (Figure 39). If you are authorized to view payroll data, you can click Payroll Details to open a display similar to Figure 40. Otherwise, the “Insufficient Authority” message appears.
Payroll data is also protected from unauthorized users for these additional user activities:
- Drilling into an unauthorized organization/department from Inquiry and Analysis to view payroll detail
- Retrieving payroll detail for an organization/department from ProSheet.
- Retrieving payroll detail for an organization/department from the Financial Report Writer.
Note: Restrictions for organizations/departments set up for imported payroll journal vouchers also apply to statistical payroll journal vouchers. Statistical payroll journal vouchers differ from regular payroll journal vouchers in these ways:
- The statistical Journal Voucher Number must begin with ST.
- The statistical JV Type on the import is STA.
- The statistical Source Journal cannot be PAY.
- The account codes must be statistical accounts.
ProSheet, Financial Report Writer, and account inquiry security is now aligned with users’ Data Profile settings.
- Data Profile settings for allowed organizations and departments control the account data that you can access using the application's account inquiry, the Financial Report Writer, and ProSheet’s account retrieval and downloading functions.
- If you do not wish to use the data profile security feature, you can bypass it via a new setting on the System Values panel.
- A new version of ProSheet (6.08.007) is also available. The new version lets you configure an error message that appears in place of data when users try to retrieve accounts to which they do not have access.
Important: This feature was deployed with Update 6.7.8. If you are using it for the first time since it was made available, note the following:
For ProSheet users, this feature affects data and calculations on any version of ProSheet currently installed on your system, as well as on the new ProSheet version 06.08.007.
You need to be aware of the following:
The organizations/departments for which you currently retrieve account data using account inquiry, the Financial Report Writer, or ProSheet must all be included in your Data Profile. If you have specified organizations/departments on a financial report or inquiry, and those departments/organizations are not included in your Data Profile…
- The downloaded ProSheet data will be different than previously.
- The results of any calculations on ProSheet will be different.
This security also applies to account masks, and to account templates called in to ProSheet, account inquiry, or used with the financial report writer. Accounts covered by a mask are not downloaded if the organizations/departments “wildcarded” in the mask are not in your Data Profile.
Make sure that your Data Profile contains the organizations/departments whose data you want to work with. If you need to have organizations/departments added to your Data Profile, contact your site’s System Administrator. For questions or problems, the Premier Solutions Center is available at 877.633.4911.
Below are details of this enhancement for ProSheet, and examples, including a short discussion on masks.
Figure 42 displays tools that download account data to ProSheet. The user's Data Profile applies to account data downloaded via Retrieve Data (accounts or JVs) and Formula Builder.

The ProSheet Retrieve Data Tool
![]() Retrieving Accounts
Retrieving Accounts
Clicking Retrieve Data > Retrieve Accounts (Figure 42) opens the Retrieve Account Codes panel. An example is in Figure 43. (Alternately, you could select Retrieve Data > Retrieve JVs. Data Profile settings would also apply.)

The Retrieve Account Codes Panel for ProSheet
Since account codes have a segmented structure, to capture multiple accounts, without listing every account, you create a pattern — or mask — for the group of account codes to be retrieved. Typically, one account segment identifies the organization, and another identifies the department.
To capture data in multiple organizations’/departments’ accounts, you enter a beginning organization/department code in the mask and include a wildcard symbol (?). The wildcard symbol instructs ProSheet to pick up other organizations/departments that fit the pattern.
For example, suppose you have an account pattern as follows:
Segment 1 – organization numbered from 001 to 013.
Segment 2 – account identifier: between 01 and 99.
Segment 3 – account sub-identifier: three numbers.
Segment 4 – department, numbered from 0100 to 0210.
Figure 43 contains a mask used to download liability and expense account data for...
Organizations 010 to 013.
. . .with an account value of 02.
. . .and a sub-account value of 070.
. . .for departments in each organization numbered 0100 to 0199.
With this enhancement, the user must have Data Profile access to all the departments and organizations specified or covered by a mask. If some of those organizations/departments are not included in the user’s Data Profile, their account data is not accessible, and is not downloaded to ProSheet.
Instead, a zero (0) appears on the spreadsheet line where the account data would otherwise be written.
Zero is the default. However, you can configure the value that appears, if you wish to use something more meaningful at your site; for example “Restricted data” or “Not authorized.” Instructions are below.
In Figure 43, for example, if the user had access to every “01...” department, except for department 0123, then account data for Department 0123 (which was not in his/her Data Profile) would not be downloaded.
![]() Security in ProSheet Functions
Security in ProSheet Functions
The example in Figure 43 is for the Retrieve Data tool in ProSheet. A user’s Data Profile also controls data for ProSheet functions. The Formula Builder button (Figure 42, next to Retrieve Data) lets you create formulas/functions to return data such as account balances. Formulas may contain organization and department segments, or masks that identify organizations and departments.
In function masks, organizations/departments can be specified literally, or retrieved using wildcards (e.g., “1?10”), ranges (e.g., “1267:1277”), and other selection shorthand. Templates for accounts defined in the Financial Report Writer can also be called in to ProSheet formulas.
If the organizations/accounts referenced by any of these methods are not in your Data Profile, then account data for those organizations/departments does not download. Instead, the ProSheet lines will contain a zero, or whatever message you have configured.
When you drill down on summary accounts to display detailed accounts for different organizations and departments in ProSheet, once again, you can only display organization/department data that you are authorized to see.
![]() Configuring the Message for Accounts Not Allowed to the User
Configuring the Message for Accounts Not Allowed to the User
Note: The latest version of ProSheet is 06.08.007. You do not need to download ProSheet to avail yourself of this new security enhancement. But, if you wish to configure a message for unauthorized accounts (other than the default of 0), you do need to download and re-install the current version.
Usage: To configure a message for account data that is not allowed:
- On the ProSheet toolbar, click Configuration (Figure 44).

Click Configuration on the Toolbar
The ProSheet Configuration panel appears (Figure 45).

ProSheet Configuration Panel for Entering “not allowed” Message
- Enter a message in the field Account not found message.
- Click OK. ProSheet will use the message you specified for accounts that a user’s Data Profile does not allow.
Bypassing the Data Profile Security Feature
A field has been added to the System Values panel that allows sites to turn off ProSheet security (Figure 46).
- The field is: Bypass ProSheets/I&A/Fin Report Writer Security (Figure below).
- The default setting is “unselected” (ProSheet security is enabled). The system performs the data profile check.
- To bypass (disable) ProSheet, Financial Reporting, and Account Inquiry data profile security, check the field.
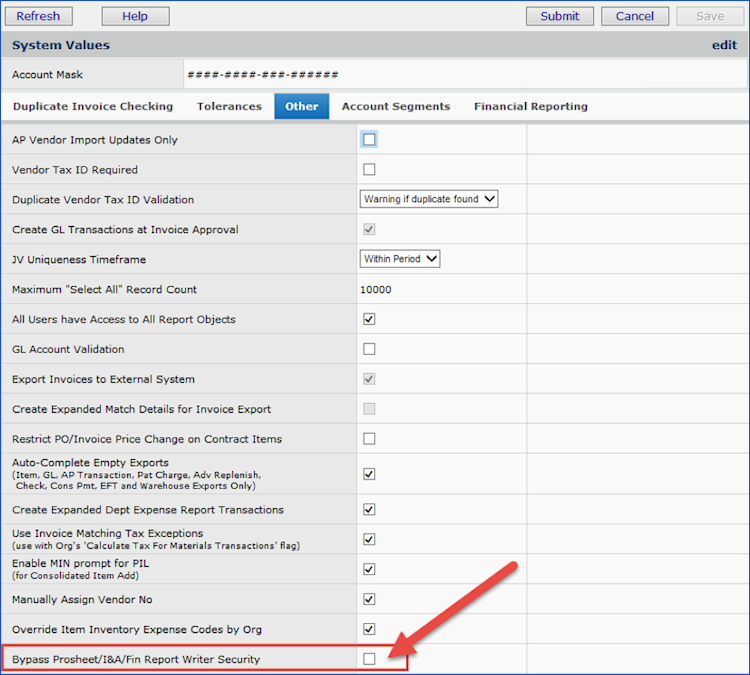
New Field for Turning Off ProSheet Security for a Site
Work In Administration > Administration > System Values > edit > Other
For detailed information on ProSheet, see the online documentation topic "Working With ProSheet."
The GTIN upload now allows you to import multiple GTINs for the same item/vendor/UOM combination.
Figure 47 is an example.
This feature avoids manual data entry of the multiple GTIN identifiers for a single item.
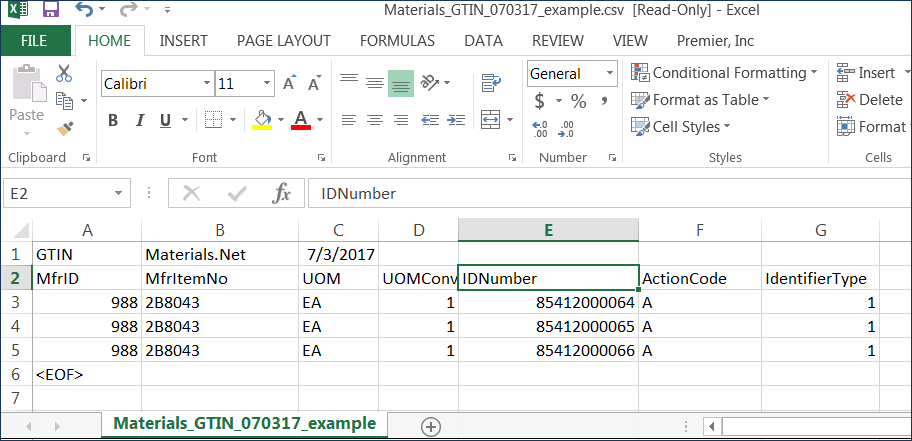
A GTIN Import (Open in Excel) with Multiple GTIN IDs for a Single Item and UOM
Note: The GTIN import does not allow the Change ( C ) Action Code.
SCM Past Updates
A primary document can now be designated within supply contracts and analysis projects.
In addition to the existing ability within services contracts, you can now designate any uploaded document within an analysis project or supply contract as a primary document. One primary document per project or contract is allowed. Setting a document as primary creates a View Primary Document link in the header of the contract or project that provides a quick way to view or download the document.
To designate a primary document:
- On the "Work with Contract", "Work with Services Contract", or "Work with Project" page, click the Documents tab.
- Click a document in the Doc Title column to open its Document Information panel (Figure 48).
- Click the Primary Document icon
 (Figure 48) to designate it as the primary document for the selected contract or project.
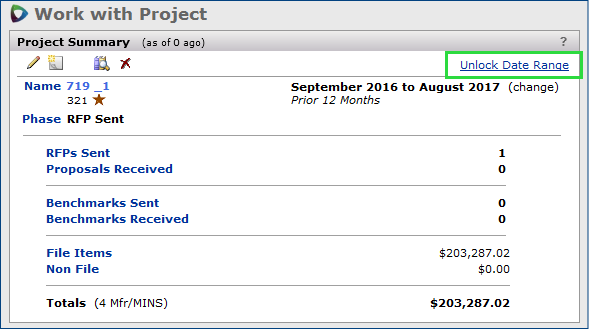
The Document Information panel closes, the screen automatically refreshes, and a View Primary Document link appears in the contract or project info panel next to the gold Primary Document icon (Figure 49).

Setting a Primary Document in the Document Information Panel
SCM main Contents > Supplies > Contracts > Contract Workbench > open contract > Documents tab

The View Primary Document Link in the Services Contract Info Panel
SCM main Contents > Services > Contracts > Contract Workbench > open contract
Note: Once set, you can click the View Primary Document link (Figure 49) at any time to download the designated primary document. If the link is not present, no primary document has been set.
The “primary document” indicator has been added to the Documents tabs to identify documents marked as primary.
Figure 50 is an example of the indicator on a contract’s Documents tab. Figure 51 illustrates the primary indicator on the Supply Contract Workbench Documents panel.

Primary Document Indicator for a Contract
SCM main Contents > Services > Contracts > Contract Workbench > open contract

Primary Documents on the “All Documents” Search Panel
SCM main Contents > Services > Contracts > Contract Workbench
When you attempt to delete a Primary Document from a supply contract, services contract, or analysis project, a confirmation message is now displayed to warn that you are about to delete a Primary Document. If the document is associated with another contract or project, the associations are listed and you must check the box at the bottom of the message to delete the document from all areas.
The ability to view the Documents tab on the "Work with Project" page is now controlled by the AnalysisProjectDocs role object.
The Documents tab on the "Work with Project" page is now controlled by the AnalysisProjectDocs role object. In order to see the contents of this tab, a user’s security level for the AnalysisProjectDocs role object must be set to a minimum of View. The CAProjects role object no longer controls the ability to view the Documents tab on the "Work with Project" page.
Role object security levels have been updated to restrict the deletion of documents, notes, and email from contracts and projects.
The security level requirements for certain security objects were updated on the Correspondence and Documents tabs for supply contracts, services contracts, and analysis projects. A user must now have the security level of All for the appropriate role object (see Table 1) in order to delete documents, user notes, and emails. The security levels of Create and Modify will no longer allow the deletion of these documents.
Table 1 - Role Objects and Security Settings for Document Deletion
Role Object Security Setting Location of Documents Purpose ContractDocuments All "Work with Contract" page > Correspondence and Documents tabs Restricts the deletion of supply contract documents, user notes, and emails. ServicesDocuments All "Work with Services Contract" page > Correspondence and Documents tabs Restricts the deletion of services contract documents, user notes, and emails. AnalysisProjectDocs All "Work with Projects" page > Correspondence and Documents tabs Restricts the deletion of project documents, user notes, and emails.
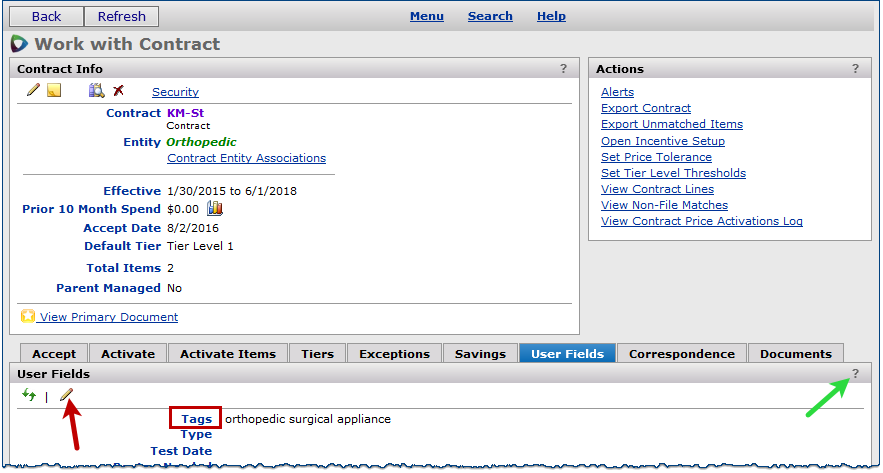
User fields for services and supply contracts now have selectable Data Types.
For supply and services contracts, 100 pre-defined user fields are available, set to the Alphanumeric Data Type. You can change the Data Type. For example, if the user field is to be a filter, the Data Type must be Field Value.
The discussion below applies only to services and supply contracts’ user fields.
- For a user field that you are setting up for the first time, edit the Data Type and the Label as needed. The path is: Administration > Tables > User-Defined Fields > Contracts or Services Contracts > select field > edit. (Detailed instructions are in the online documentation topic “Work with User-Defined Fields.”)
- For contracts' user fields already customized with a Label, you can change the Data Type, provided that the user field has not been assigned data values in any contracts.
Usage: To change the user field Label and Data Type:
- Open the user field’s parameters for editing.
The path is: Administration > Tables > User-Defined Fields > Contracts or Services Contracts > locate field > edit. - Edit the user field to reset the Label field back to its original: Field number. If you do not remember the original number, you can set number equal to any number between 1 and 100 that is not used in another Field number label.
- Save the user-defined field.
- Reopen the user field parameters Edit panel, enter a new Data Type and Label, and click Save.
Note: If the user field has data values assigned in any contract, an error message appears, and you cannot change the Data Type.
For Premier managed contracts, price changes originating in ERP that are higher than the contracted price or within the range of tolerance settings are now automatically rejected.
For Premier managed contracts only, price changes that originate in ERP are now automatically rejected when they meet specific criteria. Automatic rejection occurs when an incoming price change from ERP is:
- Higher than the contracted price.
or - Within the tolerance settings.
Note: Price changes that are lower than the contracted price and outside the tolerance settings still require manual rejection.
All items with rejected price changes, whether automatically or manually rejected, appear on the Items with Rejected Price Changes panel. An updated Source/Reason description provides details on the auto-rejection, shown in Figure 52.
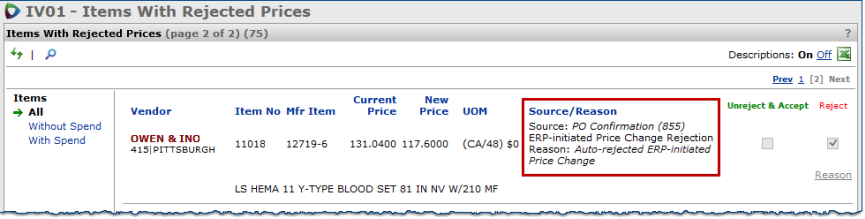
Updated Source/Reason for Rejected ERP-initiated Price Changes
SCM main Contents > Supplies > Contracts > Contract Workbench > open contract > View Rejected Items in Actions panel
Reports
Report writing: New security is available for creating, modifying, and sharing a report definition.
This enhancement improves security for a site’s reporting operations so that only users authorized to create or change report definitions can access those features. The objective is to allow Materials, AP, and GL managers to have more control over report quality.
A new role object “Reports” is available for the features My Report Definitions and Standard Report Definitions. (Materials Management, AP, or GL main Contents > Reports.)
Note: A role object is included in each role assigned on a User Profile. (Work in Administration > User > Edit.) Each role object has a security setting: None, View, Modify, Create, or All. (Work in Administration > Roles > Role Objects > Edit.) See the online documentation topic “Set Up and Maintain Users, Administration, Security” for details.
For the new “Reports” role object, settings result in the following restrictions/capabilities for users.
| “Reports” Role Object Setting | Affect on User Capabilities |
None |
The options “My Report Definitions” and “Standard Report Definitions” are not visible to the user on the Reports menu. The user cannot view report definitions at all. |
View |
The options “My Report Definitions” and “Standard Report Definitions” are visible on the Reports menu. |
Modify |
The options “My Report Definitions” and “Standard Report Definitions” are visible on the Reports menu. The user can also: |
Create |
The user has all the capabilities allowed in Modify. |
All |
The user can create, edit, modify, or delete a report definition. |
New Report Objects/Report Fields
- The field PO Reason Code has been added to the “GL Transactions MMAP” report object.
This field will help sites create a report to validate that they are getting the correct GL journal voucher information from an external General Ledger system. The PO Reason Code will serve as a flag for distinguishing GL transactions.
- A new report object "Invoice Approval History" is available to create historical reports that list rejected (and other) invoices, and reviewers' rejection comments. This report will allow managers to view trends.
Users can filter the report by Review Status, or display all invoices. The Review Status values are: Not Reviewed, Reviewed, Rejected, and Approved.
- A standard report definition is also available for this report object. The report is called "Invoice Rejection History" and is listed in Reports > Standard Definitions.
The new report object has these fields:
Field Label Field Name Data Type Length AP Location APLocation varchar 15 Approve Reject User RejectUser varchar 20 Approve Reject Username RejectUsername varchar 9 Inv Create User CreateUser varchar 20 Inv Create Username CreateUsername varchar 20 Invoice Date InvoiceDate datetime 23 Invoice Number InvoiceNo varchar 15 Invoice Status InvoiceStatusID varchar 10 Invoice Status Desc InvoiceStatusDesc varchar 50 Invoice Total InvoiceTotal money 19 Last Activity Date LastActivityDate datetime 23 Org Org varchar 15 Reason Code ReasonCodeAprv varchar 2 Reason Code Desc RejectionReason varchar 50 Approve/Reject Comments Comments varchar 200 Record Count RecordCount int 10 Review Status ReviewStatus numeric 1 Review Status Desc ReviewStatusDesc varchar 50 User ID UserID varchar 20 Vendor Name VendorName varchar 50 Vendor No VendorNo varchar 15
- The following fields have been added to the "Journal Voucher" report object:
- Direct Approver
- Approver Group
These fields will let hospital auditors identify the approver(s) responsible for each JV so that the proper checks and balances are being followed by the hospital's process.
- The following fields have been added to the "Department Expense Report Custom" report object:
- Manufacturer Name (MfrName)
- Manufacturer Number (MfrID).
The addition of these fields will make it easier for departmental managers to identify the vendors and manufacturers associated with departments expenses.
- The Vendor Set field has been added to the “Contract Price Activation Log (CaA)” report object.
A Vendor Set indicates which materials management application a vendor number is associated with. Sites that catalog vendor items within different applications may use vendor sets. The Vendor Set value appears in small type next to a vendor number on SCM application panels.
- The Vendor Group column has been added to the report object "Invoice Expense Analysis Detail with Check Number."
- The
Services Contract header fields for savings estimates — Year 1 Savings, Year 2 Savings, and Year 3 Savings — are available on the following report objects:
- “Services Contract"
- “Services Contract User Fields”
- “Services Contract User Fields – Consolidated”
- A new report object is available: "PO Header & Line View 1 with Invoice Detail.” This new report objects includes all the fields from "PO Header & Line View 1," and these additional fields for invoice distribution details:
Field Label |
Field Name |
Data Type |
Length |
Inv Line Amount |
InvLineAmount |
numeric |
17 |
Inv Line Charge Type Code |
InvLineChargeTypeCode |
varchar |
10 |
Inv Line Charge Type Desc |
InvLineChargeTypeDesc |
varchar |
50 |
Inv Line Chrg Dist Method |
InvLineChrgDistMethod |
numeric |
1 |
Inv Line Chrg Dist Method Desc |
InvLineChrgDistMethodDesc |
varchar |
17 |
Inv Line Code 1099 |
InvLineCode1099 |
varchar |
2 |
Inv Line Desc |
InvLineDesc |
varchar |
50 |
Inv Line Est Tax Amt |
InvLineEstTaxAmt |
numeric |
17 |
Inv Line Fund Code |
InvLineFundCode |
varchar |
10 |
Inv Line GL Account |
InvLineGLAccount |
varchar |
67 |
Inv Line No |
InvLineNo |
numeric |
5 |
Inv Line Posted Date |
InvLinePostedDate |
datetime |
23 |
Inv Line Posting Sts |
InvLinePostingSts |
numeric |
1 |
Inv Line Posting Sts Desc |
InvLinePostingStsDesc |
varchar |
16 |
Inv Line Project Code |
InvLineProjectCode |
varchar |
10 |
Inv Line Reverse Sign YN Desc |
InvLineReverseSignYNDesc |
varchar |
3 |
Inv Line Reverse Sign YNB |
InvLineReverseSignYNB |
numeric |
1 |
Inv Line Taxable YN Desc |
InvLineTaxableYNDesc |
varchar |
3 |
Inv Line Taxable YNB |
InvLineTaxableYNB |
numeric |
1 |
Inv Line Type |
InvLineType |
numeric |
1 |
Inv Line Type Desc |
InvLineTypeDesc |
varchar |
20 |
Invoice No |
InvoiceNo |
varchar |
15 |
Invoice Org |
InvoiceOrg |
varchar |
15 |
Administration
On the Omit Menu Options list for EM (Materials Management), the label POs for Matching (EM) has changed to Create Invoices from Purchase Orders (EM).
Previously, to control access to PO invoice matching in Materials Management, administrators selected the label POs for Matching (EM) on the Omit Menu Options list. For the default table of contents (EM Main), this label has changed to Create Invoices from Purchase Orders (EM) to be consistent with the same option for Accounts Payable.
To customize a table of contents for a role:
- From Work in Administration on the main Contents, select Administration > Roles. The Roles list appears.
- Locate the role for which you want to create a customized main Contents.
- Click Menu > Omitted Menu Options.
The Menu Options Omitted list appears. (No Data appears if no menu options have been omitted for the role.) - Click New.
The Omit Menu Options by Role selection panel appears. - Select the checkbox next to Create Invoices from Purchase Orders (EM) to exclude it. Users assigned to the role will not see menu items that you select.
- If you wish to allow a user to access a invoice matching, unselect Create Invoices from Purchase Orders (EM). - Click Submit.
Problem Resolutions
ERP - Materials Management/Accounts Payable/General Ledger/Reports
Problem Summary: When a user entered a discount amount or % greater than the extended line cost, GL transactions were incorrect.
This issue occurred in these situations:
- Non-file, receiptless items had ordered quantities on a (blanket) PO, but the invoice showed negative quantities.
- Item quantities on EDI 810 invoices were negative.
- A discount amount on an EDI 810 invoice line was greater than the extended cost for the line.
In the future, a negative quantity will cause an error in these situations. The user will not be able to proceed matching the invoice until a valid value is entered. Similarly, the system will display an error when the discount is greater than the line amount.
- POs with ordered line quantities cannot have negative line quantities on the invoice.
In both cases, correct the quantity/discount to proceed with the invoice. - For non-file lines, the discount amount or discount percentage cannot be greater than the PO line amount.
Problem Summary: The comment field on journal entries built from GL transactions was incorrect for a summarized account that had different project and fund designations.
This problem has been resolved: For summarized accounts, when re-query is performed to retrieve the line information for the comment, and multiple lines are returned, the record are filtered by project and fund code to retrieve the correct information.
Problem Summary: Users creating Department-to-Department Quick Credits were experiencing an error message when the field Non-File Commodity Code Required was set to yes for the organization.
This problem has been resolved so that the commodity code requirement field, even if set to “yes,” is ignored for quick credits.
Problems Resolved in Previous Updates
Problem Summary: Formulas in report override columns with an initial operator (+,-,*,/) caused the row to disappear.
When the report "Income Statement - By Acct" was run using View Online and a row was expanded by clicking the plus sign, the row disappeared. The problem was traced to the use of an operator (e.g., +, -. *, /) in initial position in a formula entered in a row definition “override” column.
The problem has been resolved as follows: Currently when a Report Row Detail -- Column Override is created and the column type is Formula, an error message appears for the user if an operator is entered in initial position. Revise the formula — add parentheses, for example — so that an operator does not occur initially.
Problem Summary: Exporting user settings to a spreadsheet was only allowing 501 rows to be downloaded.
This problem has been resolved so the export works as designed: when more than 500 records are available for download, you can select the number: 500, 2000, 5000 or 65000. The location of the User Settings list is: Work in Administration > Administration > User Settings (All Columns).
Problem Summary: Error messages when EDI invoices failed to auto-complete were not available.
Initially, users noticed that EDI invoices were not being auto-matched and auto-completed in some situations. Research into the problem indicated that errors existed with the invoices, but the errors were only being written to the system log, and were not available for users.
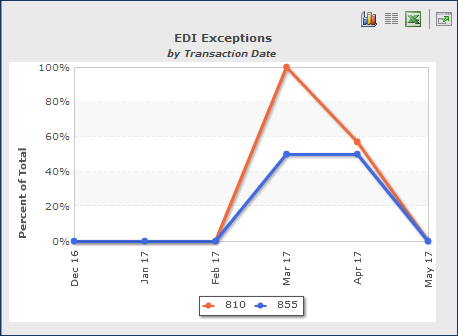
So that users can see errors when invoices cannot be completed, and take the appropriate actions, an Errors column and Menu > View Errors option have been added to the 810 Import Header list (Figure 53).
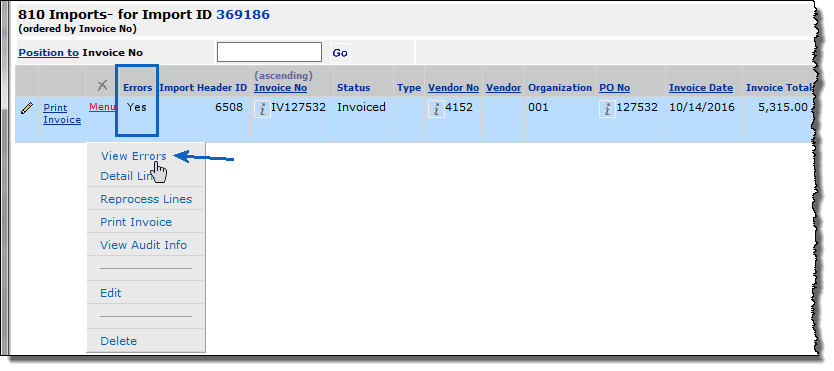
EDI 810 Invoice Header List for an EDI Import ID
Materials Management > Imports/Exports and Financials > Invoice (810) Imports > Locate header ID > Menu > View Import Details
When an error occurs during the system’s attempt to auto-complete an invoice, an additional error message is included with those already written to clarify that the error occurred while completing.
Problem Summary: Requisitions were getting stranded in the Pending Approval status when lines had both a commodity code approval and a regular approval needed, with an escalated approver.
- A requisition line had a Commodity Code approver group and an Item approver group assigned.
- The requesting user was the first approver in the Item approver group.
- The second approver in the Item approver group was also an approving user in the Commodity Code approver group.
Analysis of the problem revealed that when an approver is skipped because the user is the requestor (escalated approval), the next approver assigned was not being checked to see if he/she had already approved. This problem has been resolved. The approval sequence now occurs as designed, illustrated in the following example.
Example of escalated approvals with two approver groups
A requisitioner, Cindy, submits a requisition with a non-file line that requires both an item approval and a commodity code approval.
| User Name | Approval Limit |
| Joe | $2000 |
| Bill | $3000 |
| Roberta | $5000 |
Item Approval Group
| User Name | Approval Limit |
| Cindy | $1500 |
| Joe | $2000 |
| Steve | $5000 |
Result: Joe approves the requisition as a commodity code approver. Bill also approves. Roberta approves.
For item approval,
Cindy is skipped because she is the requester. Approval is flagged as escalated.
Joe is assigned to approve, but should not because he already reviewed the requisition. Steve is the next assigned approver as an escalated approver.
Problem Summary: Mass maintenance updates on the Item Vendor spreadsheet were deleting items’ override UOMs.
A problem occurred with mass maintenance updates for items that had Default Purchasing UOM Override and Default Issue UOM Override values. Uploading data on the Item Vendors worksheet caused Materials Management to change the Primary Supplier, deleting the previously saved issuing and purchasing override UOMs.
This problem has been resolved as follows: When item vendor fields are updated via Item Mass Maintenance, the application does not delete the Override Default UOMs unless the primary supplier is also changed.
Copyright © 2023 by Premier Inc. All rights reserved.