What's New in Service Pack 6.8
|
||||||||||||||
|
New Features and EnhancementsEnhancements made in hotfixes since the 6.7 service pack are included in this document. ERP Materials Management and Financials
Sourcing and Contract Management (SCM)
Reports
Problem ResolutionsERP Materials Management and Financials
|
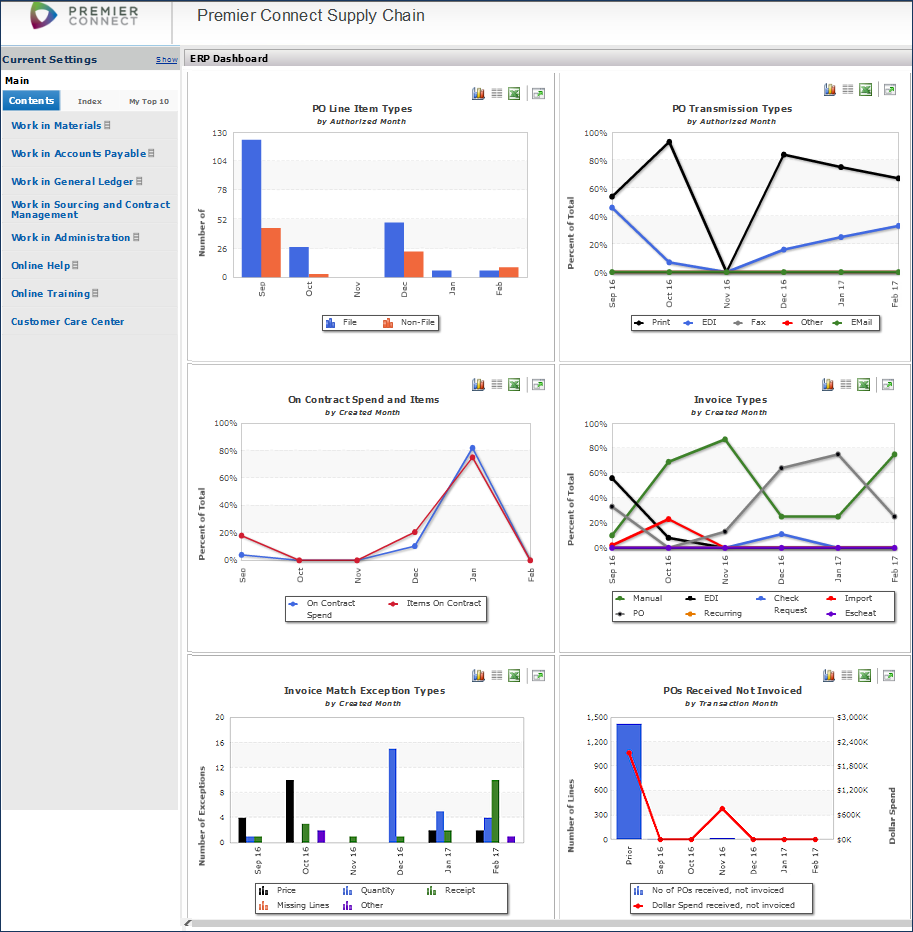
| PO Line Item Types (by Authorized Month) |
Displays purchase order lines for file and non-file items by monthly quantity of items.
|
| PO Transmission Types (by Authorized Month) |
Displays the monthly volume of authorized POs for each transmission method as a percent of total POs.
|
| On Contract Spend and Items (by Created Month) |
Exhibits the monthly percent of on-contract spend and the percent of item lines purchased on-contract for sites that use Sourcing and Contract Management (SCM).
|
| Invoice Types (by Created Month) |
Displays the monthly volume of invoices of different types as a percent of all invoices.
|
| Invoice Match Exception Types (by Created Month) |
Identifies the quantity of invoice match exceptions by type for each month.
|
| POs Received, Not Invoiced (by Transaction Month) |
Plots the monthly dollar spend for purchase orders that have been received, but not invoiced (line graph) and the total number of POs that contain received, but not invoiced lines (bar graph).
|
 Reviewing the breakdown of file vs. non-file PO lines each month helps you monitor the volume of spend that is occurring through each category, and identify areas for improvement. Many sites seek to minimize non-file volume as much as possible to promote spend transparency and efficiency.
 Enabling the Dashboard Gauge Feature and Security
- If you wish to use the ERP "Welcome Page" dashboard feature, contact the Help Desk. This feature must be enabled.
- To be able to view dashboard gauges, a user must have the specific gauges of interest authorized in a gauge profile. Once the Help Desk turns on the feature, you can begin setting up your own gauge profiles.
Each gauge profile contains permission for one or more gauges. You can create gauge profiles as needed, and assign them to users. The "Welcome Page" dashboard is not visible to a user until the user has been assigned a gauge profile. Instructions are in the online documentation topic "Work with Welcome Page Gauge Profiles."
 You can import par cart and order guide data to ERP to create new part cart and order guide lines for subsidiary organizations and departments.
With this feature, you can upload par cart and order guide lines (or entire new par carts/order guides) for affiliates live into ERP Materials Management.
The first step is to export existing par cart/order guide lines to an Excel worksheet. A new panel is available for the export task. Then, using the worksheet as a template, make changes as needed to par cart/order guide lines, or add new par carts/order guides. Save the worksheet as a .csv file, and finally upload it to the application.
The upload is the standard upload process. A panel lets you work with uploaded par cart/order guide line files.
Usage: To upload par card or order guide data:
- Export data from an existing par cart or order guide.
- From the Materials Management main Contents, select Imports/Exports and Financials > Order Guide/Par Cart Lines.

The New Order Guides and Par Carts Lines Panel for Exporting
Materials Management main Contents > Imports/Exports and Financials > Order Guide/Par Cart Lines
- Use the Quick Filters—the white text boxes at the top of each column—to set the list to par carts/order guides for the organization/department of interest.
- Click the Spreadsheet link (Figure 2, red arrow, upper right).
Windows displays download and security information. The export file opens in Excel.
Note: You will need to save the file as a .csv file for the export.
Figure 3 is an example of the worksheet filtered for order guide IVS.

Sample Order Guide/Par Cart Downloaded Worksheet
- Using the exported file as a template, enter data for new par carts/order guides, or edit existing data to make changes.
- Edit worksheet column values to change or delete existing lines, to add new lines, or to add a new par cart/order guide with new lines.
 The first column -- Action -- contains the action that the application should perform.
 - Enter the code for the appropriate action from the following list:
A - New line. Add the line to the order guide or par cart identified in Columns E and F .
.
- To create a new line, or an entire new par cart/order guide: on the worksheet, insert a row ahead of the EOF marker, or blank out existing columns and enter new values. EOF must be the last data element in the worksheet.
D - Current line: delete the line from the par cart/order guide.
C - Current line: update the line with one or more new values entered in columns G through N.
Leaving the Action column blank (no code entered) causes an error.
The order guide/par cart code and description. If you are uploading lines for a new order guide/par cart, enter the new code and description here.
 Columns for par cart/order guide lines. You can edit these columns to change existing lines, or add new lines.
 - Save the worksheet as a .csv file to a local network location.
- Import the .csv file that you saved on your network to the application.
- From the Materials Management main Contents, select Imports/Exports and Financials > Order Guide/Par Cart Imports.
The Order Guide/Par Cart Imports panel appears (Figure 4). This panel lists uploaded files and helps identify errors.
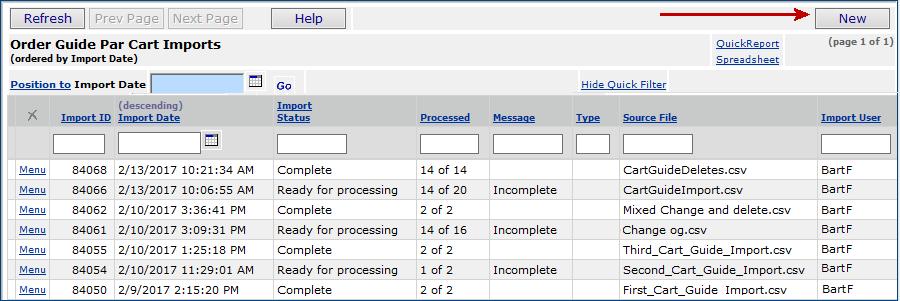
The List of Order Guide/Par Cart Imports
Materials Management main Contents > Imports/Exports and Financials > Order Guide/Par Cart Imports
(Click Help for more information on the panel.)
- Click New. The Upload Panel appears (Figure 5).
- Enter the file that you wish to import in the File to Upload field.
- Click Browse to locate the file on your network, then click the file to select it. - At this step, you have a choice. You can work through the import process in either one stage or two stages.
- If you have uploaded files to the application before, use the one-stage approach, as follows:
- Click Submit. The system attempts to upload your file and validate it. The Imports... (e.g., (Figure 4) list appears.
- Click Refresh to see your file listed. - For users working with import files for the first time, we recommend the two-stage import approach. The two-stage approach first loads the file and validates it. Click Load and verify, no import.
Once the file has successfully loaded, you can process it manually from the Imports panel to import it into the application.
- Click Help on the Import panel for details on the processing step.

The Par Cart/Order Guide Upload Panel
Materials Management main Contents > Imports/Exports and Financials > Order Guide/Par Cart Imports > New
When the file has processed and its status is Complete, your par cart/order guide changes and additions are in effect. You can review lines in par carts/order guides from the Warehousing in the Materials Management main Contents.
Security: System administrators can control who has access to the par cart/order guide upload feature. This feature is controlled by the role object "CartGuideLinesAdmin." The initial security setting for this role object defaults to None. Displaying the Order Guide/Par Cart Imports and Order Guide/Par Cart Lines list requires a minimum security level of View.
Order Guide/Par Cart Imports option includes several new fields for filtering imported data.
Several new fields have been added to the Order Guide/Par Cart Imports process to provide additional information and filtering capability during order guide and par cart data import. The field names and locations are as follows.
Field names:
- Bypass Qty Adjust (ByPass Quantity Adjustment on Import)
- Direct Delivery
- Override Charge Department
Locations of fields within Materials Management:
- Order Guide/Par Cart Lines
- Order Guide/Par Cart Lines > Spreadsheet
- Order Guide/Par Cart Imports > Menu > View Import Details
- Order Guide/Par Cart Imports > Menu > View Import Details > Edit
Vendor record import is now available from Accounts Payable.
- Vendor record import has always been available from Materials Management. This enhancement makes it available from Accounts Payable as well.
- The path is Accounts Payable > Imports/Exports > Vendor Import.
- The process is the same as for Materials Management. The documentation topic is “Import Vendor Data.”
Individual organizations can require departments to take non-stock overages, eliminating accumulation in item inventories.
On the organization record (Figure 6), the setting for Non-stock Over-Receiving Allowed either allows non-stock overages to accumulate in Item Inventory; or requires departments to take overages. (In the past, allowing departments to take overages was not an option.)

The Organization MM Info Panel
Materials Management main Contents > Tables > Organizations > edit
If the field Non-stock Over-Receiving Allowed is not checked, when clearing non-stock quantity exceptions with “Invoice Correct,” you must select a department for the overage (Figure 7).
![]()
Clearing a Quantity Exception for a Line with an Overage
Materials Management or AP main Contents > Invoicing > Exception Invoices >![]() > Clear Exception
> Clear Exception
- When only one department is associated with the PO line for an overage, the application sets that department as the default in the Overage Dept field (Figure 7).
- When multiple departments are associated with the PO Line, the application does not default the department. Then...
- If the organization's Non-stock Over-Receiving Allowed flag is not set, you must specify an Overage Dept. Click the prompt to select the department to receive the overage.
- If the organization's Non-stock Over-Receiving Allowed flag is set, the Overage Dept is optional. If you do not select a department, the overage is added to the Item Inventory on-hand quantity (OHQ).
When a department accepts an overage (regardless of the organization flag's setting), the excess quantity is then issued to that department instead of going to the Item Inventory's OHQ.
Requisition approvers can get spend information for a project/fund when reviewing requisitions.
![]() This new feature enables you to display the budgeted and current amounts for each project/fund, and determine if each requisition can be approved based on the remaining project or fund balance.
This new feature enables you to display the budgeted and current amounts for each project/fund, and determine if each requisition can be approved based on the remaining project or fund balance.
![]() If you are a requisition approver in charge of certain projects, you can inquire on the project codes from requisition lines before or during the approval process. Similarly, users responsible for funds can inquire on fund codes.
If you are a requisition approver in charge of certain projects, you can inquire on the project codes from requisition lines before or during the approval process. Similarly, users responsible for funds can inquire on fund codes.
For example, Figure 8 is a requisition ready for submission in which the Project Code and Fund Code have been entered for lines.

A Requisition with Project/Fund Codes Assigned to Lines
Materials Management main Contents > Requisitioning > Requisitions > ![]()
When the requisition goes to review and approval, the approver can check the project and/or fund code amounts as follows:
Usage: To display project/fund spend information from a requisition under review,
- From the Materials Management Requisitions list (Materials Management > Requisitioning > Requisitions), or from your approval queue (Materials Management > Requisitioning > My Approval Queue), locate the requisition.
- Click i to inquire on the requisition. The requisition opens to the Requisition Lines Quantity Status panel.
- Scroll right to display the Project Code and Fund Code columns. The inquiry i appears next to each code value.
- Click i to display current and budgeted dollars for the project/fund.
Figure 9 is an example of project spend current and budgeted dollars.

Project Spend Information for a Requisition Line
Materials Management main Contents > Requisitioning > My Approval Queue > i
For manual invoices, the Invoice Direct Approver and invoice Distribution Review Direct Approver can be the same person.
On the Approval tab of a manual invoice (Figure 10), you identify the person or group responsible for approving the invoice

For a Manual Invoice, Fields on the Approval Tabbed Panel
AP main Contents > Invoicing > Invoices > New
You may optionally also designate an individual approver or approver group for the review of distribution lines.
- The Distribution Review Direct Approver has the authority to review, balance, and approve the distribution lines prior to approval.
- The Distribution Review Approver Group reviews, balances, and approves the distribution lines of the invoice. If the invoice is not balanced, it will be routed to the Final AP Distribution Direct Approver, who must balance the distribution lines before submitting.
In the past, you could not assign the same person as the Direct Approver and the Distribution Review Direct Approver. This restriction has changed as follows:
- When your organization requires approval for manually created invoices, entering either a Distribution Review Direct Approver or Distribution Review Approver Group will satisfy the approval requirement.
- If you do select both a Distribution Review Direct Approver and the Direct Approver, and you select the same person for both, the system ignores the Direct Approver, and blanks out that field.
- If you select the same group as the Invoice Approver Group and the Distribution Review Approver Group, the system ignores the Invoice Approver Group selected, and that field is blank.
The organization record specifies whether approval of manual invoices is required. The Organization edit panel AP Info tab contains the field: Dist Review Enabled for Manually Created Invoices (Figure 11, red).
The Dist Review Enabled for Manually Created Invoices optionally allows invoice distribution to be reviewed and approved. If you want your invoices to require approvals, then check the box Approval Required for Manually Created Invoices (Figure 11, green) as well.
Note: This field was previously called: Distribution Review for Manually Created Invoices
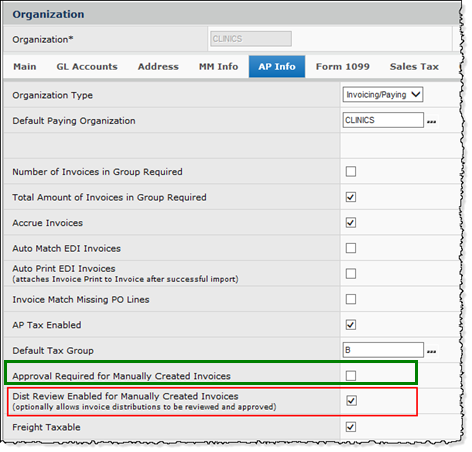
The Organization Edit Panel: AP Info Tab
AP (or Materials Management) main contents > Tables > Organizations
Select this field if you require approvals.
Note: This field was previously called: Distribution Review for Manually Created Invoices.
You can approve requisitions, invoices, and check requests from a link on an email message.
PremierConnect ERP can send an email to approvers that only requires clicking an approval or rejection link on the email message. Approvers can also add comments before sending the email back to the application. The requisition, check request, or invoice is then approved or rejected, as specified in the email.
Setup
Here are the setup steps:
- Create Reason Codes for approval/rejection, if you have not already done so.
- From AP or Materials Management, select Reason Codes > Reason for Approval/Rejection.
- Click New to create these new reason codes:
Approved from Email Notification Link
Rejected from Email Notification Link. - For each approver -- and each person who originates requisitions, invoices, or check requests -- ensure that the person's User Profile has the following information:
- A valid email address, located on the General panel.
- A data profile, located on the User Roles panel, that includes organizations/departments whose data the approver or originator will work with.
- A role (on the User Roles panel) with the correct settings for role objects.
Details on user administration are in the topic: "Set Up and Maintain Users, Administration, Security." See the sections "Work with User Roles" and "Work with Data Profiles."
![]() For requisition approvals:
For requisition approvals:
- In each approver's User Profile, on the Approver Limits panel, set Requisition Submit Notify Type to Email on Submission.
- In each request creator's User Profile, on the Requestor Limits panel, set Requisition Approval Notify Action to Email Approve or Reject.
- If the request creator's department uses a requisition approval profile, edit the department to enter the approval profile.
- From Materials Management, select Requisitioning > Departments.
- Locate the department of interest.
- Click Menu > Edit, or the edit icon .
.
- Click the Approvals tab.
- Select a value for the field Requisition Approval Profile.
![]() For invoice and check request approvals:
For invoice and check request approvals:
- On the Approver Limits panel, set Invoice Submit Notify Type, and Check Request Notify Type to Email on Submission.
- On the AP Limits panel, set Invoice Approval Notify Action and Check Request Notify Action to Email Approve or Reject.
Using Email Approvals/Rejections
When medical center staff create a requisition, invoice, or check request that must be approved, the application sets its Status to Pending Approval. Figure 12 is an example for a requisition. (This section uses requisitions as illustrative. The process is the same for invoices and check requests.)

A Requisition Awaiting Approval
Materials Management main Contents > Requisitioning > Requisitions - Current Department
The system then sends an email message to the designated approver, as in Figure 13.

The Email Message for the Approver: Approve or Reject
- The approver opens the email and clicks the link for approval or rejection. Depending on the transaction type, the links are:
- Approve Requisition, Reject Requisition
- Approve Invoice, Reject Invoice
- Approve Check Request, Reject Check Request. - In Figure 13, the email recipient is approving a requisition by clicking Approve Requisition. The approver could alternately reject the requisition (invoice, or check request), or simply view the requisition, and make a decision later.
- Clicking either Approve ... or Reject ... opens a new email to be sent back to the application.
See Figure 14. - The approver can optionally add a comment before sending the email. Enter comments between the square braces [ ].

An Approval Message for Emailing Back to Materials Management
- The approver sends the email message back by clicking Send. Another email then arrives with the approval or rejection notification.
- Approvers or other staff can review the requisition on the Requisitions List (invoices on the Invoices List, and check requests on the Check Request List), with the approval Status as specified in the email. In this example, the Status is Approved (Figure 15).

A Requisition Approved Using the Email Approval Process
Materials Management main Contents > Requisitioning > Requisitions - Current Department
For specifics on email invoice approvals, see "Invoice approvals/rejections by email." For check requests, see "Check request approvals/rejections by email."
Purchasing managers can now exert better control over non-file spend by requiring commodity codes on non-file requisition/PO lines.
You can require commodity codes to be entered for all non-file purchases by setting a flag for each organization that needs this requirement. The field is Non-file Commodity Code Required on the Organization record (Figure 6, green box, lower right).
If this flag on the Organization record is checked, and you create a non-file line on a requisition or PO, the application displays an error message. You must enter a commodity code for the line.
Changes to this field are audited.
- On the Organizations list panel, select Menu > View Audit Info.
A new option is available for exporting GTIN data to a downloadable comma delimited (.csv) file.
The new GTIN Export option is available to export GTIN data to external systems via the Gateway.
The GTIN Export creates a comma delimited file that includes all fields currently in the Item Export as well as these additional GTIN fields:
- Identifier Number
- Identifier Type
- Mfr ID
- Mfr Item No
- UOM
- Conversion Factor.
Note: The exported file is based on changes made to GTIN data only, and includes only those items that are accurately matched to GTIN data. If the system cannot match GTIN data to an actual item, then that unmatched row of data is not exported.
Parameters are available to define the export of all GTIN data, or GTIN data for a given date or timeframe. The primary export selection parameters (Figure 16) include Organization, Asset Location, and Changed Date Option. The Changed Date Option is based on when changes or additions are made to any of the GTIN fields noted above.
Important: For you to use this export feature, an administrator must update the security role object "GTINExport" in a your user profile to ALL. Users cannot export GTIN data until this setting is updated. Each user’s data profile determines which organization and asset location data the user is able to work with.
Usage: To create a new GTIN Export:
- Open Materials Management > Imports/Exports & Financials > GTIN Export.
- On the GTIN Export List, click New in the top right corner.
- The GTIN Export Selection Parameters panel appears (Figure 16).
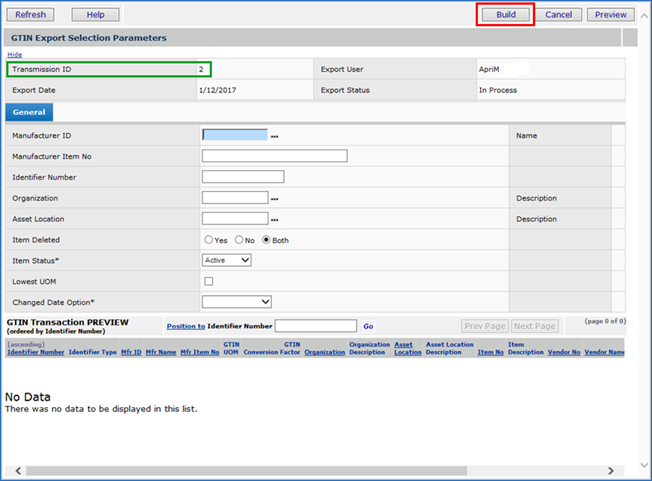
GTIN Export Selection Parameters
Materials Management main Contents > Imports/Exports & Financials > GTIN Export > New
- On the GTIN Export Selection Parameters panel (Figure 16), fill out the fields for your export and click Build (red box, Figure 16) to create a downloadable file.
Your export is automatically assigned a Transmission ID (green box, Figure 16), which you can use to locate your export on the GTIN Export List (Figure 17) once the export is complete.
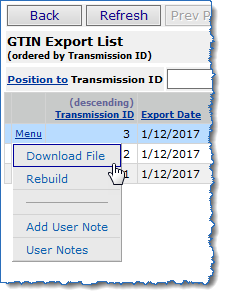
The GTIN Export List
Materials Management main Contents > Imports/Exports & Financials > GTIN Export
- On the GTIN Export List, click Menu at the left of the export row that matches your Transmission ID and select one of the following options:
- Click Download File to download the export file to a local or network location.
- Click Rebuild to open the GTIN Export Selection Parameters panel, make modifications to the information you entered in the fields, and build the export file again.
The GTIN Manufacturer Item Identifier Details can now be sorted and filtered by error type.
The list of GTIN Manufacturer Item Identifier Import Details can be sorted and filtered by errors that occur upon import (sort by Yes, No, or Both).
To use the new sort and filter feature:
- From the Materials Management menu, select Imports/Exports & Financials > Manufacturer Item Identifier Import.
- Click Menu next to an import and select View Import Details.
- To sort the details by whether or not they contain an error, click the Errors column header.
- To filter the results, select Yes, No, or Both in the Errors column and click Go.
ERP Panel and Field Changes
Organization record GL Info panel
Two new fields are available on the organization record for use with GL account imports (when GL Account Validation is enabled). The fields are Account Import Default Supplying Org and Account Import Default Supplying Asset Location. See Figure 18. If a value is entered in one of these fields, a value must be entered in the other.
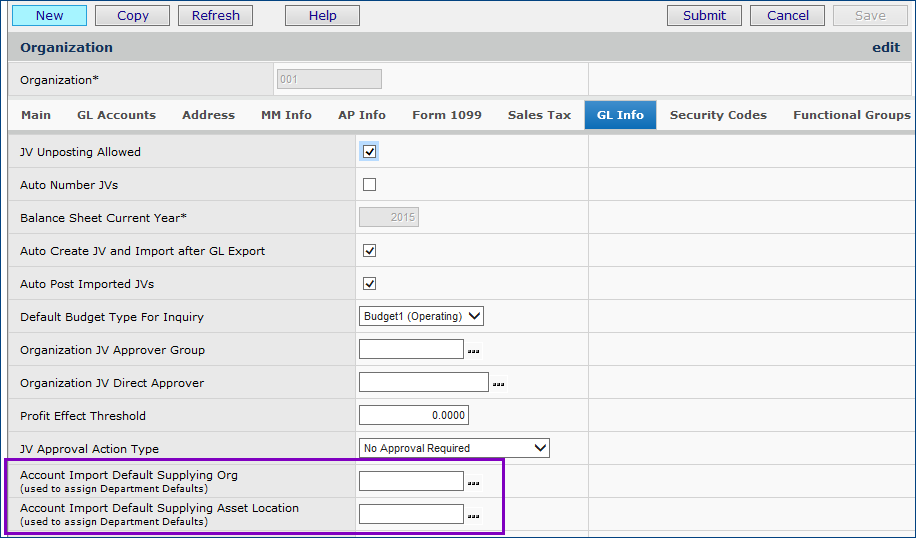
The Organization Record GL Info Panel
Materials Management (or AP) main Contents > Tables > Organizations > ![]()
These fields contain the default supplying organization and asset location to be used on GL imports for new departments in the organization.
When a new account record is created for a department in the organization from a GL account import, the application assigns the supplying organization and asset location to the values in these fields.
This assignment is made when:
a. The account Type is expense or income.
b. The account Type is asset or liability and the account is flagged as a "Materials" account.
c. The imported GL account record is new or is being changed, and the department does not yet exist and needs to be created.
Rules for using these fields:
- If a value is entered in one of these two fields, a value must also be entered in the other.
- The Supplying Asset Location must exist.
- If the organization's Inter-Org Transactions Allowed flag is Off, the supplying organization must be the same as the organization record being edited.
-
If the organization's Inter-Org Transactions Allowed flag is On,
the supplying organization must have its Inter-Org Transactions Allowed flag On also,
and must have inter-org accounts established for the organization being edited.
This enhancement addresses a situation that some sites experienced when importing GL accounts with GL Account Validation enabled.
-
With GL Account Validation turned on, when a GL account is added, the department for the account is created if it does not already exist. The department needs a default supplying organization and default supplying asset location. The supplying organization and asset location assigned to the department were the same as those in the user’s Current Values.
- This situation would create a problem when inter-org accounts did not exist between all organizations at the site, and the wrong supplying organization/asset location was assigned to the department. The new default fields allow GL accounts to be imported for new departments without generating errors.
New Fields on the Invoice Export: Project Code and Fund Code
The Project Code and Fund Code fields are now included on the .csv item export file. When you export invoices, if these fields have values on the invoice, they appear on the export.
The AP location Email Address field is expanded to 100 characters.
You can now enter a value in the vendor AP location Email Address that is up to 100 characters in length. (The previous value was 50 characters maximum.) The longer field appears on the
AP Locations List panel, AP Location Edit panel, the Vendor Locations list open to the AP Location tab, and the Consolidated Payment Export download. Also, these report objects contain the longer field:
- “Vendor AP and Buy From Locations”
- “Vendor Locations”
- “Vendor Master”
- “Vendor Master with Hospital Accounts.”
Sourcing and Contract Management (SCM)
Affiliate spend in Projects: Analysts can select (and unselect) organizations whose spend they wish to work with.
In analysis projects for medical center affiliates, this feature enables you to work with spend segments that belong to affiliate organization(s) of interest. You can analyze the spend for the selected affiliates; create RFPs and benchmarks based only on the affiliate spend; compare projected savings; and track savings on awarded contracts for the affiliate.
- Once you have added items to a project, you can select one or more organization(s) that identify affiliates.
- Spend for the chosen organization(s) can be the basis for RFPs and benchmarks.
- You can review projected savings, and comparable spend that belongs only to the designated organization(s).
- You can unselect any organizations, and return to the display of all spend.
- The Project Contents panel contains options for selecting an organization whose spend you wish to work with. You can select one, several, or all organizations. You can also work with spend that is not associated with any organization.
On the Project Contents panel, when you identify one or more organization(s), the views descriptors (Keywords, UNSPSC, Class/Subclass, Category, Mfr, Mfr/MIN, Vendor, Vendor/VIN, etc.), Graphs, and Details then display data associated only with those organizations' spend.
- Your selection of organizations on the Contents panel persists on the Proposals panel to identify spend for generating RFPs. This strategy is useful, for example, if you wish to create an RFP based on spend only for certain organization(s).
- Your selected organizations also persist on the Comparisons Summary panel; however, on the Summary panel, you can select different organizations.
- The Savings panel has a Region/Org selector similar to that on the Project Contents panel, so that you can review savings on awarded contracts for particular organizations.
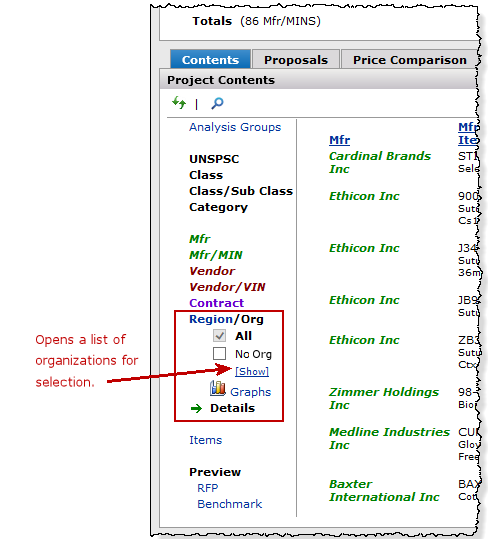
Usage: To select organizational spend on the Project Contents panel,
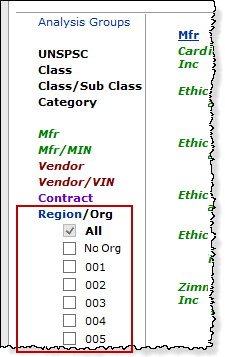
- On the Contents panel, left side, click Region/Org (Figure 19).
Several options appear: All, None, [Show], Graphs, and Details.
|
|
|
Selecting Organizations for Project Spend
SCM main Contents > Supplies > Projects > open project that has items
- Click [Show] to display a list of organizations, and to select one or more. (The default is All organizations.)
- Or, click No Org to view spend associated with no organization. [Hide] closes the list.
Example: Selecting organization 004 and displaying only Mfr/Item spend for that affiliate (Figure 20 and Figure 21).

Mfr/MIN Spend for All Organizations
SCM main Contents > Supplies > Projects > open project that has items

Mfr/MIN Spend Only for Organization 004
SCM main Contents > Supplies > Projects > open project that has items
Example: Selecting organization 004 and displaying Graphs for that affiliate (Figure 22 and Figure 23).
Click Graphs (Figure 22). (You could also click Details, and only affiliate spend would be displayed.)

Graphs of Spend for All Organizations
SCM main Contents > Supplies > Projects > open project that has items

Graphs of Spend Only for Organization 004
SCM main Contents > Supplies > Projects > open project that has items
The online documentation topic "Work with Affiliate Spend" contains additional details.
Incentives Enhancements
These enhancements provide on-demand information about spend changes that affect incentives.
New tools assist you in identifying any incentives with adjusted spend amounts: an Adjustments filter on the “Incentive Setup” page and the Spend Adjustment Detail panel on the “Work with Incentives” page Actions panel. The Spend Adjustment Detail panel contains information about the reason for the spend adjustment.
![]() The Total Spend used to calculate incentives aligns with Total Spend for the contract for the same time period.
The Total Spend used to calculate incentives aligns with Total Spend for the contract for the same time period.
The Total Spend used as the basis for calculating incentives is now consistent with the Total Spend displayed on the “Work with Contract” page. Due to this change, an automatic process will recalculate incentives at the time of this release to ensure that all incentives are accurate based on the updated Total Spend. Adjusted incentive amounts may result.
This enhancement also removes a restriction in setting up incentives. You can now create incentives for different contracts with the same items when the incentive periods overlap. The calculation process contains rules (described in the online documentation) that “decide” which contract item “gets” the spend for the period.
The nightly process that calculates incentives uses the aligned spend values. From time to time, you may see appropriate adjustments in incentive amounts as a result of changes in your spend.
- The automatic calculation process only applies to contracts whose incentive setup is complete.
- Items deleted from your site's master file with spend in the incentive period are included in the incentive calculation.
![]() A new Adjustments filter (on the “Incentives Setup” page) displays incentives with adjusted amounts.
A new Adjustments filter (on the “Incentives Setup” page) displays incentives with adjusted amounts.
The “Incentives Setup” page now includes the Adjustments sub-filter (red boxes, Figure 24).
This filter displays both current and expired contracts with adjusted incentive amounts.
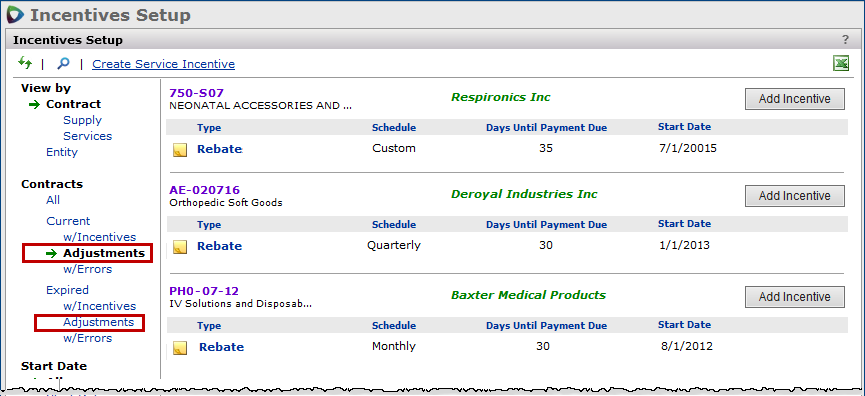
Adjustments Filter on the “Incentives Setup” Page
SCM main Contents > Incentives > Incentives Setup
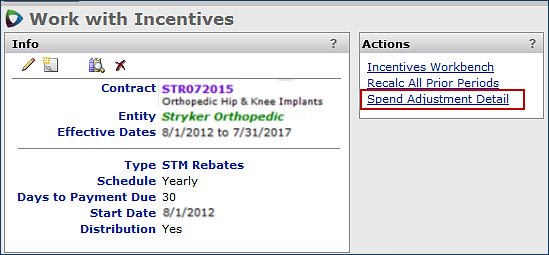
![]() Changes to historical spend that affect incentives appear on the new Spend Adjustment Detail panel, accessed from the “Work with Incentives” page.
Changes to historical spend that affect incentives appear on the new Spend Adjustment Detail panel, accessed from the “Work with Incentives” page.
For any particular incentive, the “Work with Incentive” page Actions panel contains a new link Spend Adjustment Detail. Clicking this link displays a popup panel with incentive adjustments (Figure 25).
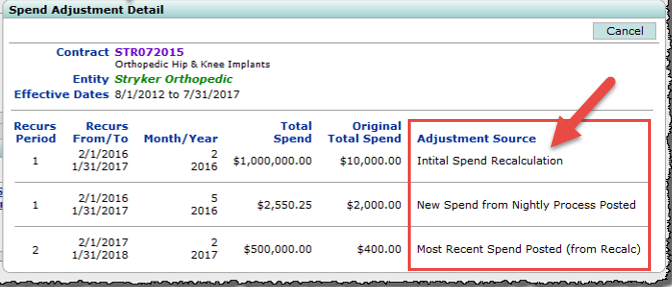
The Incentive Spend Adjustment Link and Details Panel
SCM main Contents > Incentives > Incentives Setup > click Incentive Type > Actions > Spend Adjustment Detail
You can see the Total Spend value -- the spend amount after adjustment -- compared to the Original Total Spend (before adjustment). The column Adjustment Source summarizes why spend -- and thus, incentive amounts -- were adjusted.
- For the automatic recalculation at the 6.8 Service Pack go live, the Adjustment Source is:
Initial Spend Recalculation.
The nightly process gets new spend updates. Current plus prior three months spend is used. - Whenever spend changes as a result of the nightly process, the Adjustment Source is:
New Spend from Nightly Process Posted.
- Whenever spend changes as a result of a user selecting Recalc All Prior Periods,
the Adjustment Source is: Most Recent Spend Posted (from Recalc). - When spend is adjusted because of activation or de-activation of a contract item, the Adjustment Source is: Contract Spend Amount Adjusted (Item Changes).
Contract managers can take advantage of updated tier information displays.
- Contract managers can view tier start and end dates from a new tabbed panel on the “Work with Contract” page.
The new Tiers tab on the "Work with Contract" page (Figure 26) contains dates for each tier within a contract. The tier name, description, start date, end date, and any user notes are displayed on this tab. If an SCA Price Activated Tier (Premier managed contracts) exists in the contract, it is marked by a double asterisk.
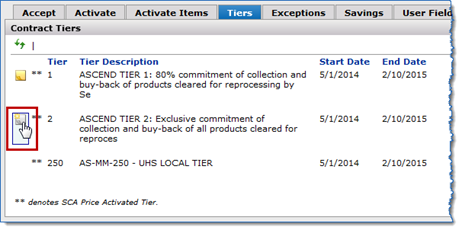
New Tiers Tab Displaying Tier Start and End Dates
SCM main Contents > Supplies > Contracts > Contract Workbench > locate and open contract
You can add notes to a tier by mousing over at the left of the Tier number and clicking the Add Note icon (red box, Figure 26). The Tiers tab also includes an Excel icon at the top right (not shown) that exports the tier information to an Excel spreadsheet.
- For Premier managed contracts, managers can now view the tier participation end date for the current price activated tier on the “Work with Contract” page.
The Tier Participation End Date is a new field on the Contract Info panel (Figure 27).
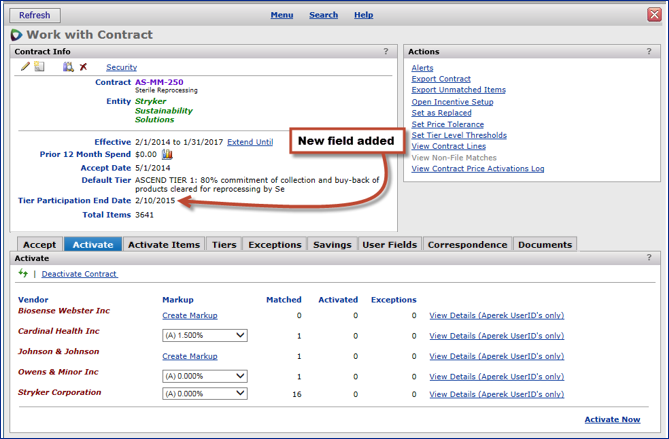
The New Tier Participation End Date Field on the Contract Info Panel
SCM main Contents > Supplies > Contracts > Contract Workbench > locate and open contract
Note: A Premier managed contract is any contract created or synced via the Premier Contract Sync process (SCA -> SCM).
- For Premier managed contracts, the Default Tier is the tier that was last activated in SCA.
The SCM Contract Info panel displays the current tier in the Default Tier field (Figure 28).
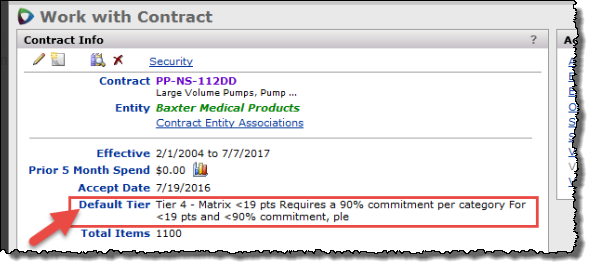
The Default Tier Field on the Contract Info Panel
SCM main Contents > Supplies > Contracts > Contract Workbench > locate and open contract
When a Premier managed contract tier is activated in SCA, SCM receives a message, and the value in the Default Tier field is displayed as follows:
On the SCM Contract Info panel, when a new tier is activated in SCA, the Default Tier value changes to the new tier.
When multiple tiers are activated in SCA, the Default Tier displayed in SCM is the tier whose price activation message was last processed by SCM.
When the current Default Tier expires, the application continues to display the tier until a new tier activation message comes over from SCA. Inactive appears next to the tier on the the Tiers panel and on the Contract Info header panel next to the Default Tier (Figure 29).

Inactive Message for Expired Tier: Premier Managed Contract
SCM main Contents > Supplies > Contracts > Contract Workbench > locate and open contract
When all the tiers on a Premier managed contract expire, the contract cannot be activated from SCM. (No activate tabs are available.) The Deactivate panel displays the message that all tiers for the contract are expired (Figure 30).

A Premier Managed Contract with All Tiers Expired
SCM main Contents > Supplies > Contracts > Contract Workbench > locate and open contract
Contract managers can upload multiple contracts in a single .csv file.
The mass contract upload is available as an automated process for uploading multiple contracts from a single CSV file.
You can download an Excel file containing instructions on the basic file format, contract layout, and a contract sample from the following location: Administration > Other > Download Instructions for Mass Contract Upload.
Analysts can send Excel files that are not bids or benchmarks to an analysis Project to be attached as documents.
Non-bid/non-proposal Excel (XLS and XLSX) files that are sent via email to a project are tracked under the project’s Correspondence tab. These Excel files are correctly processed and automatically attached under the project’s Documents tab for later review.
Automatic document attachment is subject to the standard rules for emailing project documents: the email must be sent to the project at Projects@erp.premierinc.com and the project number must be located in the body of the email.
Files emailed in a non-bid/non proposal or non-benchmark format are not displayed under the Proposals panel within a project. If your file is not in one of these formats, you will receive notification via email as confirmation.
The source of item descriptions for items uploaded to analysis projects can be specified.
Item Description values uploaded to Projects from the Project Template can differ from those in your Item Master. To get the most useful item descriptions in Projects, you can now choose to use either the descriptions entered on the project template upload,or those from your Item Master.
(Note: This option must be set by the Help Desk.)
When this option is set, Projects overrides Item Master or Product Index Layer (PIL) item descriptions with those uploaded in the Project Template.
- If you enter an Item Description in the Excel template, Projects uses that item description.
- If you do not enter an Item Description in the Excel template, or if you delete the item description, Projects uses the item description loaded into SCM from your Item Master.
Otherwise, if the option is not set, projects’ item descriptions are those in the Item Master.
The SCM application's native contract formats are now identified as "generic."
On the Upload Contracts panel (Load Contracts > Upload New Contract > GPO Portals), the native contract formats were previously labeled "Aperek."
You can define a new identifier for the link that uploads contracts in the generic formats available from the SCM application, including: the single tier contract format template, the multi-tier contract template, and the multi-contract template for mass uploads.
Usage: To define a link that uploads contracts in the SCM native format,
- Open the GPO definition panel: Administration > Tables > Group Purchasing Organizations.
- Click Create GPO (Figure 31, ). The Group Purchasing Organizations panel appears (Figure 31, inset).

The GPO Panels for Setting Up a Contract Upload Link
SCM main Contents > Administration > Tables > Group Purchasing Organizations
- For the GPO field, enter the identifier that you wish to use for generic contracts. Similarly, enter a GPO Name (Figure 31, ).
- For the Contract Import Format and the Data Source (Figure 31,
 ), select Generic for the SCM native contract formats.
 - Click Save.
When you open the GPO Portals panel in Supply Contracts to upload a contract, you will see the link for generic contract uploads as you identified it in the GPO and GPO Name fields (Figure 32).

A Link for Uploading Contracts in the SCM Native ("generic") Format
SCM main Contents > Supplies > Contracts > Load and Activate Workbench
Contract managers no longer need to complete the URL field in the GPO upload setup.
For a GPO format name to be available to users uploading contracts, the record for the GPO required entering the home URL for the GPO. The URL field is no longer required and can be left blank. The path is: Administration > Tables > Group Purchasing Organization.
SCM Panel Changes
- For Premier managed contracts, managers can now view the tier participation end date for the current price activated tier on the "Work with Contract" page (see Figure 27). The Tier Participation End Date is a new field on the Contract Info panel. Several new indicators for expired and inactive tiers are also available on the new Tiers panel.
- The following contract panels for item exceptions now include a sortable Total Spend column: Items With UOM Errors, Items With Price Exceptions, Items On Existing Contract, and Items With Rejected Prices. You can also sort items in exception using the Items spend filters on the left side. Figure 33 is an example.

Items on Existing Contract Panel - New Spend Column and Filter
SCM main Contents > Supplies > Contracts > Contract Workbench > locate and open contract > Exceptions > Existing Contract
The Total Spend field includes 12 months prior spend starting with the last full calendar month. This enhancement will help you resolve exceptions more efficiently when you wish to prioritize items to consider based on spend.
- The Documents panel has been enhanced with features that make it easier to locate specific documents within the full list of documents on the panel. Located on the "Work with Contract", "Work with Services Contract", or "Work with Project" pages, the Documents panel now includes the following:
- More visible characters in the Doc Title and Filename so that documents with similar titles are more easily distinguished from one another.
- Vertical and horizontal scroll bars within the panel.
- The ability to remove columns from view so that only relevant information is displayed.
- Click the Remove link (top image, Figure 34) above a column to remove information that is not relevant to your search.
Removing a column in this way will hide it from view until you click the corresponding Show link (bottom image, Figure 34) in the Documents panel. In this example, clicking Show Filename will return the Filename column to the panel.

Removing and Adding a Column on the Documents Panel
SCM main Contents > Supplies > Contracts > Contract Workbench > locate and open contract
Reports
Reports that use the report object "Contract Header User Fields" now output user-defined fields in separate columns, instead of as a block.
Each user-defined field has values in its own column. Figure 35 (red box) is an example with Excel output. Up to 100 user-defined fields are allowed.

Sample Excel Output for a Report with User-Defined Fields in Contract Headers
SCM main Contents > Reports > My Report Definitions >locate report definition > Menu > Print Report
When you create (or edit) a user-defined field, you can enter a Label for the field that the report writer will use on the User Defined Field Edit panel (Figure 36). The field is then available when you create a report using the "Contract Header User Fields" report object.
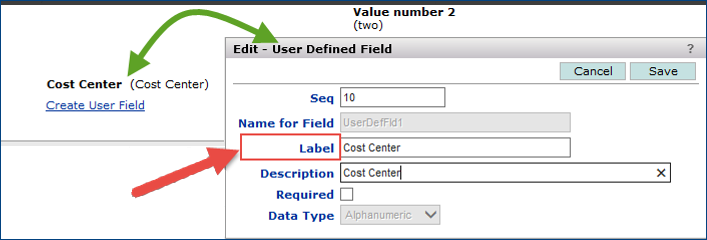
Entering a Label for a User Field
SCM main Contents > Administration > Tables > User Defined Fields > Edit or Create
When you create a services or supply contract report definition using "Contract Header User Fields," you can select any user-defined field(s) from the Select Report Fields panel. Only fields that have been labeled are available for selection individually on the report.
Note: Data conversion at the time of the Production Release will map sites' Name for Field values in user-defined fields to the Label.
New Report Objects/Report Fields
-
Several fields, listed below have been added to the “Payment Expense Accounts” report object.
- PO Ordered Qty
- PO Ordered UOM
- PO Unit Cost
- Last Update Date. - The field 1099-Misc Form Legal Name (LegalNameFor1099) has been added to these report objects:
- Vendor Master
- Vendor Master User Fields
- Vendor Master with Hospital Accounts
- GTIN fields added to “Item Vendor UOM” report object
Several GTIN fields (below) have been added to the “Item Vendor UOM” report object so that you can see what GTINs have been loaded into the application, and which are missing.
- GTINIDNumber – A GTIN number assigned to a manufacturer item.
(Some manufacturers use different GTIN numbers for the same item in different units of measure. In this case, each GTIN number represents a different UOM.)
- GTINUOM – The unit of measure associated with the GTIN.
- GTINUOMConvFactor – The conversion factor for the GTINUOM.
- GTINMatchYNB and GTINMatchYNDesc – Yes when a GTIN matches a Manufacturer ID (the application’s ID for the manufacturer), MIN, UOM or conversion factor.
- MultipleGTINYNB and MultipleGTINYNDesc – Yes when multiple GTINs match a Manufacturer ID, MIN, UOM or or conversion factor.
- The "Contract Price Activation Log" report object now includes the field Mfr Name.
- The manufacturer item number field MfrItemNo on the report object “Contract Header and Detail with Prices” has changed so that any special characters in field values are no longer deleted.
The field contains the site’s item catalog MIN as it is for the manufacturer, without stripping out any special characters. This field format is needed by sites that export data to other applications.
- The Requisition Description field (from the requisition header) has been added to the "PO Header and Line View 1" report object.
Problem Resolutions
ERP - Materials Management/Accounts Payable/General Ledger
Problem Summary: Check request invoices incorrectly approved by system. When an invoice is created from a check request, in some cases, the system creates an extra “Manual Adjustment” invoice distribution line. However, the invoice never goes into an out-of-balance exception and, instead, is approved by the system. When this occurs, an extra “Approve Invoice” GL Transaction is created and is not detected until the invoice transactions are processed in a GL export. The export is then flagged as out of balance.
This problem was traced to incorrect options available on the drop down for the line type, and has been corrected to only include the valid types for check requests.
Problem Summary: When inventory transfers were entered/approved, items on the requisition were dropped and did not go to a PO.
This issue has been resolved so that requisition lines associated with inventory transfers are not dropped from POs.
Problem Summary: The Invoices list in AP was timing out.
The invoices list was timing out. This problem was resolved in Hotfix 6.0.7.09 and has since been monitored to ensure that performance is as it should be.
Problem Summary: Blanket PO invoices with cleared exceptions were not routing to approval.
Invoices with Dollar Limit or Date exceptions for blanket POs were not being routed to a direct approver when the exceptions were cleared. The invoices were incorrectly treated as “approved.” The application now correctly routes blanket PO invoices to approval (if needed) when a Dollar Limit or Date exception is cleared. The invoice status is "Pending Approval."
Copyright © 2023 by Premier Inc. All rights reserved.