|
New Features and Enhancements
Enhancements made in updates since Release 6.9 are also included in this document.
Internal problem resolutions only in this release.
ERP and SCM Enhancements from Updates 6.9.1 to 6.9.8
The following changes to ERP and SCM were covered in previously released Update Notes for each update.
ERP
SCM
Problem Resolutions
ERP Materials Management and Financials - This release: 6.10
 Missing lines can be added to invoices created for bill-only POs. Missing lines can be added to invoices created for bill-only POs.
The capability to add missing lines to regular POs has been available in ERP.
- With this release, you can now add missing lines to bill-only PO invoices.
You can add non-file items or non-stock items. This enhancement allows you to process invoices for bill-only POs quickly and more efficiently.
The steps for adding missing lines to invoices are in the online documentation section "Enter Missing PO Lines."
Note: To work with missing lines, the field Invoice Match Missing PO Lines must be set on your organization record. This field is located on the Organization AP Info panel.
The par cart order / guide import process now allows duplicate items in par carts and order guides.
Hospitals sometimes need duplicate items on order guide/par cart imports when, for example, supplies for the same item are located in different storage areas in a department. This enhancement allows duplicate items on par cart/order guide imports. The application issues an information message when a duplicate item is processed on import.
Important: On the import, set the Line Number of the duplicate item to zero or to another line number value that does not exist in the set; in other words, the duplicate item must have a unique Line Number.
To work with order guide/par cart imports:
- Export existing par cart/order guide lines to an Excel worksheet.
- From Materials Management main Contents, select Imports/Exports and Financials > Order Guide/Par Cart Lines.
- Use the Quick Filters to locate order guide/par cart lines of interest.
- Click the Spreadsheet link.
Windows displays download and security information. The export file opens in Excel.
- Save the file as a .csv file for the export.
- Using the worksheet as a template, make changes as needed to par cart/order guide lines. You can add duplicate lines. Be sure to set the Action column to A for added lines. Set the Line Number of each duplicate line to a unique value.
- Save the worksheet.
Figure 1 is an example with the line for Item No 1000132 duplicated.

- Import the .csv file.
-
From Materials Management main Contents, select Imports/Exports & Financials > Order Guide/Par Cart Imports, select New.
- Upload the file as usual.
If no errors exist, the Processed column displays Complete. The application writes a warning message that indicates duplicates were found and processed.
-
Next to the import, click Menu > View Details. The items that were duplicates have Yes in the Processed column and Yes in the Message column.
-
Display the message to make sure that it is the warning indicating a duplicate item was added, and not an error.
For details on working with par cart/order guide imports, see the online documentation topic "Importing Par Cart (and Order Guide) Lines into ERP."
Approval fields have been added to the Journal Voucher Template Add-In.
This enhancement will allow accounting staff to expedite the JV approval process for multiple journal entries.
The Excel Journal Voucher Template Add-In includes these new columns for approvals purposes:
- ApproverGroup
- DirectApprover
- AprvNeededDate
- AprvNotifyType.
The columns are located on the right side of the Excel Add-In in the header section. You can select the ApprvNotifyType (approval notify type) from the drop list icon on the Excel document. The options are:
No Notification, Notify on Reject, Notify on Approve, and Notify on Approve or Reject.
To use the template with the new approvals columns, download the latest version (06.10.000) of the template from the General Ledger application. The path is: General Ledger main Contents > Journal Vouchers > Excel JV Template.
The new fields are also available on the Journal Voucher Edit panel, and on the Journal Voucher Import (General Ledger main Contents > Imports/Exports > Journal Voucher Imports > Menu > View Import Details) displayed in the application.
Instructions for downloading and installing the add-in are in the online documentation topic "Importing Journal Vouchers From an Excel Spreadsheet."
You can now use the *Blank value for an empty column on the Item Inventory Export Control fields for item mass maintenance.
When you enter *Blank on the item inventory template for an Export Control field, ERP processes the value of the field as NULL.
Use *Blank when you wish to specify that the field has no value. For example, you may wish to change current text (such as "ER") in the field to "nothing" (i.e., blank).
Note:
If you enter an incorrect value in any of the Export Control fields, the application will not accept any of the export control values. None of the Export Control field values will propagate to the item record in the application.
If you use this feature, download the latest version (6.09.006) of the Item Maintenance Add-In and template.
To get the download, from the Materials Management main Contents, select Imports/Exports & Financials > Excel Item Maintenance Download. Download and installation instructions are in the online documentation topic "Downloading and Installing the Excel Template and Add-In."
Enhancements from Updates 6.9.1 to 6.9.8
ERP Past Updates
The UNSPSC® code table has been updated from Version 17.1001 to (English) Version 19.0501
Some UNSPSC codes previously in use have been deleted in Version 19.0501. New codes have also been added to the total list. The descriptions of other codes have changed.
An Excel file contains the new codes, codes with changed descriptions, and obsolete (deleted) codes on tabbed worksheets. (The online Release Notes contain a link to the Excel file.)
Hospitals will need to review UNSPSC codes assigned to their item records; change any obsolete codes to the updated codes; and add any new, relevant codes to item records.
UNSPSC Reports
For users of Materials Management and Accounts Payable, several reports assist in this process.
These reports are available from the Reports menu Reports > Report Definitions:
"UNSPSC - Items by UNSPSC code"
"UNSPSC - Items Missing UNSPSC codes"
"UNSPSC - Items with invalid UNSPSC codes"
A detailed discussion of UNSPSC codes is in the online documentation: "Using UNSPSC Codes."
To review and change UNSPSC codes assigned to items, or to add codes to items,
- Identify item records that contain either invalid codes (codes or code descriptions that need to be changed) or no codes (codes that need to be assigned).
- Run the appropriate reports.
For example, Figure 2 shows the "UNSPSC - Items with Invalid UNSPSC Codes" Report Selection Values panel.
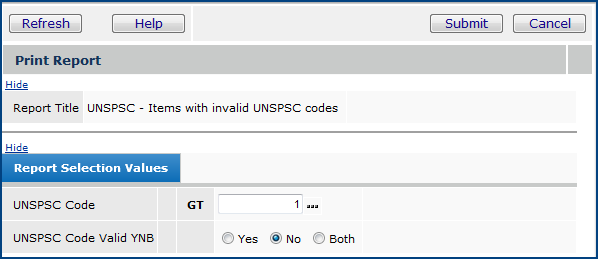
Main Contents > Reports > Report Definitions
In this case, the report outputs all invalid UNSPSC codes greater than one.
- You can select a specific UNSPSC code by clicking the prompt ( ...).
- Clicking in the third column (on GT) lets you select a different operator (such as "less than" or "range"). Click repeatedly to scroll through the operator choices.
- For each item with an invalid UNSPSC code, determine what the code should be changed to. For items with no UNSPSC codes, check the new codes to determine if any are applicable, and if so, add them to the item records.
- Edit the item records to change the UNSPSC code, or to enter a new code.
In Materials Management, you can use one of two approaches:
If you have only a few items with codes to change or add, you can work directly in the item catalog to edit the item records. See "Update Item Records" in the online documentation.
To work directly with the Item Catalog,
- From the Materials Management main Contents, select Inventory > Item Catalog. (The Item Catalog list appears.)
- Locate each item record that you need to change.
- Click Edit on the Item row. (The Item Edit panel appears.)
- Select a new code in the UNSPSC Code field.
- Click Submit.
If you have many items with UNSPSC codes to change or add, you can use item mass maintenance to change or add the codes. Item mass maintenance is described in the online documentation: "Item Import and Mass Maintenance."
- Download the item records that have invalid/no UNSPSC codes to an Excel spreadsheet using item mass maintenance.
- Enter the correct UNSPSC codes as needed. You can copy cells from the Excel spreadsheet.
- Upload the changed item records back to the item catalog.
A new Documents tab on the Receipt header lets you upload and view documents when you receive a purchase order.
Figure 3 is an example.

MM main Contents > Receiving > Receive Purchase Orders > Receive PO
This tab has been available for uploading documents to existing receipts, but with this release, you can upload documents when you create a receipt. See the discussion in the online documentation topic "Uploading an External Document to a Receipt."
EDI Invoice Enhancements
- EDI 810 documents, attached to imported invoices, are now attached in the application when the invoice is created. Previously, if an imported invoice generated exceptions, or was otherwise incomplete, attached documents were not available.
- When you have an Incomplete invoice created from an EDI 810, you can complete the invoice directly, instead of working through the EDI 810 exception process.
Clicking Submit to complete the invoice updates the EDI 810 Status to Invoiced.
Previously the 810 Status was not updated, and the only way to remove the 810 from the EDI (810) Import Exceptions list was to delete the 810.
This change will avoid the extra work for EDI 810s that could not be completed because of exceptions: i.e., print the 810, delete the exception, send the printed 810 to the Accounts Payable department who finish the invoice. Now, it will be clear that the invoice was finished when the exception clears. Also if AP staff were to complete an incomplete 810 invoice, the 810 exception will clear. The person responsible for the 810s will not get an error and then have to delete the 810 to remove the exception.
This change was available in Update 6.9.1. For details, see "EDI 810 Invoices that Cannot Be Completed" in the online documentation.
Picks originating from external system requisitions are now built automatically in secondary asset locations, as well as in primary asset locations.
Organizations typically have a primary default asset location, but may also be able to draw supplies from secondary asset locations. For par cart and other imported requisitions with items sourced from different asset locations, picks were created only for the primary asset location. With this update, ERP will automatically build picks for the secondary asset location for items on a single, imported par cart or other imported requisition. Distribution staff will no longer need to manually build picks in a secondary asset location.
This feature must be enabled on the Organization record (Figure 4) and on the secondary Asset Location Record (Figure 5).

MM or AP main Contents > Tables > Organizations

MM or AP main Contents > Tables > Asset Locations
Receiving staff can print a delivery document when its associated PO receipt is Saved or Finished Later. The receipt does not have to be completed in order to print.
This enhancement lets distribution staff confirm that a received shipment is accurate; and tag, sort, and separate the goods before submitting the final receipt. (At least one receipt line on the incomplete receipt must have a quantity greater than zero in order to print the receipt.)
To print a delivery document before you complete the receipt,
- From the Materials Management main Contents, select Receiving > Receive Purchase Orders.
- Locate the purchase order to receive.
- Click Receive PO.
- On the panel Do you want to receive all? you can select No to receive one item, and print out the delivery document for all items.
- Enter a receipt quantity for the one item.
- Click Save and Finish Later (Figure 6).The application returns to the POs for Receiving List.
- To print the delivery document, select Menu > Print Delivery Document.

MM main Contents > Receiving > Receive Purchase Orders
An image of the delivery document appears. The label Pre-Receiving appear in the upper left (Figure 7).
- Use the document to check in the delivered items, then return to the POs for Receiving List to enter remaining item quantities, and complete the receipt.

Approvers who receive approval notifications by email can now access the entire ERP features menu directly from the approval queue when they log in for review/approval.
Here is an example for an invoice approver:
- You receive an email that an invoice is ready for approval. Figure 8 is an example:

- You can click Approve Invoice or Reject Invoice.
- Alternately, you can click “Click here to view Invoice No XXX” to open ERP to the application Sign On page.
-
Sign in. ERP opens the application to the invoice.
- You can review and approve or reject the invoice as usual.
At the top of the Approval Queue panel in the menu bar, the Main Menu button appears (Figure 9).

MM or AP Main Contents > Invoicing > My Invoice Approver Queue
- Click Main Menu to open the application to the Welcome Page. All of the features that you are authorized to use are available. (If you go back to the approval queue, however, the Main Menu button does not appear again.)
When you receive an email for distribution review of an invoice, you must log in to look at the invoice.
You cannot reject or approve from the email. You need to log in in to the system to look at the invoice.
- Click the link in the email to open and review the invoice on the application. Figure 10 is an example.
Note: Your User Profile must be set up for email review of invoices. See the online documentation for instructions.

Click “Click here to view Invoice No XXX” to open ERP to the application Sign On page. Sign on. ERP opens the application to the invoice.
Enhanced validation in General Ledger allows you to delete unused balance sheet accounts.
Previously, when a General Ledger user created a balance sheet account – possibly by mistake, intending to create a different kind of account – the account could not be deleted. The reason is that ERP assigns an open balance and period to the account. This enhancement allows users to delete unused balance sheet GL accounts.
To delete an unused balance sheet GL account,
- From the General Ledger main Contents, select Account Management > GL Accounts.
The chart of accounts appears.
- Locate the account that you wish to delete.
- Select Menu > Delete.
The application displays a panel for you to verify that you want to delete the account.
- Click Delete.
The application performs these validations:
- Checks that the balance sheet account has had no activity (e.g., journal entries).
- Checks that all account data records are for period 0 and have 0 in the debit/credit amounts.
If both validations are successful, the account is deleted.
In Accounts Payable, you can now reuse the check number for a voided payment even if you did not check the reuse option when you were voiding the check.
When you have a check number that you have voided, you can instruct ERP to reuse the check number as follows:
- From the AP main Contents, select Payments > Payments. The list of payments appears.
- Locate the voided payment of interest.
- Click W to work with the payment.
- On the Work With… menu, a new option Reuse Check Number appears (Figure 11).
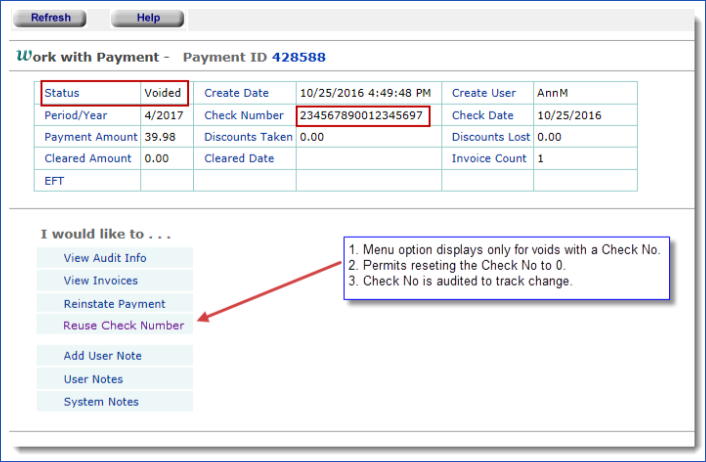
Accounts Payable main Contents >Payments > Payments > locate payment > w
- Click Reuse Check Number. The check number is available for reuse.
The Delivery Confirmations List has had several improvements in filtering.
Previously, the Delivery Confirmation List was restricted to the organization in a user’s Current Settings. The Organization column was not displayed. The Organization column now appears (Figure 12) and is used to pre-filter the list. When the list is pre-filtered, Show All is available.
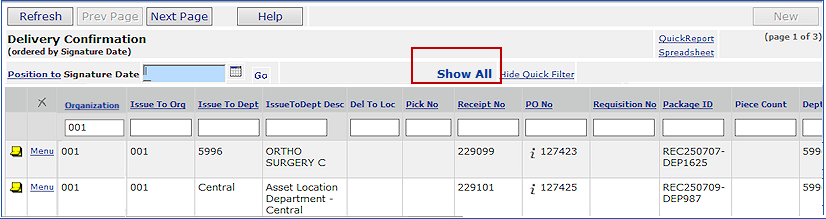
MM main Contents > Warehousing > Delivery Confirmations
Clicking Show All, unfilters the list. (Show All disappears.) Delivery confirmations for all organizations allowed in your User Profile appear. You do not need to go back to Current Settings to specify an organization.
Note: The organizations and departments in the list are only those allowed by your User Profile.
Enhancements to punchout-generated requisitions are available.
 With the recent update, requisitions generated for punchout vendors follow the same direct delivery requirements for a department as any manual requisition created in the department. With the recent update, requisitions generated for punchout vendors follow the same direct delivery requirements for a department as any manual requisition created in the department.
Punchout requisitions are no longer “separate PO by requisition” automatically, but you can specify “separate PO by requisition” for punchout vendors.
Previously, ERP created punchout requisitions as “direct delivery, separate PO by requisition.” A problem occurred If the department record was not set up for direct delivery: the POs had no associated delivery information.
This enhancement covers two areas:
1. Punchout requisitions are generated as specified by the Direct Delivery settings on the department record (Figure 13). (This setting has always applied to manual requisitions.)
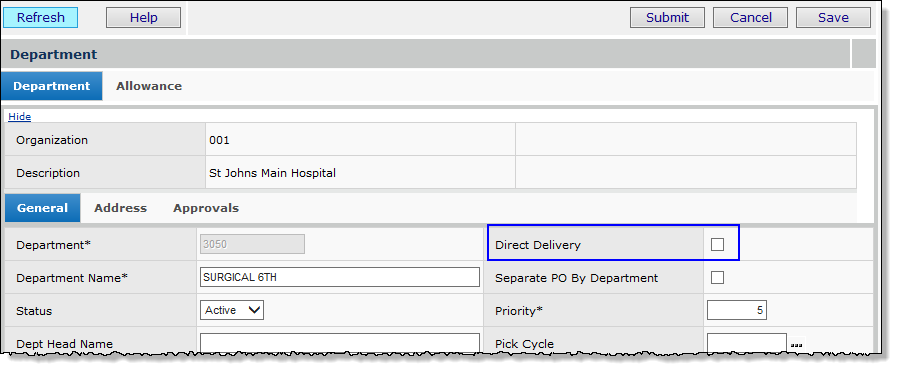
Materials Management main Contents > Requisitioning > Departments > edit department
When selected, the Direct Delivery field creates direct delivery requisitions/POs for the department. The address fields on the Address tab must also be completed (Figure 14).
Materials Management main Contents, Requisitioning > Departments > edit department > Address
2. Separate POs by requisition are no longer automatically generated by the Punchout feature. You can require the punchout feature to generate separate POs by requisition for any vendor. Use the Vendor Punch-out Registration panel (Figure 15).
Work in Administration main Contents > Administration > Punch-out Registration > edit vendor
To locate and edit the Punch-out Registration panel (Figure 15),
- From the Work in Administration main Contents, select Administration > Punch-out Registration.
- Locate the vendor of interest and click the edit icon
 . The Punch-out Registration panel appears. . The Punch-out Registration panel appears.
- Click the Registration tab. At the bottom of the page (Figure 15) is a field Separate PO by Requisition.
- Select the field Separate PO By Requisition if you want separate purchase orders for each requisition (for the vendor). If you do not need separate POs by requisition, leave the field unselected.
- Click Save, Submit.
Problems Resolved in ERP Updates
- Printing patient charge labels required opening and closing the print panel for each item.
When printing patient charge labels (roll format) from Item Inventory, users needed to click Menu > Print next to each item that they wished to create a label for. This process should not be necessary when printing multiple items. This problem has been resolved.
As in the past, users can now start printing one item label, and then enter a different item number in the Print Patient Charge Labels panel -- without having to leave the print panel – to print another label.
To print patient charge labels,
- From the Materials Management main Contents,
- Select Inventory > Item Inventory. The Item Inventory list appears.
or:
- Select Inventory > Item Catalog. The Item Catalog list appears.
- Locate the item of interest
- Select Menu > Patient Charge Labels (Roll). The Print Patient Charge Labels panel appears (Figure 16).
- Next to Print Labels By, click the down arrow and select Item No (Figure 16).
Materials Management > Inventory > Item Inventory > locate item > Menu > Patient Charge Labels (Roll)
- Click Print Labels. Another Print panel appears.
- Enter the number of labels to print, select the printer, adjust the margins if needed, and specify the printer type.
- To specify the Printer Type, click the down arrow and make a selection.
- Click Print Labels Now. The system sends you a message that patient charge labels are being printed.
- The Print Patient Charge Labels panel stays open.
- To print another label, use the prompt for the Item No field to select another item.
- Problems with the Item Mass Maintenance Excel add-in running on Windows version 8.1 and Windows 10 have been resolved.
You must install the Excel-Add In to use item mass maintenance.
In the past, if you had a problem with the template running on Windows versions 8.1 or 10, download and re-install the template from the application. Instructions for installing the Excel Add-In have not changed from the Windows 7 version. See the online documentation topic “Item Import, Export, and Mass Maintenance.”
- When an invoice was balanced but had the Status Distribution Review, it was excluded from the "Unapproved Invoice Accrual Process."
This issue has been resolved: balanced invoices in distribution review are now collected in the “Unapproved Invoice Accrual Process.” Accrued invoices are available from the Accounts Payable panel Unapproved Invoice Accrual (AP main Contents > Invoices > Unapproved Invoice Accrual).
Report and Report Object Changes in ERP Updates
- For Vizient users, the fields below are added to the report definition “Vizient Invoice Distribution Report.”
The fields are also added to the report object “Invoice Distribution Details All.” Also, for this report object, a problem with incorrect display of data in the Dept Desc field has been resolve.
- Invc Posted Date – the posting date of an invoice distribution detail.
- InvcLine Line No – a line number on an invoice distribution detail.
- For Vizient users, the following reports have been added to the list of standard reports Reports > Standard Report Definitions:
Report Name |
Report Object |
Fields Used in Report |
Vizient ADS
Invoice Distribution File |
Invoice Distribution Details
All |
| Org |
| Org Desc |
| Vendor No |
| Vendor Name |
| Invoice No |
| Line Amount |
| Posted Date |
| Inv Line No |
| GLAcctSegment3 |
| Account Desc |
| Department |
| Dept Desc |
| PO No |
| Inv Line Type |
|
Vizient ADS
Item Master File |
Item Inventory
All Vendors |
| Item No |
| Item Desc |
| Vendor Mfr Name |
Vendor Mfr
Item No |
| Vendor No |
| Vendor Name |
| Vendor Vendor Item No |
| UOM |
| UOM Conversion Factor |
| UOM Price |
| Item Status Desc |
| Item Type Desc |
| UNSPSC Code |
| UNSPSC Code Desc |
| Item Catalog Create Date |
| Asset Loc |
| Item Inventory Create Date |
| Item Class Desc |
| Item Sub Class / Sub Class Desc |
| UOM Dft Purchase YNB |
|
Vizient ADS
Vendor Master File |
Vendor Master |
| Vendor No |
| Vendor Name |
| Address Line 1 |
| City |
| State Country |
| Country |
| Zip Code |
| Tax ID Char |
| Vendor Type |
|
Vizient ADS
Purchase Order
History File |
Invoice Match Header,
Detail and PO
Line View 2 |
| Org |
| Org Desc |
| Vendor No |
| Vendor Name |
| Invoice No |
| Line Amount |
| Posted Date |
| Inv Line No |
| GLAcctSegment3 |
| Account Desc |
| Department |
| Dept Desc |
| PO No |
| Inv Line Type |
|
SCM Past Updates 6.9.1 to 6.9.7
Panel changes
These columns are now sortable on exceptions panels: Item No, Mfr Item, and, on the Items with UOM Errors panel, Vendor Item.
Figure 17 is an example. The panels with the new sortable columns are:
- Items With Price Exceptions
- Items With UOM Errors (The Vendor Item column is on this panel.)
- Items on Existing Contract
- Items With Rejected Prices.
SCM > Supplies > Contracts > Exceptions > click Price Exception count
This change makes it easier to locate a particular panel row, particularly for sites activating contracts at the vendor/vendor location level.
- The length of a contract number entered in the Related Contracts field has been extended to 50 characters. This Related Contracts field is on the Contract Header Edit panel. Click the Related tab (Figure 18)
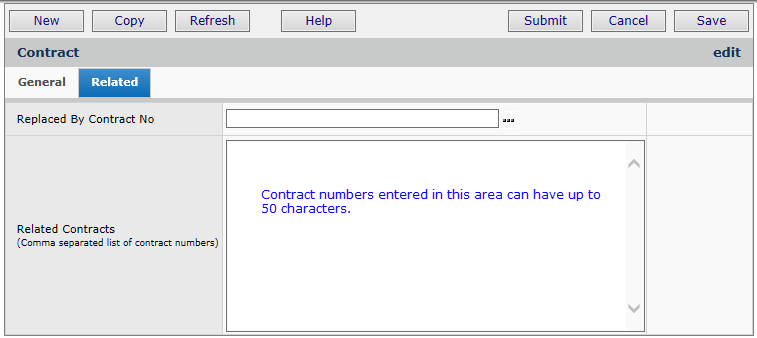
SCM > Supplies > Contracts > open contract> Contract Info panel >click edit icon > Related tab
Problem Resolutions
ERP - Materials Management/Accounts Payable/General Ledger/Reports
Problem Summary: On EDI 855 documents, ERP now evaluates the contents of the IN field against the PO line to avoid exceptions when the item is non-file.
On EDI 855 documents, for POs with non-file items, the IN field (item number) was sometimes populated with a value (such as a VIN). The result was an EDI exception error. Users would need to manually clear the exception by removing the information in the IN field.
This problem has been resolved so that user intervention is no longer needed. The application now checks the actual PO line and PO type to determine if the EDI references a non-file item. If yes, the application ignores any values in the IN field (since, for non-file items, the IN field is irrelevant).
Copyright © 2018 by Premier, Inc. All rights reserved.
Copyright © 2023 by Premier Inc. All rights reserved.
|