Apportion Non-File Line Charges Among Departments Version
Contents
Overview
Costs associated with non-file item requests sometimes need to be apportioned across multiple departments. For example -- training materials used in a class attended by staff from several departments, equipment such as walk-up copy machines, break room furniture and amenities -- are all expenses that may be shared. To meet this need, you can set up charge allocation groups that identify departments which share non-file item costs.
In a charge allocation group, each department is assigned a percentage value that represents its portion of the cost on non-file items. Requesters can then associate the charge allocation group with non-file requisition lines. The charged departments and percentages carry over to the purchase order, and are reflected in the inventory and general ledger transactions.
When departments in a charge allocation group belong to different organizations, the appropriate inter-org accounts must be in place.
You can only share charges among departments for non-file items. You can use charge allocation groups with regular, blanket, bill-only, and standing requisitions and their parallel purchase orders; quick credit returns to vendor; and quick credit department cost adjustments.
This topic outlines how to set up and use charge allocation groups to share non-file costs.
Security
The ability to create charge allocation groups is controlled by the role object "Charge Alloc Group." The initial setting of this role object is None, so that the menu item does not appear on the Materials Management main Contents. System administrators must change the setting to Create or All for users who maintain charge allocation groups.
You can only create charge allocation groups for organizations/departments that are included in your data profile. See Work with Data Profiles for details.
You can restrict a charge allocation group to specified organizations/departments so that it can be used only by those departments.
Setup
- Have your system administrator set the role object "Charge Alloc Group" appropriately. For information on user security, including role objects, see Work with User Roles.
- Identify the organizations and departments that will share costs, and make sure that they have inter-org accounts in place. See the discussion of Processing Across Organizations for details on inter-org accounts.
- If your site has enabled GL Validation, make sure that all the departments sharing costs have valid GL accounts for the expense code(s) that you are using. See Using General Ledger Account Validation.
- Create the Charge Allocation Groups that you need, and assign the organization/department percentages. This process is outlined below.
Create a Charge Allocation Group
Materials Management panels are available for creating and maintaining charge allocation groups. The steps are:
- Create a header for the group to give the group a name and description.
- Identify departments/organizations in the group.
- Assign a percentage value to each department. This is the percentage of the shared cost that the department is responsible for.
- Select a department that will also be responsible for rounded costs.
For example, if you have a $100.00 charge split 30%-30%-30% among three departments, two departments will be charged $33.33,
and the "rounding" department will get the rounded up cost of $33.34.
- If the charge allocation group is to be used only by specific organizations/departments, identify them as restricted organizations.
To create a charge allocation group,
- From the Materials Management main Contents, select Requisitioning > Charge Allocation Groups. If any charge allocation groups have been created, they appear on the list. Otherwise, No Data appears.
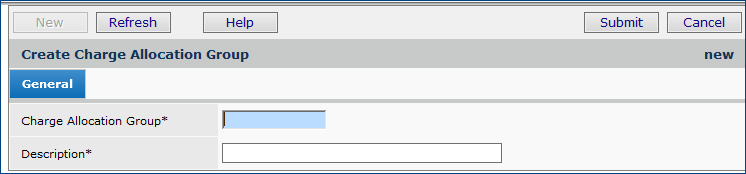
- Click New. The Create Charge Allocation panel (Figure 1) appears for entering header information.
Figure 1 - Creating a Charge Allocation Group Header
- Enter an alphanumeric value in the field Charge Allocation Group to name the group.
- Enter a Description.
- Click Submit. The panel is refreshed and additional tabs appear in the middle and bottom.
-
The lower tabbed panel lists departments and organizations for selection (Figure 2). In Figure 2, the list is sorted by Department. There are two organizations in the list.
-
The middle panel is for searching the departments and organizations. Enter any part of a department or organization name and click Enter.
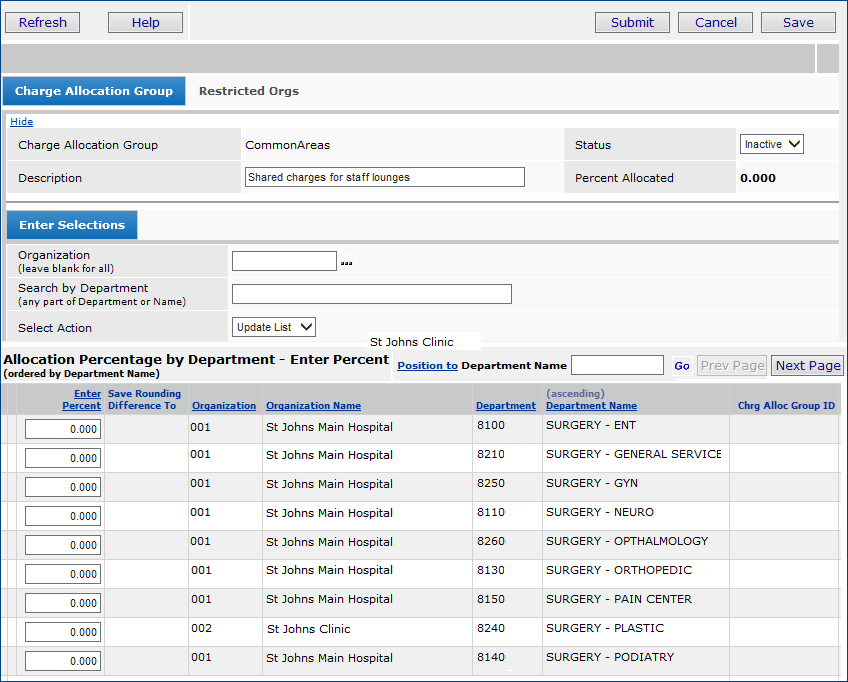
Figure 2 - Charge Allocation Edit Panel
- Next to each department that will share charges, enter the percentage for which the department will be responsible.
-
You can enter a whole percentage; e.g., 25.00 or a fractional percentage: 25.40.
-
All percentages must total to 100 for the group Status to be Active, and usable in requisition/PO lines.
- Click Enter.
When you click Enter, the link Save Rounding Differences appears next to each department with a percentage (Figure 3).
(Rounding departments are explained in the next section.)"

Figure 3 - Charge Allocation Group with Percentages Entered
- Click Save.
Note: If any organization/department to which you assign a percentage does not have inter-org accounts in place, or (with GL Validation enabled) does not have an existing account for item expense codes, an error occurs when you click Save. You can proceed with assigning percentages to departments, but you will not be able to finalize the charge allocation group until you fix the problem(s) that caused the error(s).
Assign Rounding Differences to an Organization/Department
- Click Save Rounding Differences to select the department/organization that will be assigned any residual amounts due to rounding.
Essentially, this department is apportioned the amount that is "leftover" after all the percentage charges have been apportioned.
A validation panel appears (Figure 4). Click Submit.
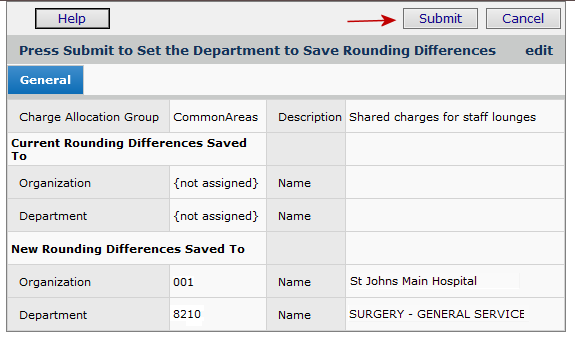
Figure 4 - Confirm Department for Rounding Amounts
The Charge Allocation Group panel refreshes. In the Save Rounding Difference To column, Yes appears for the department that will take rounding differences (Figure 5).

Figure 5 - Department Responsible for Rounding Differences
Restrict Charge Allocation Group by Organization (optional)
By restricting charge allocation groups to specific organizations, you can limit user access to them.
When a charge allocation group is restricted to designated organizations, the group will only appear in lists and prompts where the user has access to at least one of the restricted organizations. (A user's data profile identifies organizations and departments whose data the user can work with.)
When a charge allocation group is not restricted by organization, any organization can use it.
If you wish to restrict the charge allocation group by organization, select the Restricted Orgs tab. (See Figure 6.)
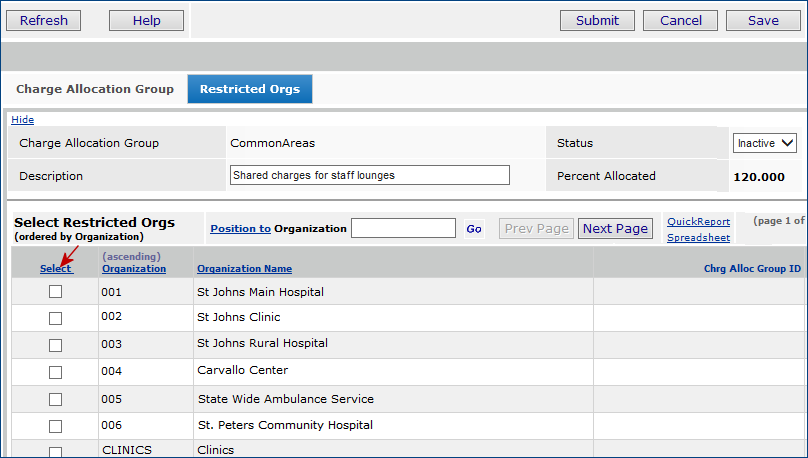
Figure 6 - Restricted Orgs Panel for a Charge Allocation Group
- On the Restricted Orgs tab, select from the list of organizations displayed.
- Click Save.
Finish Creating the Group
When all of the percentages assigned to each organization/department total 100, and a "Save Rounding Department" is selected, the Status field changes to Active.
- To finish a charge allocation group, click Submit.
If no errors exist, the group is created and added to the list of groups. You can now select the charge allocation group on non-file requisition and PO lines, and on department adjustment and return-to-vendor quick credits.
You can edit any charge allocation group on the list to set its Status to Inactive if you do not wish the group to be used.
If you edit department percentages so that the total drops below 100, the system sets the group to Inactive. Inactive groups are not available for selection on requisition/PO lines. (The select list does not display Inactive groups.)
The Charge Allocation Group menu lets you copy or delete a group. However, you will not be able to delete a charge allocation group if the group is used on a requisition that is not Complete.
Shared Charges in Requisition Lines: Use a Charge Allocation Group
On requisitions, charge allocation groups are assigned to non-file lines to specify how costs for the items are shared among departments/organizations.
To specify a charge allocation group on a requisition,
- With the requisition open for editing (or, as you are creating it), on the non-file requisition line, click the edit icon
 or Menu > Edit (Figure 7).
The Requisition Line Detail panel appears.
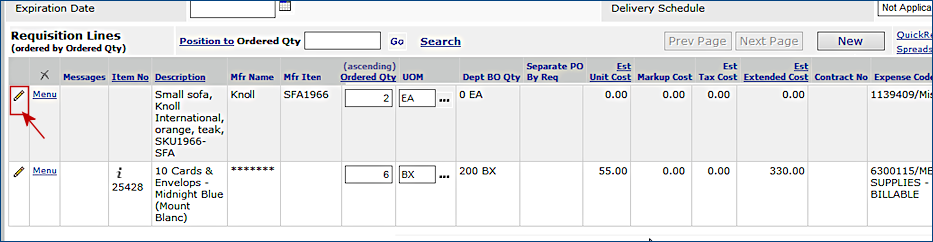
Figure 7 - Editing a Non-File Requisition Line
- Click the Overrides tab. The Overrides tabbed panel opens (Figure 8).
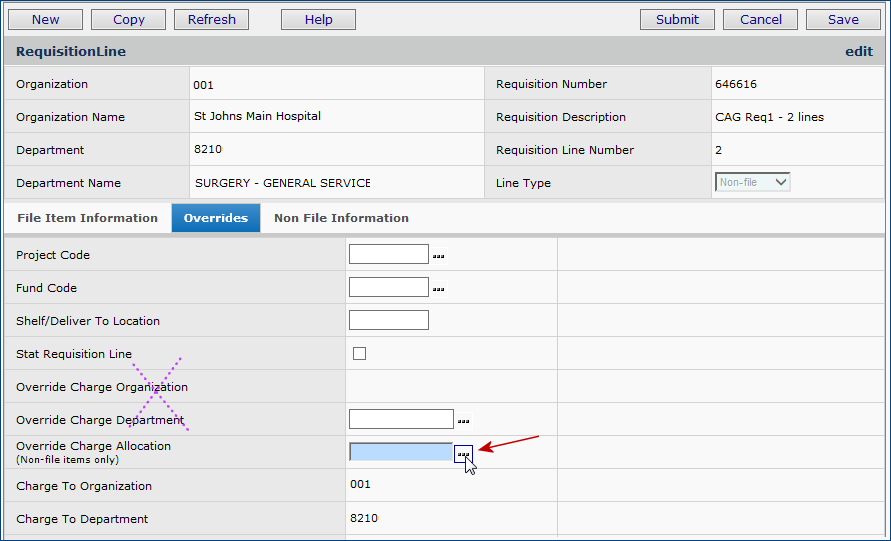
Figure 8 - Requisition Non-File Line: Selecting a Charge Allocation Group
- Next to the field Override Charge Allocation, click the prompt.
The Search appears.
- Use the search fields to locate the Charge Allocation Group that you wish to use for the line, and select it.
The system populates the Override Charge Allocation field with the selected charge allocation group.
- Click Save.
Note: You cannot select an Override Charge Department if you specify a charge allocation group.
- Continue processing the requisition to send it for approval to create a purchase order for the non-file item.
Shared Charges in Purchase Orders: Use a Charge Allocation Group
- With the purchase order open for editing, on the non-file requisition line, click the edit icon or Menu > Edit.
The PO Line Detail panel appears.
- Click the Non-File Item Information tab (Figure 9).
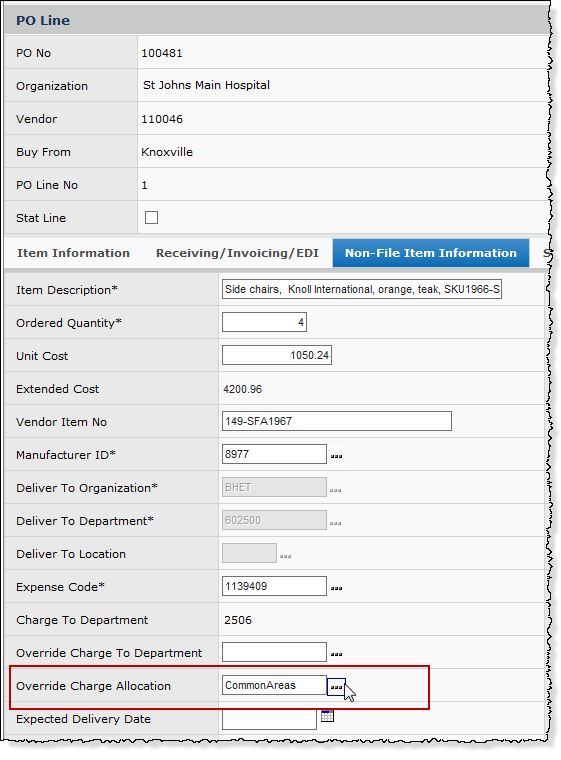
Figure 9 - Purchase Order Non-File Line: Selecting a Charge Allocation Group
- Next to the field Override Charge Allocation, click the prompt.
The Search appears.
- Use the search fields to locate the charge allocation group that you wish to use for the line, and select it.
The system populates the Override Charge Allocation field with the selected charge allocation group.
Note: You cannot select an Override Charge Department if you specify a charge allocation group.
- Click Save.
- Click Submit to continue processing the purchase order.
Quick Credits: Return-to-Vendor and Department Cost Adjustments
Return to Vendor Quick Credits process credits for multiple items returned to vendors from departments. This feature generates credit purchase orders in a single step.
If a department is issued an item with an incorrect average cost, the cost
can be changed without affecting the quantity issued. Department Cost Adjustment
is available as a selection on the Quick Credits panel for the field Credit
Type.
Department-to-vendor quick credits and department cost adjustments let you assign a charge allocation group so that costs incurred from a purchase can be credited back to the organizations/departments that are sharing the cost. How to create a return to vendor quick credit or a cost adjustment is explained in Return-to-Vendor Quick Credits and Department Cost Adjustments.
To specify a charge allocation group on a return-to-vendor quick credit,
- With the quick credit open for editing (or, as you are creating it), click the Overrides tab. The Overrides panel appears (Figure 10).
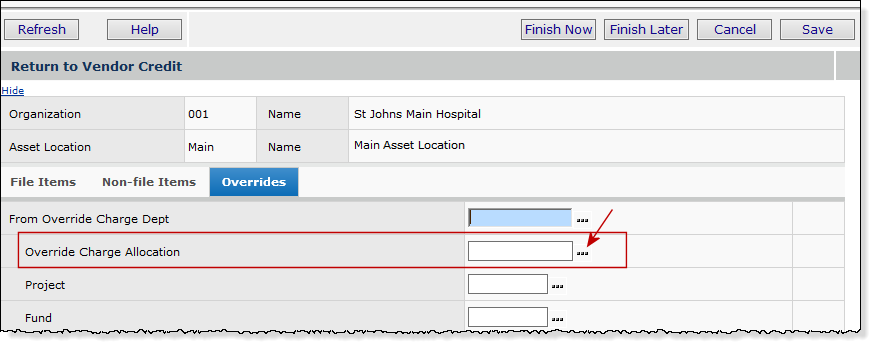
Figure 10 - Quick Return to Vendor or Cost Adjustment: Selecting a Charge Allocation Group
- Next to the field Override Charge Allocation, click the prompt (Figure 10).
The Search appears.
- Use the search fields to locate the correct charge allocation group, and select it.
The system populates the Override Charge Allocation field with the selected charge allocation group.
- Click Save.
- When you are finished with the return-to-vendor quick credit, click Submit.
- For department cost adjustment credits, the process is the same as for returns to vendors.
- When you create a cost adjustment credit, the Override Charge Allocation field is located on the Overrides panel (Figure 10).
- Click the prompt to select the appropriate charge allocation group.
Inventory and General Ledger Transactions
This section contains details of inventory transactions and their parallel General Ledger transactions for charge allocation group purchase orders and credits.
Issue to Department Transactions
A non-file line on a purchase order is received, then issued to a department.
- GL transactions for department expense (debit) are created for each department as defined by the charge allocation group.
- The total line cost (item cost + tax + markup) is multiplied by the percentage specified for each department to produce the cost to allocate to each department.
- The department flagged as Save Rounding Difference is always processed last, and always receives the remainder of the total cost after other allocations have been done.
- When the organization for the supplying asset location is different from any of the Charge Allocation Group department organizations, the sum of the departments' costs is used to create the inter-org GL transactions for each inter-org instance.
Cost Adjustment - Invoice Line Exception Cleared
A price exception on a non-file invoice line is cleared.
- GL transactions for department expense (increase debit, decrease credit) are created for each department as defined by the charge allocation group.
- The cost adjustment is multiplied by the percentage specified for each department to get the cost to allocate to each department.
- The department flagged as Save Rounding Difference is always processed last and always receives the remainder of the cost adjustment after other allocations have been done.
- When the organization for the supplying asset location is different from any of the Charge Allocation Group department organizations, the sum of the departments' costs is used to create the inter-org GL transactions for each inter-org instance.
Quick Credit - Return to Vendor
The system processes a Quick Issue - Return to Vendor for a non-file purchase order line.
- GL transactions for department expense (debit) are created for each department as defined by the charge allocation group.
- The total line cost (item cost + tax + markup) is multiplied by the percentage specified for each department to produce the cost to allocate to each department.
- The department flagged as Save Rounding Difference is always processed last, and always receives the remainder of the total cost after other allocations have been done.
- When the organization for the supplying asset location is different from any of the Charge Allocation Group department organizations, the sum of the departments' costs is used to create the inter-org GL transactions for each inter-org instance.
Quick Credit - Department Cost Adjustment
A receipt for a non-file purchase order line is canceled.
- GL Transactions for department expense (credit) are created for each department as defined by the charge allocation group.
- The total line cost (item cost + tax + markup) is multiplied by the percentage specified for each department to produce the cost to allocate to each department.
- The department flagged as Save Rounding Difference is always processed last, and always receives the remainder of the total cost after other allocations have been done.
- When the organization for the supplying asset location is different from any of the Charge Allocation Group department organizations, the sum of the departments' costs is used to create the inter-org GL transactions for each inter-org instance.
Cancel Receipt for PO Line
A Quick Issue - Department Cost Adjustment for a non-file purchase order line is processed.
- GL transactions for department expense (increase debit, decrease credit) are created for each department as defined by the charge allocation group.
- The cost adjustment is multiplied by the percentage specified for each department to produce the cost to allocate to each department.
- The department flagged as Save Rounding Difference is always processed last, and always receives the remainder of the total cost after other allocations have been done.
- When the organization for the supplying asset location is different from any of the Charge Allocation Group department organizations, the sum of the departments' costs is used to create the inter-org GL transactions for each inter-org instance.
Reports
The following report objects include the fields Charge Allocation Group and its Description. The Charge Allocation Group field can be a selection field.
Invoice Match Header, Detail, and PO Line
Invoice PO NonFile Detail
PO Requisition Analysis
PO Header & Line View 1
PO Header & Line View 2
Requisition Details - Warnings and Errors
Requisition Details.
Copyright © 2023 by Premier Inc. All rights reserved.