Handling Unmatched Contract Items and Adding Vendors to Contracts Version
Contents
Overview
Important Technical Note: The item management feature is only available to sites that use the Item Master (PIM) data. If you are unsure whether you use the PIM, check with your system administrator.
This chapter is designed to help you know what to do with the unmatched items on your contracts. Figure 1 is an example of a contract with unmatched items.
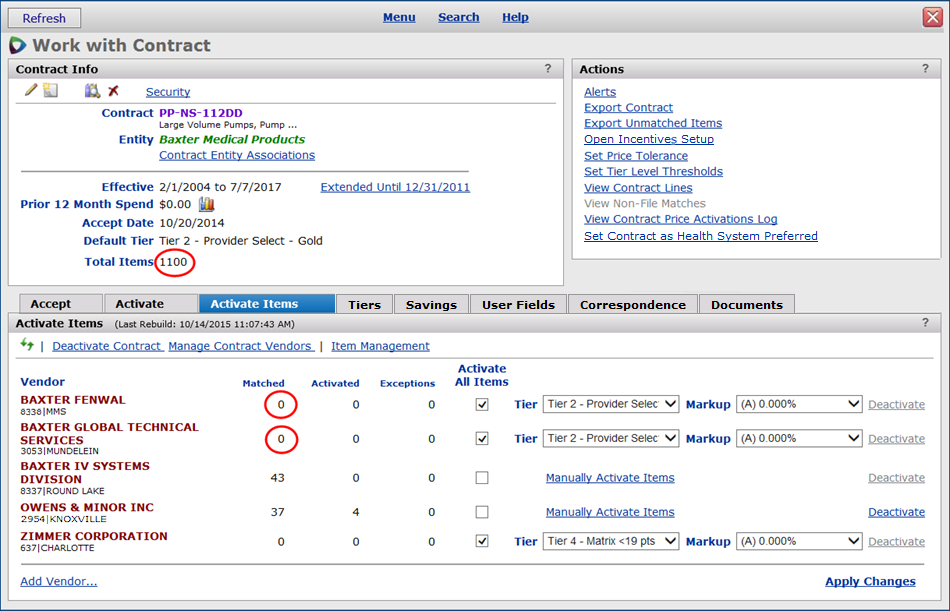
Figure 1 - Unmatched Items on the Work with Contract Page
The Item Management feature provides the tools you need, and will guide you through the steps of how to...
- Find unmatched items.
- Flag items for item management.
- Export the items, so that you can import them into your item catalog.
There are two ways you can manage unmatched contract items.
- You can work with unmatched items from a list of all vendors with unmatched items,
- or you can work with vendors and unmatched items on a single contract.
Access to the Item Management Feature
Customers have the option of enabling/disabling the Item Management feature as part of their SCM package. This feature is enabled by default, so that the ability to work with Item Management is available.
When this feature is not enabled, users cannot work with dashboards. The SCM main menu does not provide an Item Management element. Also, the Item Management link on the Work with Contract panel Activate Items tab is not visible.
Contact the Help Desk or your Premier Consultant to enable or disable this feature.
Security
To work with item management, users must have at least the Item Management security role set to Modify.
Using Item Management
You can use Item Management to display all contract vendors with unmatched items, and to manage unmatched contract items from the list of all vendors.
Displaying all Contract Vendors with Unmatched Items
-
From the Sourcing and Contract Management main Contents, select Item Management. (Figure 2)
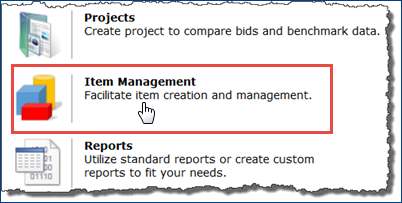
Figure 2 - The Item Management Link on the SCM Home Page
The "Item Management for Vendors" page opens. (Figure 3)
This page shows a list of all vendors that are associated with contracts, but that have unmatched items.
The first area on the page  is a list of vendors. The columns display the name of the vendor and the vendor buy-from location (Vendor Loc), the amount of non-file spend for the contract vendor, if any (Non-File Spend), if the price was activated in the last 90 days, (Activated in Last 90 Days?) and the date the vendor activated on a contract, (Activate Date).
You can use the second area
is a list of vendors. The columns display the name of the vendor and the vendor buy-from location (Vendor Loc), the amount of non-file spend for the contract vendor, if any (Non-File Spend), if the price was activated in the last 90 days, (Activated in Last 90 Days?) and the date the vendor activated on a contract, (Activate Date).
You can use the second area  to filter the list. The filters are Activated (All / Last 90 Days), and Vendors (All / with Non-File Spend). See Tools on the Item Management for Vendors Page.
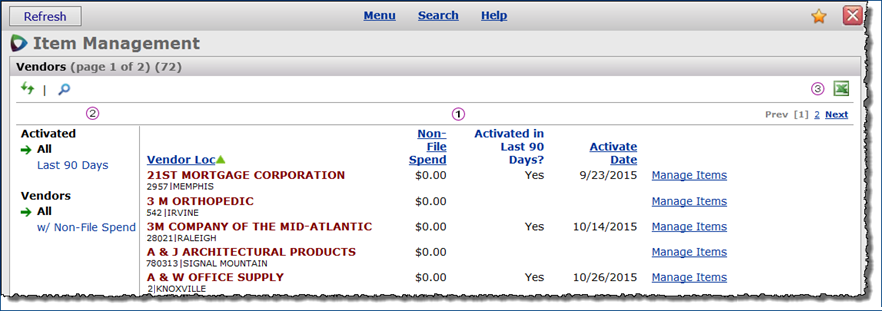
Figure 3 - Item Management for Vendors Page
- On this page you can sort and filter the list of vendor associated with contracts, but that have unmatched items.
See Tools on the Item Management for Vendors Page.
- You can include all activated vendors or only some.
- You can also add all vendors, or just the vendors with non-file spend.
- Use the Output to Excel feature
 to create a list vendors with unmatched items. The Excel spreadsheet show the same columns that are on the "Item Management for Vendors" page, and is set up based on how you sort and filter. (Figure 3)
Tools on the Item Management for Vendors Page
Using the Sort:
You can sort the list of vendors associated set up by any column with an underlined header.
- Click a header to reorder the list by ascending or descending order.
- A green arrow appears next to the column, and points in the direction that the items are sorted.
- For example, if you sort in the Vendor Loc column, and the arrow is pointing up, then it sorts the list of vendor names in ascending order.
- If you sort in the Vendor Loc column with the arrow pointing down, then it sorts the list of vendor names in descending order.
Using the Filters:
You can use one or both filters on the left side to display and group vendors.
- Click a filter from both Activated and Vendors. For example, click Activated > Last 90 Days.
- Then click Vendors > w/Non-File Spend. The list shows all the records that meet both criteria.
Using the Output to Excel Feature:
After you are finished using the filter and sort features, then you are ready to use this export feature.
You can include all the vendors or only some. Output to Excel  is available from an Excel image in the upper right-hand corner.
- In the upper right-hand corner, click the Excel icon. Output to Excel appears when you mouse over the icon. (Figure 4)
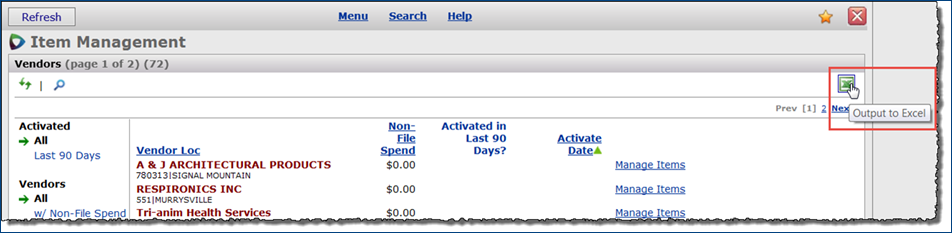
Figure 4 - Export to Excel
- A dialog box asks if you wish to open or save the Excel (.xls) export file containing the list of vendors.
- Click either Open, Save, or Cancel.
Managing Unmatched Contract Items from the List of All Vendors
On the Select Item Management Vendor panel, you can work with a list of unmatched items for a single vendor. (Figure 5)
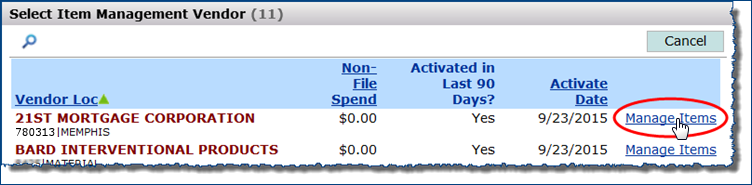
Figure 5 - Select the Manage Items Link
- Click Item Management on the SCM home page (Figure 2). The "Item Management for Vendors" page appears. (Figure 3)
- On Item Management for Vendors, find the vendor whose items you wish to manage.
- Click Manage Items to the right of the Activate Date field. (Figure 5)
- You can select one or more unmatched items to manage them for a single vendor.
- You can also export unmatched items to an Excel spreadsheet, and import them into ERP Materials Management or to another MMIS system.
- The Manage Items panel appears, with the vendor at the top, followed by the list of items. (Figure 6)
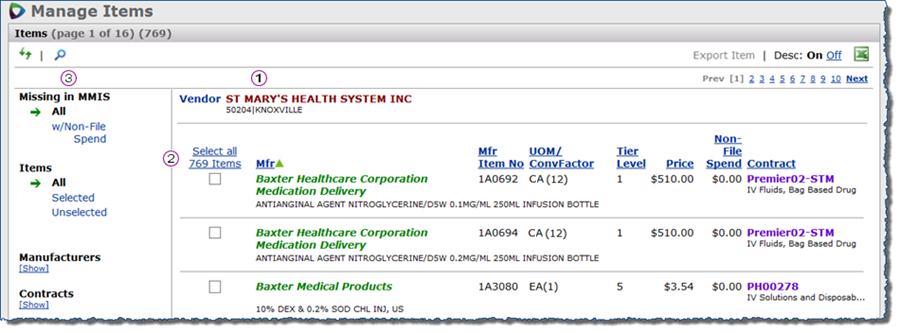
Figure 6 - Manage the List of Items for a Vendor
This panel contains different sections.
the vendor name and the buy-from location.
the list of vendor items.
You can sort by all the headers in this section. You can select all the records, or some of the records by using the checkbox to the left of each record. This area includes:
- The item's manufacturer (entity), (Mfr),
- the manufacturer's identifier for the item. Also called Manufacturer Item Number or MIN., (Mfr Item No),
- the unit of measure conversion factor, (UOM/ConvFactor),
- the tier level of the contract, (Tier),
- the manufacturer price, (Price),
- the amount of non-file spend for the contract vendor. This is the dollar amount that the organization has spent off-contract because the contract items are non-file, (Non-File Spend),
- and the name of the contract, (Contract).
The filters for the list are Missing in MMIS (All / with Non-File Spend), Items, Manufacturers, and Contracts.
- Use Export Item, located in the upper right-hand corner, if you are planning to import the item records into ERP Materials Management.
- Use Output to Excel to create a list of unmatched manufacturer items for a single vendor. The Excel spreadsheet shows the same columns that are on Manage Items, and is set up based on how you sort and filter.
Note that if an item is matched for some particular vendors, but unmatched for other vendors, the item will appear for each of the other vendors as unmatched.
Tools on the Manage Items Panel
The Manufacturers and Contracts filters work best together when there are several to choose from.
- If you wish to view the complete list of manufacturers and contracts, click Show for both the manufacturer and the contract.
- Select the checkbox for the contract you wish to view. After you make the selection, the manufacturer list is hidden.
- Click Show under Manufacturers to see the complete list.
- Then select the checkbox next to the contract you wish to view.
The results list (Figure 7) appears with the matching contract and manufacturer, along with the unmatched contract items.
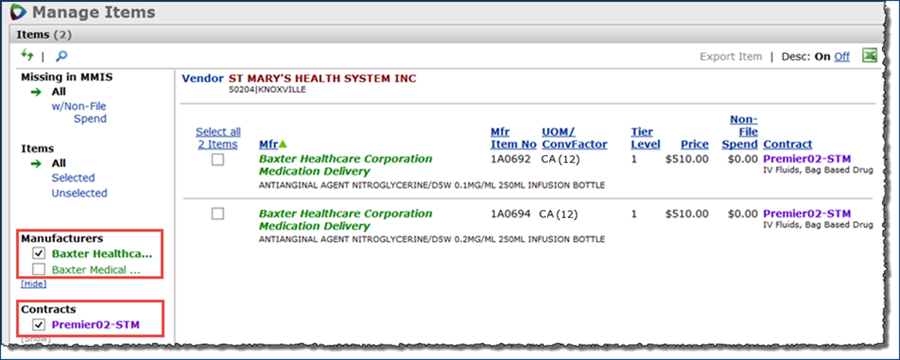
Figure 7 - The Contracts and Manufacturers Filters and Results
Using Export Item to Excel:
When you have the items list filtered for your items of interest, you can export the items to Excel. The Excel spreadsheet can be used for importing unmatched items into your item catalog.
- Select the items that you wish to export.
- Click the Selected filter under Items. (The Export Items link, which was grayed out, becomes active.)
- Click Export Items in the upper right-hand corner of the page.
- Notes:
- If you do not select the checkbox for Internal Item Import Format, then you get a list of items in Excel that looks similar to the list on the Items panel. See Step 5A.
- If you select the checkbox for Internal Item Import Format, you want to export the list of items in a format that ERP Materials Management uses to import items to your item catalog. See Step 5B.
Step 5A. If you do not select the checkbox next to Internal Item Import Format. (Figure 8)
- Click Export. A dialog box asks if you wish to open or save the Excel .xls file.
- Click Open to open and display the file, or Save to save it to a network location.
Step 5B. If you select the checkbox next to Internal Item Import Format.
(Figure 8)

Figure 8 - The Create - Export Items Panel
- A new area of the pop up screen opens, and displays several fields you can fill in. (Figure 9) Some fields have checkboxes you can select if needed. In the Item Type field, choose between Stock or Non-Stock. The other fields are: Org, Patient Non-Billable Expense, Replenish From Org, Order From Vendor, Set VIN equal to MIN, Asset Loc, Replenish From Asset Loc, and Recalculate UOM Prices. See (Table 1).
- When you are finished filling in the fields, click Export. A dialog box asks you which action to perform.
- Click either Cancel or Export.
- The Excel file opens with the list of items.
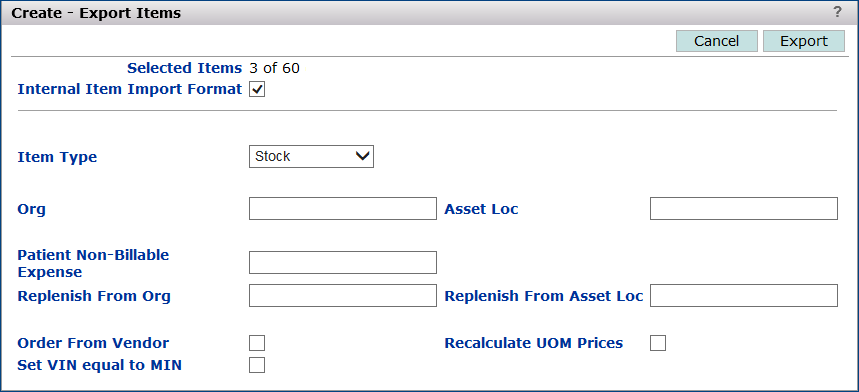
Figure 9 - The Create - Export Items Panel
Fields
The fields below are only relevant for ERP Supply Chain users who are importing export worksheet items into Materials Management.
Number of Items Selected |
The number of items you selected by using the checkbox. |
Number of Items Total |
The total number of items to be added to the Excel spreadsheet. |
Number of Items Missing Info. |
There is some information missing from this number of records. |
Item Import Format |
If you select the checkbox, the items will be in a format that the system uses to import items to your item catalog. |
Item Type |
A stock item is inventoried on site.
A non-stock item is not normally kept in inventory.
- Click the down arrow to select Stock or Non-Stock.
|
Org |
The organization responsible for the contract.
- Enter the organization code.
|
Asset Loc |
The asset location that inventories the contract items.
- Enter the asset location.
|
Patient Non-Billable
Expense |
A Patient Non-Billable Expense code identifies the account for items that are not directly billed to patients.
- If the items on the contract are not billable to patients, enter the code.
|
Replenish From Org |
The organization that orders or
replenishes the items if Order From Vendor is not checked.
- Enter the organization code.
|
Replenish From Asset Loc |
The asset location that orders or
replenishes the items if Order From Vendor is not
checked.
- Enter the asset location.
|
Order From Vendor |
- Check the box to signify that the contract items are ordered from a
vendor, if such is the case. Otherwise, leave the box blank.
If the box is not
checked, the items are replenished via system transfer from the
organization
and asset location specified in Replenish From Organization and Replenish From Asset Location.
Purchase orders for the items originate at the organization and asset location in which the items are created when you import the Excel worksheet into Materials Management. |
Set VIN equal to MIN |
- Click this box if the vendor item number for each item should be the same as its manufacturer item number.
|
Recalculate UOM Prices |
This field is useful if the prices of the items are expected to change in the future.
When the price of an item changes, it
is important for the change for each unit of measure to occur in the correct order.
- Select this field to recalculate all UOM prices for each item based on a new price for the lowest UOM.
|
Using the "Select All" Link:
- Click Select All to select all the records. (Figure 10)
- Note: The number of records that displays in the header is dependent on how many records there are in the list.
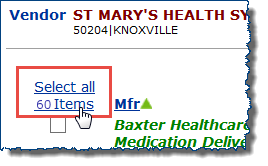
Figure 10 - Select All Items
- A selected checkbox displays next to all the records, and the message in the column header changes to Unselect all ... Items.
- Click the header again to unselect all items. A dialog box appears with the text:
Are you sure you want to unselect ... items? (Figure 11)
- Click Submit.
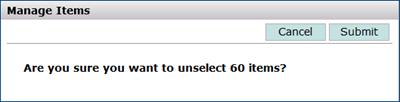
Figure 11 - Unselect Items
Turn the Description Field On or Off:
You can toggle between showing and not showing the item descriptions and the contract name in the unmatched item list.
In the upper right-hand corner of the panel next to the Excel icon, there are two links called Desc: On Off. 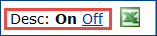
- Click On to display the description. (Figure 12)
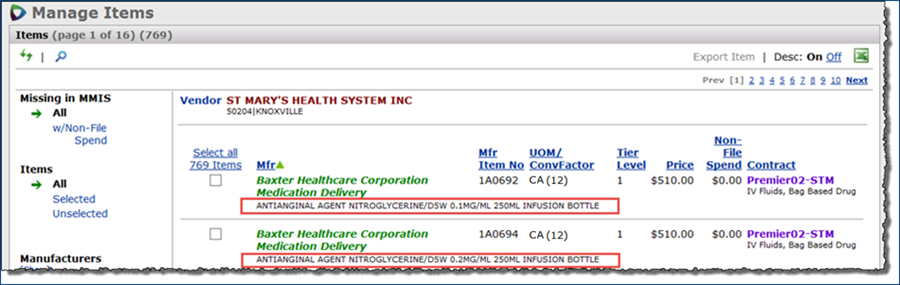
Figure 12 - Description Toggle On
- Click Off to hide the description. (Figure 13)

Figure 13 - Description Toggle Off
Managing Unmatched Items on a Single Contract
If you would like to manage unmatched items that belong to both a particular vendor and contract, open the contract.
For a contract, you can find the unmatched items for a particular vendor. Then you can use the Export Item feature and import the unmatched items for matching in Materials Management. (If you wish, of course, you can also simply export all the unmatched items on the contract from the Actions panel.)
-
From the Sourcing and Contract Management main Contents, select Contracts > Contract Workbench. (Figure 14)
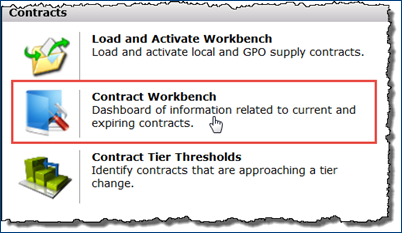
Figure 14 - The Contracts Workbench on the SCM Home Page
- On the Contracts panel, find the desired contract with unmatched items.
- Hover over the contract with the mouse, and click the contract to open it. (Figure 15)

Figure 15 - Opening a Contract from the Supply Contract Workbench
- Click Item Management to manage items for individual vendors.
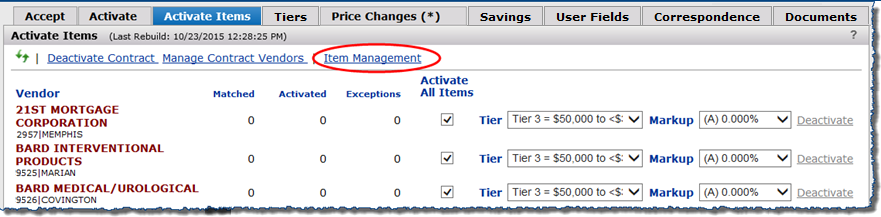
Figure 16 - The Item Management Link
- The Select Item Management Vendor panel opens with a list of vendors. Click Manage Items next to the vendor of interest. (Figure 17)
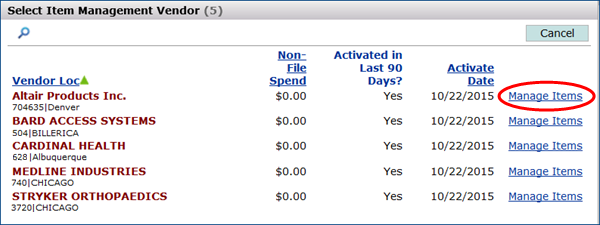
Figure 17 - The Select Item Management Vendor Panel
- The "Manage Items" page opens with the list of unmatched items that belong to the particular vendor and contract.
You can manage the unmatched items as described in Managing Unmatched Contract Items from the List of All Vendors.
(Figure 18)
- Note: This "Manage Items" page includes the contract at the top of the page, since all the unmatched items belong to the same contract. If an item is matched for a contract vendor, but unmatched for other contract vendors, the item will appear for each of the other vendors as unmatched.

Figure 18 - The Manage Items Page for Managing a Single Contract
Add a Vendor to a Contract
In situations where an item offered in a contract by a manufacturer does not have a vendor associated with the contract, you can add the vendor.
To add a vendor,
- Follow steps 1 - 4 from Managing Unmatched Items on a Single Contract.
- On the Activate Items panel, lower left-hand side, click Add Vendor. (Figure 19)

Figure 19 - The Add Vendors Link
-
The Select Vendor search panel opens. (Figure 20)

Figure 20 - The Search for Vendors Panel
- Add the name of the vendor to the search box, and click the search icon
 to the left of the search box. The list of results appears if the criteria you entered match the criteria for any vendors.
The list is created from all activated vendors (including any previous, manually added vendors) that are on non-expired contracts.
- Select the checkbox next to the name of the vendor that you want, and click Submit. (Figure 21)
A message appears: "1 new vendor(s) have been successfully added. To activate the vendor(s) you must verify the tier and markup and then click Apply Changes."
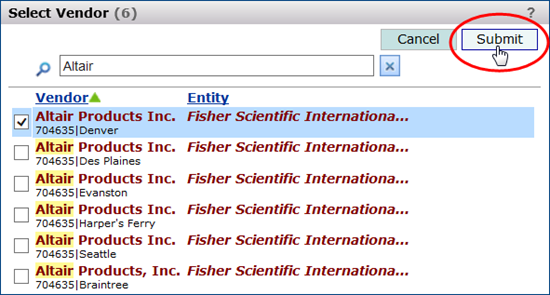
Figure 21 - Search Results on the Vendors Panel
- Click OK.
The Activate Items panel appears with the new vendor. In the Activate All Items column, a checkbox is selected next to the new vendor.
- Click Apply Changes.
A message appears on the screen: "Background processes are running to refresh the contents of this panel - please wait..."
- Click the green refresh arrows.

- Click Item Management if you wish to manage the items for the new vendor you just added, and follow the instructions in the Managing Unmatched Contract Items from the List of All Vendors section.
Add Units of Measure and Change Conversion Factors in Units of Measure
In Sourcing and Contract Management, standard UOMs such as case, box, carton, and others are in the system tables (Administration > Tables > Units of Measure). These "standard" UOMs include both those defined by SCM, and those brought over from a site's master data during implementation.
Definition: A Standard UOM is an alternate UOM automatically loaded into Sourcing and Contract Management from ’s Master Data.
A contract can price an item for a UOM that is not in the MMIS item record. Or, an item record may contain a UOM that is the same as the contract UOM, but with a different conversion factor. To align the item record with pricing UOMs in one or more contracts, you can manually create new UOMs for items so that they match contract UOMs. You can also edit Standard UOM conversion factors for item records.
To Add a Unit of Measure or Edit a Standard UOM
- Locate the item information using the Search box set to Items. Figure 22 is a search for an item containing "glove" in its description.
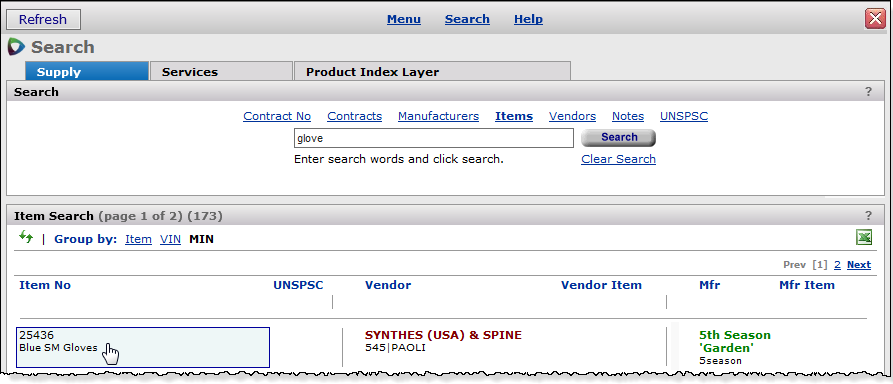
Figure 22 - Using Search to Locate Item Information in SCM
- Click the item listed in the search results (Figure 22).
The Item Catalog Info panel appears (Figure 23).
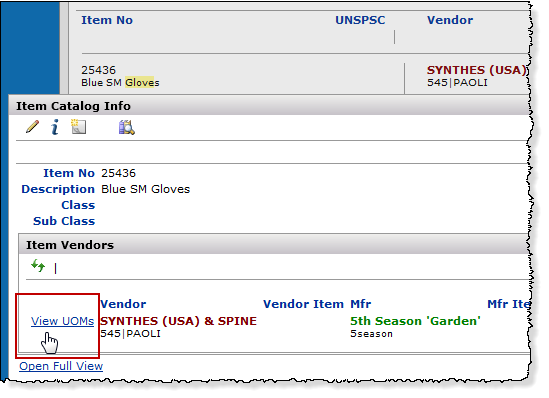
Figure 23 - The Item Catalog Info Panel in SCM
- Click View UOMs. A list of units of measure for the item appears (Figure 24).
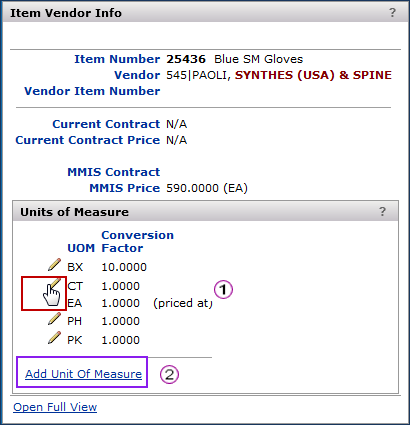
Figure 24 - UOMs for an Item
To add a unit of measure,
- Click Add Unit of Measure (Figure 24, purple box, ).
The Create Unit of Measure Panel appears (Figure 25).
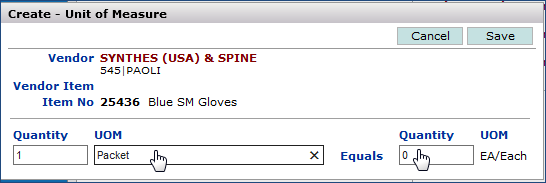
Figure 25 - Adding a "Manually Created" Unit of Measure
- Enter the identifier for the new UOM in the UOM field.
- Specify the conversion factor: enter a Quantity (on the left) that equals the lowest unit-of-measure Quantity (on the right). For example, if you were adding 1 "BX/box," it might contain 10 "EA/each."
- Click Save.
To edit the conversion factor for a unit of measure,
Standard UOMs (Non MMIS UOMs) are now editable. The edit icon (pencil) appears next to the UOM record.
- Click the edit icon
 next to the Conversion Factor that you wish to edit (Figure 24, red box, ).
An edit panel appears (Figure 26).
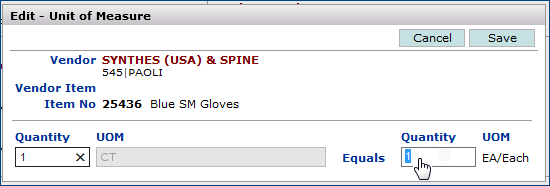
Figure 26 - Changing a Standard UOM's Conversion Factor
- Edit the Conversion Factor field as needed to match the contract pricing UOM.
- Click Save.
The conversion factor is changed, and system identifies the changed UOM as a manually created UOM.
Copyright © 2023 by Premier Inc. All rights reserved.